As we trudge through the second wave of the pandemic, I have discovered that my sisters LOVE cake pops. They have replaced brownies as the #1 most requested sweets to be shipped in their care packages. I came up with these cookies and cream cake pops to incorporate their love for all things cookies and cream.
Like most bloggers, I stumbled upon the idea of cake pops on Bakerella’s blog. However, the idea of cake and icing mushed together never sat quite right with me. That is why I was super excited when companies started coming out with cake pop pans. They do take a bit of practice to get working, but they are great once you get the hang of them.

Use a sharp knife to cut your chocolate sandwich cookies into bite-sized chunks. Resist the temptation to put in a ziploc bag and crush with a rolling pin. You don’t want the pieces too small.
Also, sift your dry ingredients together and have them ready.

Cream the butter and the sugar together. Add the egg and vanilla, then beat until well-combined.

Add the the dry ingredients alternately with the milk, beginning and ending with the flour mixture. Mix until just combined, but do not overmix. Fold in the chopped cookie pieces.

Grease your cake pop pans, then divide the mixture evenly between 18 of the cavities. Grease the cake pop pan covers, then cover and clamp shut. Bake for 12-15 minutes, or until a toothpick inserted in the center comes out clean.
I have found that the cake pops release easier when the pan is still hot, so I let the covered pans sit on a wire rack for about 5 minutes before I pop them open and take the cake pops out. If the baked cake balls have a protruding ring around them, you can cut them using kitchen shears or shave them down with a thin serrated knife.

Because these are less dense than a traditional cake pop, dipping them can be a challenge. What you should do is melt your coating, and once it’s melted use a lollipop stick to poke a hole in each cake pop. Then, dip a lollipop stick in the coating and stick it into the prepared hole. Use a clean cake pop pan to hold them so that the sticks stay upright and the cake balls don’t roll around. Then, pop them into the freezer for 10-15 minutes to harden before you resume the dipping process.
Unfortunately, I couldn’t capture a picture of the process that I use to dip them, since I only have two hands. I copied the process from the candy makers at Disney World (shhh don’t tell them!). I dip the pop slowly and completely in the coating, turning the pop a few times if needed to fully coat, lift up, and then move the pop (still facing down) in a swift circular motion to remove the excess.
For extra cookies and cream goodness, I dipped the tops in chocolate sandwich cookie crumbs after dipping in the coating. Then, set them on a cake pop stand or styrofoam block to dry.

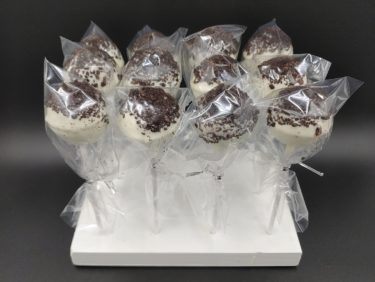
Once they are dry, you are free to package the cookies and cream cake pops however you like. I like to wrap them individually in cellophane baggies. The ones I used here are the 6″ x 4″ size. They are always a hit!
Cookies and Cream Cake Pops
Ingredients
- 1/4 cup butter, softened
- 1/2 cup sugar
- 3/4 cups
- 1/2 tsp baking powder
- a pinch of salt
- 1 egg, room temperature
- 1 tsp vanilla extract
- 1/4 cup of milk
- 1/2 cup chopped Oreo pieces (about 4 Oreos)
- 16oz of vanilla confectionery coating
- Required materials: Cake pop pan(s) (I used this kind)
- Optional: 1/2 cup to 1 cup crushed chocolate sandwich cookie crumbs
Directions
Preheat oven to 325 degrees
Sift together the flour, baking powder, and salt. Set aside.
Cream the butter and sugar together using an electric mixer. Add the egg and vanilla. Mix until smooth.
Add the flour mixture alternately with the milk. Beat until just combined. Fold in the Oreo pieces.
Grease the cavities of your cake pop pan, then divide your batter evenly among the cavities. I normally get about 18 cake pops, so if you only have one pan then you will need to do bake in batches. Grease the cover of the cake pop pan, then cover. Bake at 325 degrees for about 15 minutes, or until a toothpick inserted comes out clean.
Allow to cool on a wire rack for about 5 minutes before removing the pan cover (be careful, as it is still very hot). Let cool another 10 minutes, then remove the cake balls from the pan. If your cake spheres have a “ring,” you can use a small knife or kitchen shears to trim them off.
When the cake balls are cooled, melt the white candy coating using your preferred method (I use a melting pot). Using a lollipop stick, poke a small hole on top of each cake ball. Dip the stick in the melted candy coating, then stick the dipped end of the lollipop stick into the hole that you created in the cake pop. Repeat for the remaining cake balls. Transfer to the freezer for 10-15 minutes.
After the cake balls are set, dip each cake ball in the melted candy coating. Lift the cake pop out of the coating and gently shake off the excess. Immediately dip into the chocolate cookie crumbs (if using), then set on a cake pop stand or styrofoam block to dry. Store the cookies and cream cake pops in an airtight container or individually wrapped.
Makes about 18 cookies and cream cake pops.
Leave a Reply