Category: Candies

  • Caramel Apple Cake Pops

    Caramel Apple Cake Pops

    Skip to Recipe

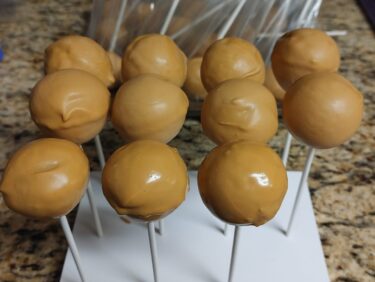
    I don’t know who it was that decided that apples and caramel would make a good pair, but they deserve a shrine in their memory. Since I was a kid, I have loved caramel apples, as well as any dessert that pairs caramel and apples. I had been entertaining the idea of trying to make caramel apple cake pops for a while, but I just never got around to it. I finally gave it a go, and wound up getting requests for the recipe. So, here it is!

    Since I never liked the idea of mushing cake and frosting together and feeding that to people, I use cake pop pans for my cake pops. The Telebrands Bake Pop pans that I use have long since been discontinued, but I have also used the Nordic Ware cake pop pans with great results.

    Caramel Apple Cake Pops

    Ingredients

    • 1 cup of all-purpose flour
    • 1 tsp baking powder
    • 1/4 tsp baking soda
    • 3/4 tsp ground cinnamon
    • 1/8 tsp ground nutmeg
    • a pinch of salt
    • 5 tbsp butter, softened
    • 3/4 cup granulated sugar
    • 1 large egg, room temperature
    • 1/2 cup store bought apple butter
    • 1 cup of peeled, grated apple (I used 3 small Honey Crisp apples)
    • 16oz caramel-flavored candy melting wafers

    Directions

    Preheat oven to 325 degrees. Grease your cake pop molds and set aside. Sift your dry ingredients and set aside.

    Cream the butter and sugar together on medium speed using a stand mixer fitted with the paddle attachment. Add the egg, and beat until just combined. Reduce the mixer speed to low and add the apple butter, and then the grated apple. At this point, the mixture may start to look curdled. This is fine.

    Add the sifted dry ingredients and mix until they are just combined with the wet ingredients. Divide the batter equally among the cavities of your cake pop pan. Bake according to the instructions provided by the cake pop pan’s manufacturer. For my model of pan, it takes about 20 minutes. If using a Nordic Ware sized cake pop pan, check the pops after 15 minutes. They are done when a toothpick inserted into the center comes out clean.

    When baking is complete, allow the cake balls to cool in the pan on a wire rack for about 10 minutes before removing to cool completely.

    When the cake balls are cooled, melt the caramel candy coating using your preferred method (I use a melting pot). Using a lollipop stick, poke a small hole on top of each cake ball. Dip the stick in the melted candy coating, then stick the dipped end of the lollipop stick into the hole that you created in the cake pop. Repeat for the remaining cake balls. Transfer to the freezer for 10-15 minutes.

    After the cake balls are set, dip each cake ball in the melted candy coating. Lift the cake pop out of the coating and gently shake off the excess. Set on a cake pop stand or styrofoam block to dry. Store the caramel apple cake pops in an airtight container or individually wrapped.

    Makes about 24 caramel apple cake pops (if using a cake pop pan)

  • Cookies and Cream Cake Pops (Using a cake pop mold)

    Cookies and Cream Cake Pops (Using a cake pop mold)

    Skip to Recipe

    As we trudge through the second wave of the pandemic, I have discovered that my sisters LOVE cake pops. They have replaced brownies as the #1 most requested sweets to be shipped in their care packages. I came up with these cookies and cream cake pops to incorporate their love for all things cookies and cream.

    Like most bloggers, I stumbled upon the idea of cake pops on Bakerella’s blog. However, the idea of cake and icing mushed together never sat quite right with me. That is why I was super excited when companies started coming out with cake pop pans. They do take a bit of practice to get working, but they are great once you get the hang of them.

    Use a sharp knife to cut your chocolate sandwich cookies into bite-sized chunks. Resist the temptation to put in a ziploc bag and crush with a rolling pin. You don’t want the pieces too small.

    Also, sift your dry ingredients together and have them ready.

    Cream the butter and the sugar together. Add the egg and vanilla, then beat until well-combined.

    Add the the dry ingredients alternately with the milk, beginning and ending with the flour mixture. Mix until just combined, but do not overmix. Fold in the chopped cookie pieces.

    Grease your cake pop pans, then divide the mixture evenly between 18 of the cavities. Grease the cake pop pan covers, then cover and clamp shut. Bake for 12-15 minutes, or until a toothpick inserted in the center comes out clean.

    I have found that the cake pops release easier when the pan is still hot, so I let the covered pans sit on a wire rack for about 5 minutes before I pop them open and take the cake pops out. If the baked cake balls have a protruding ring around them, you can cut them using kitchen shears or shave them down with a thin serrated knife.

    Because these are less dense than a traditional cake pop, dipping them can be a challenge. What you should do is melt your coating, and once it’s melted use a lollipop stick to poke a hole in each cake pop. Then, dip a lollipop stick in the coating and stick it into the prepared hole. Use a clean cake pop pan to hold them so that the sticks stay upright and the cake balls don’t roll around. Then, pop them into the freezer for 10-15 minutes to harden before you resume the dipping process.

    Unfortunately, I couldn’t capture a picture of the process that I use to dip them, since I only have two hands. I copied the process from the candy makers at Disney World (shhh don’t tell them!). I dip the pop slowly and completely in the coating, turning the pop a few times if needed to fully coat, lift up, and then move the pop (still facing down) in a swift circular motion to remove the excess.

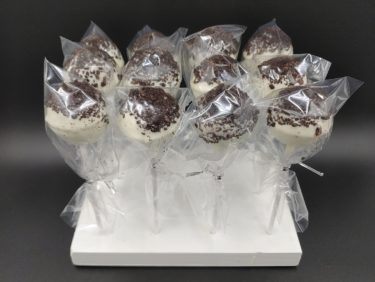
    For extra cookies and cream goodness, I dipped the tops in chocolate sandwich cookie crumbs after dipping in the coating. Then, set them on a cake pop stand or styrofoam block to dry.

    Once they are dry, you are free to package the cookies and cream cake pops however you like. I like to wrap them individually in cellophane baggies. The ones I used here are the 6″ x 4″ size. They are always a hit!

    Cookies and Cream Cake Pops

    Ingredients

    • 1/4 cup butter, softened
    • 1/2 cup sugar
    • 3/4 cups
    • 1/2 tsp baking powder
    • a pinch of salt
    • 1 egg, room temperature
    • 1 tsp vanilla extract
    • 1/4 cup of milk
    • 1/2 cup chopped Oreo pieces (about 4 Oreos)
    • 16oz of vanilla confectionery coating
    • Required materials: Cake pop pan(s) (I used this kind)
    • Optional: 1/2 cup to 1 cup crushed chocolate sandwich cookie crumbs

    Directions

    Preheat oven to 325 degrees

    Sift together the flour, baking powder, and salt. Set aside.

    Cream the butter and sugar together using an electric mixer. Add the egg and vanilla. Mix until smooth.

    Add the flour mixture alternately with the milk. Beat until just combined. Fold in the Oreo pieces.

    Grease the cavities of your cake pop pan, then divide your batter evenly among the cavities. I normally get about 18 cake pops, so if you only have one pan then you will need to do bake in batches. Grease the cover of the cake pop pan, then cover. Bake at 325 degrees for about 15 minutes, or until a toothpick inserted comes out clean.

    Allow to cool on a wire rack for about 5 minutes before removing the pan cover (be careful, as it is still very hot). Let cool another 10 minutes, then remove the cake balls from the pan. If your cake spheres have a “ring,” you can use a small knife or kitchen shears to trim them off.

    When the cake balls are cooled, melt the white candy coating using your preferred method (I use a melting pot). Using a lollipop stick, poke a small hole on top of each cake ball. Dip the stick in the melted candy coating, then stick the dipped end of the lollipop stick into the hole that you created in the cake pop. Repeat for the remaining cake balls. Transfer to the freezer for 10-15 minutes.

    After the cake balls are set, dip each cake ball in the melted candy coating. Lift the cake pop out of the coating and gently shake off the excess. Immediately dip into the chocolate cookie crumbs (if using), then set on a cake pop stand or styrofoam block to dry. Store the cookies and cream cake pops in an airtight container or individually wrapped.

    Makes about 18 cookies and cream cake pops.

  • Chocolate Covered Apple Cider Caramels

    Chocolate Covered Apple Cider Caramels

    While the rest of the country is enjoying the changing colors of autumn, we South Floridians have to make do with palm trees and sun. That doesn’t mean that we can’t get into the spirit of fall with some great fall spices, though! And, since October is the month for Halloween candy, I thought it would be fun to celebrate with homemade candy. Chocolate covered apple cider caramels, to be exact.

    I originally stumbled across these while I was looking for a way to infuse apple flavor in caramel. It seemed like it had already been done before by adding apple cider syrup to the caramel mixture. You can buy premade apple cider syrup and save yourself a lot of time and trouble, but you can also make your own by buying a quart of cider and boiling it down on your own. And, I made them extra decadent by covering them in chocolate.

    Cider Caramels

    One thing that I noticed about the apple cider caramels is that they need to be cooked to a higher temperature than traditional caramel recipes. I was squeamish on my first attempt and cooked my caramel to 249 degrees. I wound up eating that caramel with a spoon. For these, I cooked my caramel to 253 degrees and they still needed to be kept in the refrigerator to stay firm enough to dip. I recommend using compound chocolate or chocolate melting wafers instead of chocolate that needs to be tempered for dipping the caramels. Otherwise, your cold caramel squares will ruin your temper during the dipping process.

    Chocolate Covered Apple Cider Caramels

    Adapted from this recipe

    Ingredients

    • 1/2 cup boiled cider (see *NOTE at the end of this recipe)
    • 1/2 cup (1 stick) of unsalted butter
    • 1 cup granulated sugar
    • 1/2 cup light brown sugar
    • 1/2 cup heavy cream
    • 1/4 cup light corn syrup (optional, but will help with crystallization)
    • 1 tsp salt
    • 1/2 tsp ground cinnamon
    • Dark chocolate melting wafers (I used about 12oz)

    Directions

    Line the bottom and sides of an 8in square baking dish with parchment paper. Alternately, you can use silicone molds. I used silicone mini brownie molds.

    In a medium, heavy bottomed saucepan, combine the cider, butter, sugars, cream, corn syrup, and salt. Cook over medium-high heat until the temperature reaches 253 degrees or until the mixture reaches the firm ball stage. Remove from heat and quickly stir in the cinnamon.

    Pour the mixture into your prepared pan (or molds). Let the caramel cool completely, at least 2 hours. Remove caramel from pan and cut into small squares. If caramel is too soft to cut easily, refrigerate it to firm it up.

    Melt the dark chocolate using your preferred method of melting. Dip the caramel squares into the melted chocolate, one at a time. Set on a parchment-lined baking sheet to allow the chocolate to cool and harden. Store candies in an airtight container.

    *NOTE: If you cannot find boiled cider, you can make your own by boiling 1 quart of cider and reducing it until you have about 1/2 cup of liquid left.

  • Mango Truffles

    Mango Truffles

    Skip to Recipe

    I recently got into the idea of making truffles again after giving up on it for many years. It took one batch of hand-rolled truffles for me to decide to go online and find a better solution. I found a really neat truffle mold on Amazon, and have made more truffles in the last few weeks than I have made in the past YEAR. And, since it is Mango Season here in South Florida, there have been a lot of mango truffles.

    Since my first batch of these truffles, I have made them 3 more times. These truffles are a bittersweet chocolate shell with a whie chocolate mango ganache filling. And, they are a hit each time. Because the white chocolate mango filling is not firm enough to hold a shape for rolling, it is good for molded truffles where you pipe the filing into each one.

    These truffle molds make beautiful, bite-sized truffles. They are smaller than a traditional hand-rolled truffle, which means that they work great for fillings that don’t exactly hold their shape for dipping and still have enough filling without creating a big mess.

    Make sure that your molds are clean and dry before you get started. I recommend working with the molds on a baking sheet lined with parchment. It will make cleaning up between steps a LOT easier.

    Your ganache needs to be cold before you get started, so make that first. Just mix your white chocolate, mango pulp, and cream, then microwave in bursts until the chocolate is melted and the mixture is smooth. Let it cool to room temperature, then cover it with plastic wrap and refrigerate. I let it sit overnight in the fridge, or 1 hour in the freezer.

    I’m using a chocolate melting pot from my local craft store. Since these truffles are best stored in the refrigerator, I didn’t see a need to temper the chocolate. If you want to temper your chocolate, feel free. Otherwise, melt the bittersweet chocolate using whatever method you like best.

    When the chocolate is melted, fill each cavity of the truffle mold with chocolate.

    If your chocolate is thin, let the filled molds sit for a few minutes before you continue. My chocolate is on the thick side, so I flip the molds upside down right away. Let the chocolate run out of the molds, then turn it back facing up and use an offset spatula to scrape off any excess. Let the chocolate sit in the mold until it starts to set. You can expedite this by popping the mold in the fridge around 10 minutes.

    You can return the leftover chocolate back to the pot. I used a large angled spatula to scrape it off of the parchment and back into the pot.

    Now, it’s time to fill your shells. Fill a piping bag with the white chocolate mango ganache. Pipe some of the ganache into each chocolate-lined cavity. Do not fill them all the way to the top. You will need to leave some room for the next step.

    Cover the top of each filled cavity with more melted bittersweet chocolate. Take an offset spatula and smooth out the top of each filled cavity, scraping off the excess chocolate.

    Let the assembled truffles set. Again, you can speed up this process by popping them in the fridge for about 15 minutes.

    You can pop your truffles out of your truffle mold with some gentle coaxing after they have set.

    So pretty!

    Store your mango truffles in the refrigerator. Since the filling is softer than a traditional ganache, these are best served cold. They should keep for up to a week.

    Mango Truffles

    (Adapted from this recipe)

    Ingredients

    • 5oz white chocolate, chopped
    • 1/4 cup mango puree
    • 1 tbsp heavy cream
    • 1lb bittersweet chocolate (more or less as needed)
    • Materials needed: Silicone truffle mold (link here)

    Directions

    In a microwave-safe bowl, melt the white chocolate with the mango puree and cream in bursts of 15-20 seconds until smooth. Cover with plastic wrap and refrigerate or freeze until ready to use.

    Melt the bittersweet chocolate using your preferred method. Fill each cavity of the truffle mold with melted chocolate. Turn the mold upside down and allow the excess chocolate to drip down. Turn mold right side up and scrape the excess chocolate off of the top of the molds.

    Allow the chocolate to set in the molds. You can speed this up by refrigerating the molds for 7-10 minutes.

    When the chocolate is set, spoon or pipe some of the ganache into each cavity, leaving space at the top to seal the truffles with chocolate.

    Spoon some of the remaining melted chocolate on top of each filled cavity. Spread it evenly until it covers the ganache and seals the sides. Scrape off any excess chocolate.

    Refrigerate for about 15 minutes or until set.

    Once they are set, gently remove the truffles by turning the mold upside down and applying pressure to the bottom of each truffle cavity.

    Makes about 4 dozen 1in truffles.

  • Caramels

    Caramels

    Skip to Recipe
    First off, I must apologize to everyone that has been asking me for this recipe.  I have nothing to blame except for myself, my laziness, and the fact that I am easily distracted.

    I first started attempting homemade caramel when I was obsessed with caramel apples.  While I still haven’t quite mastered covering an apple, I managed to find a recipe that makes a caramel that is amazing on its own.  These have become a holiday tradition for me, and I easily make and wrap several hundred caramels during the holiday season.  There are people who look forward to these throughout the year.  So, for them, I pass the recipe along.

    (more…)