Category: Beverages

Beverages

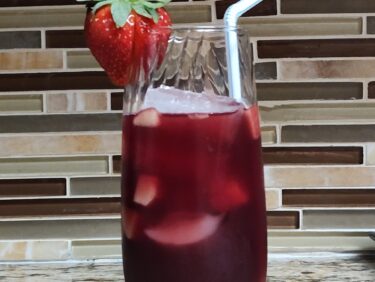
  • Apple Cider Sangria

    Apple Cider Sangria

    This recipe was developed after I had some leftover apple cider that I needed to use somehow (I don’t drink cider). I wound up fairly blown away by how easy and how delicious it turned out. It’s a perfect cocktail for your next holiday gathering.

    This recipe is also customizable to your tastes. Feel free to experiment with different types of wine, fruit juices, and fruit liqueurs. Just be wary. This drink goes down very easily, so it’s hard to tell that there’s still alcohol in it.

    Apple Cider Sangria

    Ingredients:

    • 1 750ml bottle of dry red wine (recommend Cabernet)
    • 3 cups apple cider
    • 1 cup fresh orange juice
    • 1/2 cup Triple Sec
    • 1/2 cup honey
    • 2 cups of freshly diced apples

    Directions:

    In a pitcher, pour the wine and honey. Stir until the honey is completely dissolved. Add the remaining liquid ingredients and stir to combine.

    Add the diced apples. Serve over ice, and garnish with additional fruit, if desired.

  • Chocolate Coquito

    Chocolate Coquito

    Skip to Recipe

    The 2019 holiday season was definitely the season of coquito. It was also the year of experimenting with different flavors of coquito. After last month’s Pumpkin Spice Coquito was such a hit, I decided to keep trying new things. I had been meaning to try to make chocolate coquito for a while, but I kept putting it off. This was finally the year that it happened.

    Using bittersweet chocolate for the chocolate coquito ensures that you add a good amount of chocolate flavor without adding too much additional sweetness. The cream of coconut and the condensed milk are already plenty sweet. It tastes almost like a spiked chocolate milk with a hint of coconut and spices!

    The recipe makes enough chocolate coquito to fill about 6 12oz bottles for gifting, or 1 64oz bottle with a little extra to stash for yourself. If you like it stronger, you can add more rum until it’s your desired potency. Just remember that it intensifies as it sits.

    Chocolate Coquito

    Ingredients

    • 1 cinnamon stick
    • 1 14oz can sweetened condensed milk
    • 1 12oz can evaporated milk
    • 1 13.5oz can coconut milk
    • 1 14oz can cream of coconut (I use Coco Lopez)
    • 6oz bittersweet chocolate, chopped
    • 2 tsp vanilla extract
    • 1/2 tsp cinnamon
    • 1/4 tsp nutmeg
    • 2 cups Puerto Rican rum (I used dark rum)

    Directions

    Place the chopped chocolate in a heat-proof bowl and set aside.

    In a small saucepan, heat the evaporated milk and the cinnamon stick until the milk just starts to simmer. Remove the cinnamon stick and pour the milk over the chopped chocolate. Stir until the chocolate is completely melted and the mixture is smooth.

    Combine the remaining ingredients with the chocolate mixture in a blender. Blend until smooth. Taste and adjust spices as needed. Pour into a large bottle (or multiple smaller bottles) and refrigerate. Serve cold.

    Shake well before serving.

  • Pumpkin Spice Coquito

    Pumpkin Spice Coquito

    Every year, it seems like I start making coquito earlier and earlier. This year, I made my first batch right after Halloween. I defended myself, however, in that I was experimenting to see if making a pumpkin spice version would work. Long story short: yes it did. Since then, I have made a few more batches of pumpkin spice coquito. I have also had a few requests for the recipe, which I have been sitting on for several weeks. But, better late than never!

    You can store your pumpkin spice coquito in small bottles to give as gifts, or you can pour your finished coquito in a large bottle to serve at a party. It should keep for a while if refrigerated. It has a tendency to separate, but will come back together if you give it a vigorous shake before you drink it.

    Pumpkin Spice Coquito

    Ingredients

    • 1 cup water
    • 2 cinnamon sticks
    • 10 whole cloves
    • 1 15oz can pumpkin puree
    • 1 14oz can sweetened condensed milk
    • 1 12oz can evaporated milk
    • 1 13.5oz can coconut milk
    • 1 14oz can cream of coconut (I use Coco Lopez)
    • 2 tsp vanilla extract
    • 1 1/2 tsp pumpkin pie spice
    • 2 cups Puerto Rican rum (I use Bacardi Oakheart)

    Directions

    In a small saucepan, combine the water 2 cinnamon sticks, and 10 cloves.  Bring to a boil and cook until the water has reduced to about 1/3 cup.  Remove from heat and set aside to cool, then discard the whole spices

    Combine the remaining ingredients in a blender (if you have a smaller blender, you might need to do this in batches).  Add the spiced water.  Blend until combined.  Pour the pumpkin spice coquito into bottles or jars and refrigerate until ready to serve.

  • Pressure Cooker Berry Citrus Liqueur

    Pressure Cooker Berry Citrus Liqueur

    Skip to Recipe

    A friend of mine has a cousin with a mulberry tree, and was nice enough to share some of their surplus with me. When I got the berries, they were frozen. Once fruit has been frozen, your choices for what to do with it become more limited. That is basically what gave me the idea to make this berry citrus liqueur.

    Making “moonshine” has become all the rage in the pressure cooking community. But, what most don’t realize is that what they are calling “moonshine” is actually liqueur. Moonshine is a high-proof distilled spirit, whereas liqueur is a sweet alcoholic liquor that is infused with things like herbs, fruits, spices, flowers, nuts, and creams. The “moonshine” that is made in the pressure cooking community gets its name from the fact that it usually uses grain alcohol (151 proof) in the beverage. Because I wanted a citrus flavor, I used citrus rum, but I added a little bit of 151 proof rum to offset the reduced alcohol content of flavored rums.

    Combine water, sugar, berries, and citrus rum in the liner of your pressure cooker. Cover, seal, and cook on High Pressure for 30 minutes. Once the time is up, allow the pressure to release naturally.

    At this point, you can move directly to the next step, or let the mixture cool for another hour or so. I let mine cool for an hour, and then strained mixture into a large bowl using a fine mesh strainer. Gently press the berries in the strainer so that they release more liquid, then discard. Add lemon juice and 151 proof rum to the mixture.

    My large mason jar was in use, so I poured the mixture into 16oz mason jars. One batch filled 5 jars

    Seal your jars (or chosen storage vessel) and then store in the refrigerator. You should let it sit for at least 2 weeks for best flavor, but no one will judge you if you can’t wait that long.

    Pressure Cooker Citrus Berry Liqueur

    Ingredients

    • 4 cups water
    • 1 1/2 cups sugar
    • 1 lb fresh or frozen berries (I used mulberries)
    • 2 cups citrus rum (I used Bacardi Limon)
    • 1 cup fresh squeezed lemon juice
    • 1/2 cup 151 proof rum

    Directions

    Combine the water, sugar, berries, and citrus rum in the liner of your electric pressure cooker. Cover, seal, and cook on High Pressure for 30 minutes. When the time is up, allow the pressure to release naturally. If desired, allow the mixture to cool for an additional hour after pressure has released.

    Strain the mixture through a fine mesh strainer to remove the berries. Gently press them down to release the additional juices. Stir in the lemon juice and 151 proof rum. Pour into your desired storage vessel.

    Refrigerate the berry citrus liqueur for 2-4 weeks before serving.

  • Coquito (Puerto Rican Eggnog)

    Coquito (Puerto Rican Eggnog)

    Skip to Recipe
    The name Coquito literally translates to “Little Coconut.”  In Miami, though, Coquito means “Christmas is here.”  This coconut-based alcoholic drink originated in Puerto Rico.  It’s a popular drink to have around the holidays, and pretty much all Latinos in Miami have adopted it as a holiday staple.  If I’m ever a loss for what to bring to a holiday party, I can rarely go wrong if I show up with a bottle of homemade coquito.

    Old-school coquito recipes are made with egg yolks, hence why it’s often referred to as “Puerto Rican eggnog.”  They both also use cinnamon, clove, and nutmeg as flavorings.  The recipe that I use is egg-free, as are a lot of the more modern takes on this holiday beverage.  This means that it comes together fairly quickly.  However, if you really miss the extra thickness that the eggs provide, you can always add them to your liking.

    To add some extra depth of flavor to the coquito, boil water with some cinnamon sticks and cloves.  Let the water reduce, then set it aside to cool while you prepare everything else.

    Meanwhile, grind another cinnamon stick with more cloves.  You can use pre-ground spices if you like, but the fresh ground spices add more flavor.  For extra oomph, toast your spices lightly in a pan before grinding.

    Combine all of your canned milks/creams, ground spices, rum, vanilla, and the spiced water (discard the whole spices) in a blender and blend until combined.  Taste your coquito and adjust any spices if you wish.

    Store your coquito in the refrigerator and serve it cold.  Bottled coquito makes a great gift.  It is very rich, so a little goes a long way.

    You can also make coquito ice cream using this same recipe, but reduce the amount of rum to 1 cup.  Most recipes recommend to use white rum to make coquito, but I prefer to use spiced rum.  I think it adds a little something.

    Coquito (Puerto Rican Eggnog)

    Ingredients

    • 3 cinnamon sticks
    • 20 whole cloves
    • 1/2 tsp grated nutmeg
    • 1 cup water
    • 1 14oz can sweetened condensed milk
    • 1 12oz can evaporated milk
    • 1 14oz can cream of coconut
    • 1 13.5oz can coconut milk
    • 2 tsp vanilla extract
    • 2 cups Puerto Rican rum

    Directions

    In a small saucepan, combine the water 2 cinnamon sticks, and 10 cloves.  Bring to a boil and cook until the water has reduce to about 1/3 cup.  Remove from heat and set aside to cool, then discard the whole spices.

    Grind the remaining cinnamon stick and cloves (toast them beforehand if you like) using a coffee or spice grinder.

    Combine the remaining ingredients in a blender.  Add the ground spices and the spiced water.  Blend until combined.  Pour into bottles or jars and refrigerate until ready to serve.

  • Homemade Irish Cream

    Homemade Irish Cream

    For years, I have been making Irish cream around the holidays and giving it away as gifts.  I don’t remember how exactly it is that I happened across the original recipe.  But, over time, I tweaked the Irish Cream recipe to suit my own taste buds, and it always well-received by the recipients.

    This holiday, I figured that I would give one additional gift along with the Irish cream: the recipe!  As you can see, it is deceptively easy to make.  Additionally, it is much cheaper to make your own than buying the popular brand- name versions.

    You can also use half-and-half instead of heavy cream to make this.  It won’t be as thick, but it will still taste great.

    I use Bushmill’s Irish Whiskey, but you can use whichever brand you prefer.

    Irish Cream

    (Adapted from this recipe)

    Ingredients

    • 1 cup heavy cream
    • 1 can sweetened condensed milk
    • 1 cup Irish whiskey
    • 2 tsp instant coffee granules
    • 3 tbsp chocolate syrup
    • 1 tsp vanilla extract

    Directions

    Combine all ingredients in a blender.  Blend until smooth.  Store in a container in the refrigerator.  Serve cold.

  • Red, White, and Blue Jello Shots

    Red, White, and Blue Jello Shots

    Skip to Recipe
    Back in July, I brought a batch of red, white, and blue jello shots to an Independence Day party.  They went over very well, and the hostesses requested the recipe.  Sure, I said, I will put the recipe on the blog as soon as I can.  I just need an excuse to make them again so that I can take pictures of the process, I told them.

    So, now we’re in November.  I don’t know how that happened, but it did.  Meanwhile, the recipe never made it to the blog.  That is, until Veteran’s Day gave me the perfect excuse to channel my inner patriot.  And, the red, white, and blue jello shots finally made their triumphant return.

    The jello shots are a bit time-consuming, because you have to wait until each layer is set before you can do the next one.  So, patience is required to make them.  They don’t require a lot of actual effort to make, though.  I use 2oz mini pedestal cups that I get from my local party supply store, but you can use any other 2oz shot cups. The pedestal cups are nice because their sides only taper slightly, so each of the layers are mostly the same size.

    I start with the red layer.  Bloom your unflavored gelatin in your water, then add the cherry Jello and heat on medium to medium-low just everything has dissolved into the liquid.  Do not let the mixture boil or you will ruin the gelatin.

    Once it’s dissolved, remove it from the heat and stir in your booze, then divide it evenly among your shot cups.  Refrigerate until almost set.  It took about 20 minutes in my fridge.

    When the red layer is almost set, you can start making the white layer.  Bloom your gelatin again, and the heat on medium to medium-low until the gelatin dissolves.  Once the gelatin has dissolved, add the condensed milk and the half-and-half.  Remove the mixture from the heat and stir in the white chocolate liqueur.

    This is where it gets tricky.  Your red layer needs to be set enough to where your white layer doesn’t sink or mix when you pour it on top.  Additionally, if your white layer is too warm, it will melt part of your red layer and cause it to bleed into your white.  You can avoid this by letting the white mixture sit at room temperature to cool down for 10 minutes or so if you notice that your red layer is starting to bleed.  You can see where it was bleeding in some of my cups, and I SHOULD have stopped and let it cool down some more.  But, I was in a hurry.  My guests enjoyed them anyway.

    After you’ve finished the white layer, refrigerate until almost set.  These took a little bit longer, likely because the mixture was warmer.  I had to leave them for about half an hour.

    Lastly, do the blue layer the same way that you did the red layer (using blue Jello, of course).  And, again let the mixture cool a bit before you attempt to layer.

    After this, they should be set and ready for consumption in about an hour.  Since they are small, they don’t take very long to firm up.  However, I would still recommend refrigerating for at least 4 hours so that they are nice and firm.

    If you’re not in the mood for red, white, and blue jello shots, don’t fret.  You can substitute the cherry and berry blue Jello for any other flavor of Jello that you like and create all sorts of other flavor combinations.  Just make sure to match your liqueurs so that the flavors don’t clash.

    These jello shots can be made a day ahead of time.  However, I wouldn’t recommend making them any sooner than that, as gelatin tends to dry out the longer it sits.

    Red, White, and Blue Jello Shots

    Ingredients

    Red layer

    • 1 3oz package cherry jello
    • 1 cup water
    • 2 slightly heaping tsp unflavored gelatin
    • 1/2 cup triple sec
    • 1/2 cup vodka

    White Layer

    • 3/4 cup half-and-half
    • 1/2 cup water
    • 1/2 cup condensed milk
    • 3/4 cup white chocolate liqueur
    • 5 tsp unflavored gelatin

    Blue Layer

    • 1 3oz package berry blue jello
    • 1 cup water
    • 2 slightly heaping tsp unflavored gelatin
    • 1/2 cup Blue Curacao
    • 1/2 cup vodka

    Required equipment: 2oz plastic shot cups

    Directions

    Make the red layer

    Place the water in a small saucepan.  Sprinkle gelatin over the water and allow to soften for about 5 minutes.  Add the Jello and heat on medium to medium-low until mixture is hot and gelatin has dissolved.  Do not boil.

    Remove from heat and add the Triple Sec and vodka.  Divide mixture evenly among the shot cups.  Refrigerate for 20 minutes or until almost set before you begin making the white layer.

    Make the White Layer

    Place the water in a small saucepan.  Sprinkle gelatin over the water and allow to soften for about 5 minutes.  Heat over medium to medium-low heat until gelatin has completely dissolved.  Stir in the condensed milk and half-and-half.  Stir until the mixture is slightly warm.  Remove from heat and stir in white chocolate liqueur.  Pour over the set red layer of gelatin, dividing evenly among the shot cups.  Refrigerate for 30 minutes or until almost set.

    Make the Blue Layer

    Place the water in a small saucepan.  Sprinkle gelatin over the water and allow to soften for about 5 minutes.  Add the Jello and heat on medium to medium-low until mixture is hot and gelatin has dissolved.  Do not boil.

    Remove from heat and add the Blue Curacao and vodka.  Divide mixture evenly among the shot cups.  Refrigerate for at least 2 hours (preferably 4) before serving.

    Makes about 3 dozen

  • Pressure Cooker Thai Iced Tea

    Pressure Cooker Thai Iced Tea

    Skip to Recipe
    Thai iced tea is basically dessert in a glass, and is great for soothing the burn from that hot and spicy Thai food that you might be enjoying.  Here in South Florida, practically any Asian restaurant serves Thai iced tea nowadays.  There are just so many of them that serve more than one type of Asian food.

    I think I first had Thai iced tea at a Japanese/Thai joint.  Someone else at the table ordered one, and it looked so good when it came to the table that I followed suit.  After basically inhaling my glass, and many more in subsequent visits, I eventually tried making my own at home.  I started with the Thai iced tea bags, which were basically like drinking Thai tea flavored water.  I eventually found the bags of Thai tea dust at one of my local Asian grocery stores, but getting the right flavor still eluded me.  Eventually, the game-changer came at a Vietnamese restaurant, when a server leaned over and whispered to me that the secret is that it needs to be STRONG and have enough sugar to suspend the half-and-half.  I won’t name the restaurant or the server, because I don’t want to get him in trouble for giving away secrets, but I thank him to this day.

    I used to make this on the stovetop, but just to try I decided to make it in the electric pressure cooker.  It made the flavor MUCH more intense with the same amount of tea leaves, so this will be how I make it from now on.

    Pressure Cooker Thai Iced Tea

    Ingredients

    • 6 cups water
    • 1 cup sugar
    • 1 cup Thai tea dust
    • Half-and-Half or evaporated milk for serving

    Directions

    Combine the water, sugar, and Thai tea dust in the liner of your pressure cooker.  Cover, seal, and cook on Manual (High Pressure) for 1 minute.  Allow the pressure to release naturally for 15 minutes before releasing any remaining pressure.

    Strain the tea through a mesh strainer, then through a coffee filter (I use a reusable coffee filter).  Let it cool at room temperature, then refrigerate until cold.

    To serve, add some ice to a glass then pour tea until it reaches about 2/3 of the way up.  Gently pour your evaporated milk or half-and-half to layer and fill the rest of the glass.  Enjoy!

    Makes about 1.5 quarts

    Stovetop directions:

    In a medium saucepan, bring the water and the sugar to a boil.  Remove from heat and stir in the tea dust.  Let stand for 10-15 minutes, then strain the tea through a mesh strainer and then through a coffee filter.  Allow to cool, then refrigerate until cold.