Tag: caramel

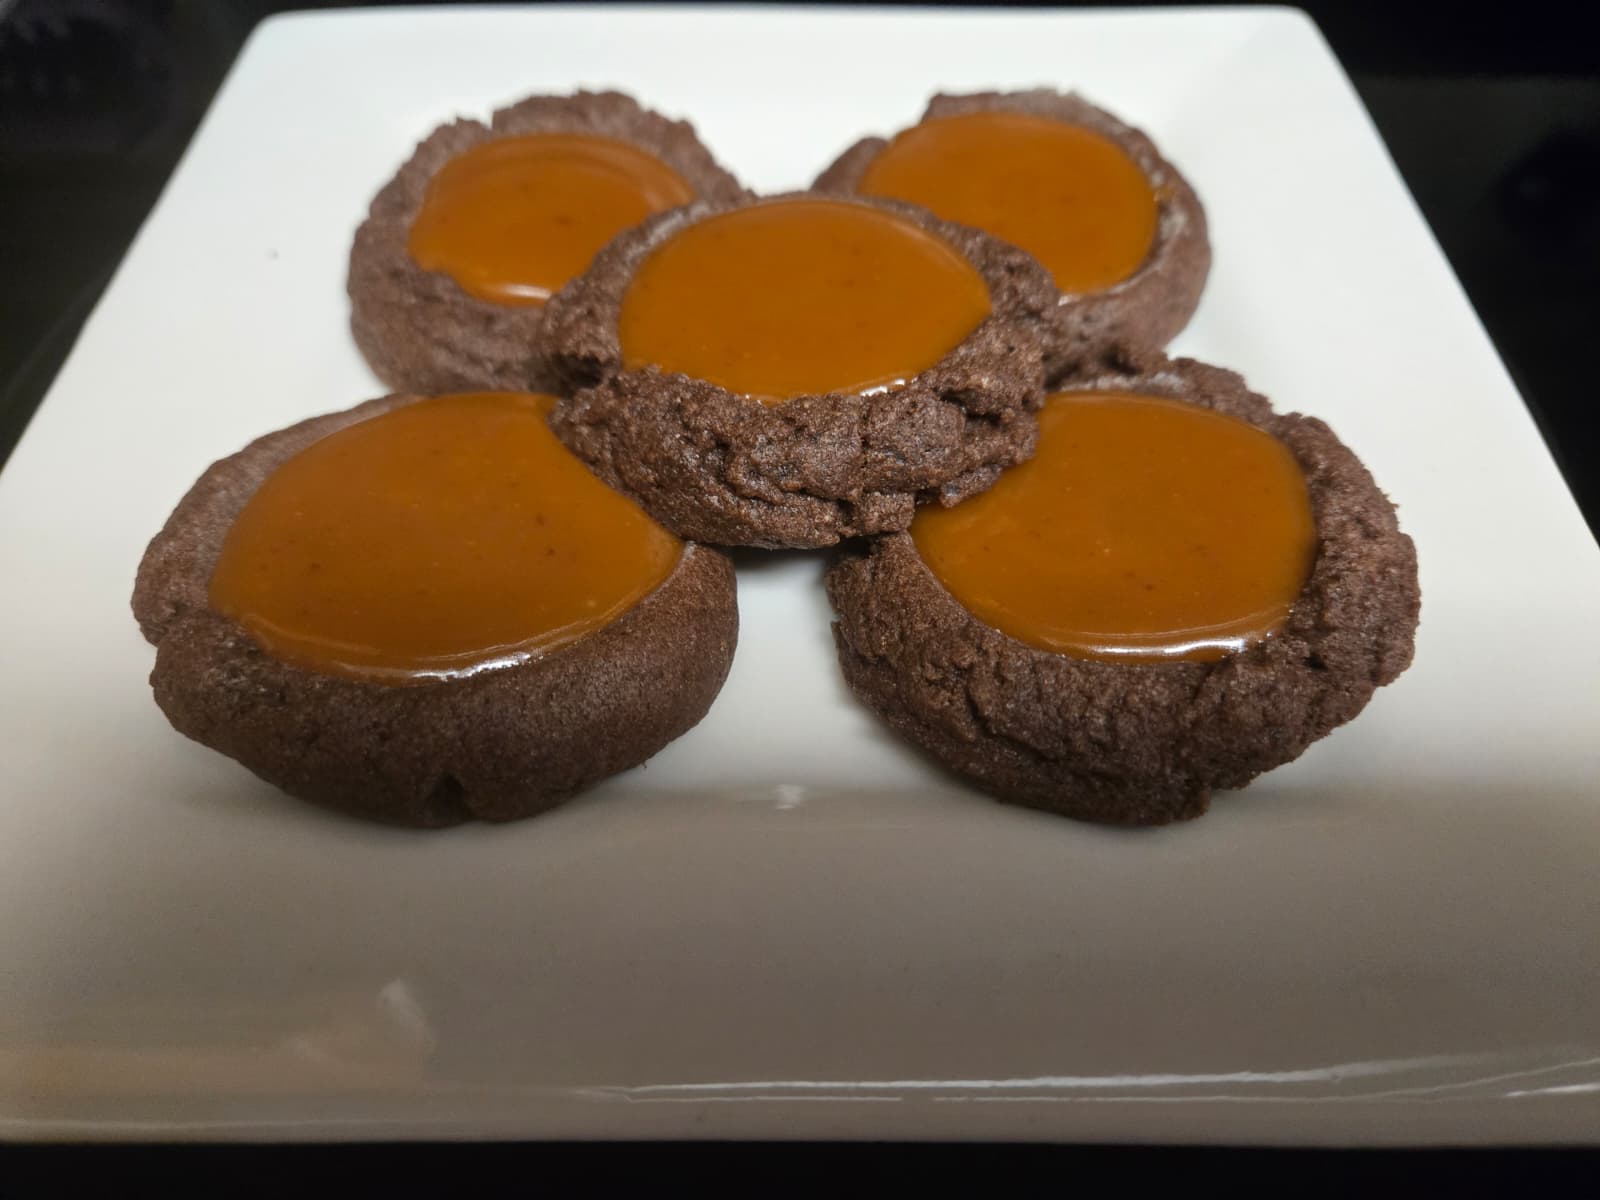
  • Chocolate Caramel Thumbprint Cookies

    Chocolate Caramel Thumbprint Cookies

    I discovered my love for thumbprint cookies not too long ago. It was also around the time that I discovered that I don’t dislike desserts with jams/jellies in them, as long as the jams/jellies are homemade. I still prefer chocolate desserts, though, which is why I was immediately drawn to the idea of a chocolate thumbprint cookie. That idea eventually became these chocolate caramel thumbprint cookies.

    I decided to pair the cookies with a caramel filling, because chocolate and caramel are one of the most perfect combinations IMHO. You want to cook the caramel just shy of soft ball stage. You want it soft, but not runny. Adjust the salt level in the caramel to your liking.

    Chocolate Caramel Thumbprint Cookies

    Adapted from this recipe

    Ingredients

    For the cookies:

    • 1 cup (2 sticks) unsalted butter, softened
    • 3/4 cup brown sugar
    • 1/4 cup granulated sugar
    • 1 large egg, room temperature
    • 2 cups all purpose flour
    • 1/2 cup unsweetened cocoa powder
    • 1/2 tsp salt
    • 1 tsp vanilla extract
    • 2 tsp instant coffee powder (optional)

    For the caramel filling:

    • 1 cup granulated sugar
    • 1/4 – 1/2 tsp salt
    • 1 1/2 cups heavy cream
    • 4 tbsp unsalted butter

    Directions

    Line your cookie sheets with parchment paper and set aside.

    In the bowl of a stand mixer fitted with the paddle attachment, cream the butter and sugars until fluffy. Add the egg and beat until combined. Add the vanilla, salt, and coffee powder (if using) and beat until just combined.

    Add the flour and cocoa powder and mix on low speed until just combined.

    Scoop the dough (I used a Size #40 cookie scoop) and roll into uniform balls. Arrange the cookie dough balls about 2 inches apart on the baking sheets. Using your thumb, a measuring spoon, or a tart tamper, press down in the center of each dough ball to create an indentation.

    Place the cookie sheets in the freezer and freeze for about 20 minutes. Meanwhile, preheat the oven to 350 degrees F.

    Bake the cookies for 11-14 minutes, or until the edges appear set. Remove from the oven and quickly press the indentations back down (they will have puffed up a bit in the oven). Cool the cookies on the cookie sheets while you make the caramel.

    To make the caramel: Heat the cream in the microwave for about 1 minute, then set aside. In a medium saucepan, heat the sugar over medium-high heat. Gently swirl the pan occasionally, but do not stir until most of the sugar has dissolved. Once the sugar has dissolved and turned a light amber, remove from heat and CAREFULLY add the cream. Bits of sugar may clump up. This is normal.

    Return the pan to the heat and reduce the heat to medium. Continue to stir until the clumps of sugar disappear. When the caramel is liquid again, add the butter and the salt. Continue cooking the caramel until it has thickened and reaches a temperature of 238 degrees. If you like a firmer caramel, you can cook to 244 degrees.

    Working quickly (but carefully), pour the caramel into the indentations in the center of each cookie. Allow to cool completely, then store in an airtight container.

  • Chocolate Covered Apple Cider Caramels

    Chocolate Covered Apple Cider Caramels

    While the rest of the country is enjoying the changing colors of autumn, we South Floridians have to make do with palm trees and sun. That doesn’t mean that we can’t get into the spirit of fall with some great fall spices, though! And, since October is the month for Halloween candy, I thought it would be fun to celebrate with homemade candy. Chocolate covered apple cider caramels, to be exact.

    I originally stumbled across these while I was looking for a way to infuse apple flavor in caramel. It seemed like it had already been done before by adding apple cider syrup to the caramel mixture. You can buy premade apple cider syrup and save yourself a lot of time and trouble, but you can also make your own by buying a quart of cider and boiling it down on your own. And, I made them extra decadent by covering them in chocolate.

    Cider Caramels

    One thing that I noticed about the apple cider caramels is that they need to be cooked to a higher temperature than traditional caramel recipes. I was squeamish on my first attempt and cooked my caramel to 249 degrees. I wound up eating that caramel with a spoon. For these, I cooked my caramel to 253 degrees and they still needed to be kept in the refrigerator to stay firm enough to dip. I recommend using compound chocolate or chocolate melting wafers instead of chocolate that needs to be tempered for dipping the caramels. Otherwise, your cold caramel squares will ruin your temper during the dipping process.

    Chocolate Covered Apple Cider Caramels

    Adapted from this recipe

    Ingredients

    • 1/2 cup boiled cider (see *NOTE at the end of this recipe)
    • 1/2 cup (1 stick) of unsalted butter
    • 1 cup granulated sugar
    • 1/2 cup light brown sugar
    • 1/2 cup heavy cream
    • 1/4 cup light corn syrup (optional, but will help with crystallization)
    • 1 tsp salt
    • 1/2 tsp ground cinnamon
    • Dark chocolate melting wafers (I used about 12oz)

    Directions

    Line the bottom and sides of an 8in square baking dish with parchment paper. Alternately, you can use silicone molds. I used silicone mini brownie molds.

    In a medium, heavy bottomed saucepan, combine the cider, butter, sugars, cream, corn syrup, and salt. Cook over medium-high heat until the temperature reaches 253 degrees or until the mixture reaches the firm ball stage. Remove from heat and quickly stir in the cinnamon.

    Pour the mixture into your prepared pan (or molds). Let the caramel cool completely, at least 2 hours. Remove caramel from pan and cut into small squares. If caramel is too soft to cut easily, refrigerate it to firm it up.

    Melt the dark chocolate using your preferred method of melting. Dip the caramel squares into the melted chocolate, one at a time. Set on a parchment-lined baking sheet to allow the chocolate to cool and harden. Store candies in an airtight container.

    *NOTE: If you cannot find boiled cider, you can make your own by boiling 1 quart of cider and reducing it until you have about 1/2 cup of liquid left.

  • Caramel Apple Bundt Cake

    Caramel Apple Bundt Cake

    Skip to Recipe

    Lately, I have been rethinking my aversion to cooked fruit.  Those of you that are close to me know that I am always complaining about mushy fruit in desserts, like apple or berries.  And, those of you that only know me through this blog are probably now just realizing why this blog has so few pies, tarts, etc.  I am slowly starting to realize that my issue isn’t necessarily with all types of cooked fruit, but with canned fruit or the fruit in mass-produced pastries and pies (which is probably also canned).  It’s very much a texture thing with me, so cooking fruit at home gives me greater control over the texture and any other aspects that may make the fruit unpleasant for me.

    Before my gradual acceptance of including cooked fruit in desserts, there were a few exceptions.  Apples cooked in “apple pie filling” were meh, but apples cooked in CARAMEL SAUCE were a win.  I would normally serve it over cheesecakes or ice cream, but one day I found myself wondering if I could incorporate the caramel apples into a cake.  To be more specific, I decided to make a caramel apple bundt cake.  After a few experiments, several of which were failures, I came up with a recipe that worked for me.  The caramel apples still sink to the bottom of the pan, meaning that they end up at the top of the bundt cake.  But, I decided that it doesn’t matter.   The cake is delicious anyway.

    Make Caramel Apple Filling

    The first step is to make the caramel apple filling.  Melt some butter in a pan, then add chopped apples (sprinkle them with cinnamon, if you want).  Cook until they start to soften and are coated in butter, then add the sugar and continue cooking until the sugar melts.  Use a slotted spoon or strainer to strain the apples out of the pan and set aside.  Continue cooking until it starts to turn dark amber, then remove from heat and add the cream.  If it looks thin, you can return it to the heat and keep cooking after that so that it continues to thicken.  Once it’s done, remove from heat and stir in the apples.

    It’s best to make this a day in advance and refrigerate so that it gets firm.  It will be easier to fill the bundt with a firmer filling.

    makecaramelapplecake

    Once you’re ready, you can make your batter for the caramel apple bundt cake.  Cream the butter and sugar until fluffy, then add the eggs one at a time until combined.  Add your (pre-sifted) dry ingredients alternately with your liquid, then pour all but about 1 cup of the batter into your greased bundt pan.  Using the back of a spoon or a small spatula, trace a small “moat” in the center of the bundt.  Fill it with the apple filling, taking care that it doesn’t spill over towards the edges of the pan.  Top with the remaining batter and gently spread it across.  It doesn’t have to cover all of the apples.  The cake rises during baking, and that will take care of that.

    DSCN4538

    Into the oven it goes!

    DSCN4531

    When it’s done, let the caramel apple bundt cake cool in the bundt pan for no more than 10 mins before inverting.  If any of the caramel apple filling leaked out, you don’t want it to harden and make your cake get stuck to the pan.

    Plated caramel apple bundt cake

    You can see parts of the caramel apple filling had started to poke out, but who cares?  It’s delicious!

    Sliced caramel apple bundt cake

    I could never get the apples to stay in the middle of the cake, but it tastes great regardless!

    Slice of caramel apple bundt cake

    Check out those thinly sliced apples floating around up there!  The caramel apple bundt cake can be served warm or at room temperature.  I have never had issues storing this cake at room temperature, but feel free to refrigerate if you are squeamish about that sort of thing.

    Caramel Apple Bundt Cake

    Ingredients

    For the Caramel Apple Filling

    • 1/2 cup ((1 stick) butter
    • 1 cup granulated sugar
    • 4 medium Granny Smith apples, peeled and chopped
    • 1/2 cup heavy cream
    • 1/2 tsp cinnamon (optional)

    For the cake

    • 1 cup butter, softened
    • 2 cups brown sugar
    • 4 eggs, room temperature
    • 1 cup buttermilk (or regular milk)
    • 1 teaspoon vanilla extract
    • 3 cups all-purpose flour
    • 1/2 teaspoon baking powder
    • 1/2 teaspoon baking soda
    • 1 pinch salt


    Directions

    Make the caramel apples

    Melt the butter in a large skillet over medium-high heat. Add the apples and cinnamon (if using).  Cook, stirring, until they are coated with butter, about 2 minutes. Add the sugar and stir until the sugar dissolves and the liquid starts to boil, about 3 minutes.

    Using a slotted spoon, transfer the apples to a bowl. Reduce the heat to medium and cook the remaining liquid, stirring often, until it turns a deep amber. Remove the skillet from the heat to stop the cooking and add the cream. Be careful, as the cream may splatter. Return the skillet to the heat and bring it to a boil, whisking constantly. Remove the sauce from the heat and stir in the apples. Allow to cool until lukewarm.  Store in an airtight container in the refrigerator until ready to use.

    Make the cake

    Preheat oven to 350°F.  Generously grease your bundt pan (or spray with cooking spray)

    Sift together flour, baking powder, baking soda, and salt. Set aside.

    Beat butter and brown sugar until fluffy. Add eggs, one at a time, mixing well after each addition. Mix in the vanilla.

    Gradually add flour mixture, alternating with buttermilk. Begin and end with flour mixture. Mix just until combined.  Do not overmix!

    Transfer batter to prepared bundt pan, reserving about 1 cup of matter. Trace a small trench in the center of the cake batter and fill with chilled caramel apple filling (you will have some left over).  Top with remaining cake batter and gently spreading to cover most of the filling.  Bake for 55-70 minutes, or until a toothpick inserted into center comes out clean.  Remove from oven and allow to cool in pan for no more than 10 minutes before inverting.


  • Caramel Macchiato Cupcakes

    Caramel Macchiato Cupcakes

    Skip to Recipe
    I have a love/hate relationship with coffee.  While I like coffee-flavored things, I don’t actually like to drink coffee.  Some people like that black, unsweetened concoction to just punch them in the face with caffeine.  I, on the other hand, prefer to add enough sweeteners and flavorings that I almost forget that I am drinking coffee.  My favorite “coffee additive” is caramel, because caramel is awesome.  So, it’s no wonder that caramel macchiatos are my favorite coffee beverage.  This cupcake is an homage to this beverage.  As an added bonus, the presentation of these caramel macciato cupcakes makes so you can fool people into thinking that they’re actual drinks.  Pretty neat for an April Fool’s Day post, no?

    (more…)

  • Dulce de Leche Brownies

    Dulce de Leche Brownies

    Skip to Recipe
    When I was a teenager, I wasn’t allowed to get a job.  My “job,” I was told, was to get good grades.  So, in order to make a little bit of spending money, I started making brownies and selling them at school.  I quickly became known as “Brownie Girl,” and it would be a miracle of my batch of brownies for the day even made it to lunchtime.  Some of my friends still talk about them.

    It’s hard to believe that this happened about half of my lifetime ago.  And, back then, my brownies were made using boxed brownie mix.  My friends still insist that I did something magical to the brownies, when all I ever really did was add a little bit of vanilla extract to my brownie batter.  Brownies became such a staple of my everyday life that, after high school, I went through a period where I absolutely couldn’t stand them.  I’m over it now, but it took a very long time.  These days, my brownies are made from scratch. (more…)