Category: Cakes

  • Caramel Apple Cake Pops

    Caramel Apple Cake Pops

    Skip to Recipe

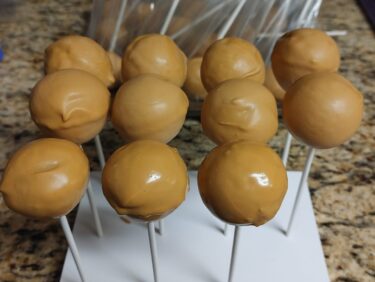
    I don’t know who it was that decided that apples and caramel would make a good pair, but they deserve a shrine in their memory. Since I was a kid, I have loved caramel apples, as well as any dessert that pairs caramel and apples. I had been entertaining the idea of trying to make caramel apple cake pops for a while, but I just never got around to it. I finally gave it a go, and wound up getting requests for the recipe. So, here it is!

    Since I never liked the idea of mushing cake and frosting together and feeding that to people, I use cake pop pans for my cake pops. The Telebrands Bake Pop pans that I use have long since been discontinued, but I have also used the Nordic Ware cake pop pans with great results.

    Caramel Apple Cake Pops

    Ingredients

    • 1 cup of all-purpose flour
    • 1 tsp baking powder
    • 1/4 tsp baking soda
    • 3/4 tsp ground cinnamon
    • 1/8 tsp ground nutmeg
    • a pinch of salt
    • 5 tbsp butter, softened
    • 3/4 cup granulated sugar
    • 1 large egg, room temperature
    • 1/2 cup store bought apple butter
    • 1 cup of peeled, grated apple (I used 3 small Honey Crisp apples)
    • 16oz caramel-flavored candy melting wafers

    Directions

    Preheat oven to 325 degrees. Grease your cake pop molds and set aside. Sift your dry ingredients and set aside.

    Cream the butter and sugar together on medium speed using a stand mixer fitted with the paddle attachment. Add the egg, and beat until just combined. Reduce the mixer speed to low and add the apple butter, and then the grated apple. At this point, the mixture may start to look curdled. This is fine.

    Add the sifted dry ingredients and mix until they are just combined with the wet ingredients. Divide the batter equally among the cavities of your cake pop pan. Bake according to the instructions provided by the cake pop pan’s manufacturer. For my model of pan, it takes about 20 minutes. If using a Nordic Ware sized cake pop pan, check the pops after 15 minutes. They are done when a toothpick inserted into the center comes out clean.

    When baking is complete, allow the cake balls to cool in the pan on a wire rack for about 10 minutes before removing to cool completely.

    When the cake balls are cooled, melt the caramel candy coating using your preferred method (I use a melting pot). Using a lollipop stick, poke a small hole on top of each cake ball. Dip the stick in the melted candy coating, then stick the dipped end of the lollipop stick into the hole that you created in the cake pop. Repeat for the remaining cake balls. Transfer to the freezer for 10-15 minutes.

    After the cake balls are set, dip each cake ball in the melted candy coating. Lift the cake pop out of the coating and gently shake off the excess. Set on a cake pop stand or styrofoam block to dry. Store the caramel apple cake pops in an airtight container or individually wrapped.

    Makes about 24 caramel apple cake pops (if using a cake pop pan)

  • Strawberries and Champagne Petit Fours

    Strawberries and Champagne Petit Fours

    Skip to Recipe

    Commercial petit fours can be very hit or miss. In my experience, they are often too cloying. That, or they are filled with things that I don’t like (almond extract, anyone)? It’s a shame, because they are absolutely adorable. They also have to pack a lot of flavor into a small package. That was the goal when I made these Strawberries and Champagne Petit Fours.

    For the uninitiated, a petit four (French for “little oven”) is the name given to a small confection (usually a cake) that is typically served after a meal. They are always bite sized. This is a good thing, because they tend to be very rich and/or sweet. My strawberries and champagne petit fours use a champagne pound cake, strawberry frosting, and poured fondant icing flavored with champagne.

    Strawberries and Champagne Petit Fours

    Petit fours are a bit time-consuming to make, so it is best to plan ahead. Sometimes, I bake and frost my cakes one day, then cut and glaze the next.

    I used sparkling Rose for my petit fours, mainly because I thought it would be cute to make pink ones for Valentine’s Day. But, you are welcome to use regular sparkling wine or champagne. Use the driest kind that you can find. There is already plenty of sugar in these, so there is no need to use a sweet champagne.

    Strawberries and Champagne Petit Fours

    Ingredients

    For the Cake (adapted from this recipe):

    • 1 1/2 cups all purpose flour
    • 1 teaspoon baking powder
    • 1/4 teaspoon salt
    • 7 tablespoons unsalted butter melted
    • 1 cup granulated sugar
    • 1 tablespoon sour cream
    • 3 eggs, room temperature preferred
    • 1 teaspoon vanilla extract
    • 1/8 teaspoon sparkling wine flavoring (optional)
    • 1/2 cup champagne, still bubbly

    For the soaking syrup:

    • 1/3 cup granulated sugar
    • 1/3 cup champagne

    For the Frosting:

    For the Poured Fondant (Adapted from this recipe):

    • 4 1/2 cups confectioner’s sugar
    • 1/4 cup light corn syrup
    • 1/4 cup champagne reduction (see *NOTE)
    • 1/2 tsp vanilla extract
    • 2-3 drops of sparkling wine flavoring
    • Pink food coloring if desired

    Directions

    Make the Cake:

    Preheat oven to 350°F. Spray an 8 x 8 inch square pan with nonstick cooking spray (the kind with flour) or grease and flour it.

    Sift the flour, baking powder, and salt in a medium bowl. Set aside.

    In the bowl of a stand mixer, mix the melted butter, sugar, and sour cream. Stir in eggs, one at a time, then stir in vanilla and sparkling wine flavoring (if using).

    Add the dry ingredients alternately with the champagne, beating until just combined with each addition. Pour into prepared pan.

    Bake for 27-32 minutes, until a toothpick comes out clean (mine took 30 minutes). Place the cake (still in the pan) on a wire rack. Use a toothpick to poke holes over the surface of the cake, then slowly pour the champagne soaking syrup over the hot cake. Let the cake finish cooling completely before frosting.

    To make the soaking syrup:

    Heat the sugar and champagne in a small saucepan over medium heat until it boils. Boil for 1 minute, then remove from heat.

    Prepare the strawberry frosting before assembling.

    Assembly:

    Remove the cooled cake from the pan. If the cake has a dome, trim off the dome using a cake leveler or a bread knife.

    Torte the cake into two even halves. Spread strawberry frosting over one of the halves, then top with the second half. Spread additional strawberry frosting over this half, then place in the freezer until the frosting is firm and no longer sticks to your fingers when touched. This took about 2 hours for me.

    Remove the cake from the freezer. Trim off the dry edges of the cake, then cut the cake into even pieces. You can cut it into squares using a knife, or you can use a cookie or biscuit cutter to cut out shapes.

    Place the cut cake bites in the freezer while you make the poured fondant.

    Make the Poured Fondant Icing:

    Prepare a double boiler over medium heat; bring 2 inches of water in the lower pot to a simmer. Sift confectioners’ sugar and salt into the top of the boiler. Add corn syrup and champagne reduction; whisk until well blended. Stir with a spatula until icing is completely smooth and an instant-read thermometer registers no higher than 105 degrees F (40 degrees C), about 5 minutes.

    Stir in the champagne flavoring and vanilla extract into the icing. Keep stirring until icing takes on a glossy sheen and flows easily off of the spatula, about 2 minutes. Add food coloring, if using. Reduce heat to low to keep the fondant the proper consistency while you glaze. Glaze your strawberries and champagne petit fours using your preferred method. For best results, take only a few out of the freezer at a time while you dip so that the rest remain firm for dipping.

    *NOTE: To make champagne reduction, bring 1 cup of champagne to a boil in a small saucepan. Continue to boil until the champagne darkens in color and is reduced to about 1/4 cup.

  • Pressure Cooker Chocolate Stout Molten Pudding

    Pressure Cooker Chocolate Stout Molten Pudding

    Skip to Recipe

    I had experimented with making molten puddings (AKA lava cakes) in the Instant Pot for a while.  This chocolate stout molten pudding is the result of such experiments.

    I was not on board with making lava cakes in my electric pressure cooker (Instant Pot) when I first heard that this was a thing.  Truth be told, I tried it.  In fact, I invited a few friends over to my house and we made a batch of lava cakes in the oven and nother batch in the Instant Pot to see which ones we liked better.  The decision was split fairly evenly, but I was firmly on Team Oven.  What finally changed my mind was a trip to the Epcot Food and Wine Festival last year, where the Ireland station was serving up “chocolate pudding” that was basically a lava cake.  But, that was when it hit me that what was REALLY bothering me was that I associate a certain texture to “cake.”

    When I stopped thinking about Instant Pot lava cakes as “cakes” and instead thought of them as “molten puddings,” I quickly warmed up to them.  It’s important to make the distinction, because molten puddings/lava cakes made in the Instant Pot do have a very different texture than their oven counterparts.  The exterior is more smooth and custard-like.  The oven gives you a drier, brownie-like crust.  You can also bake these in the oven if that is the texture that you prefer.

    Start by melting your chocolate and your butter, then set it aside.  Whisk the eggs with the sugar until foamy, then whisk in the flour until there are no clumps.  Slowly which the chocolate mixture into the egg mixture.  I did it in 4 rounds so that the heat from the chocolate mixture didn’t curdle the eggs.

    Once the chocolate mixture is thoroughly combined, gradually add the stout.  Doing it little by little ensures that it won’t make your batter separate.  After that is done, pour it into greased ramekins, then cook uncovered on High Pressure for 7 minutes.  When the timer is up, use Quick Release to release the pressure and remove the ramekins.

    Invert each pudding on a plate to serve.  You could eat it as is if you want.

    Since I was sticking to the St. Patrick’s Day theme, I served them with an Irish Cream Creme Anglaise.  The rich sweetness of the cream sauce paired perfectly with the bitterness of the chocolate and the stout.  Of course, this would also go great with ice cream.

    Because these stout molten puddings use both bittersweet chocolate and beer, the pudding itself does have some bitter notes.  You can use semi-sweet chocolate for a less bitter taste, or add more sugar to suit your taste.

    Pressure Cooker Chocolate Stout Molten Pudding

    Ingredients

    For the puddings:

    • 8 oz bittersweet chocolate, chopped (or semi-sweet chocolate)
    • 1/2 cup (1 stick) butter
    • 4 whole eggs
    • 1/2 cup Stout beer (I used Guinness)
    • 1/4 cup sugar
    • 5/8 cups flour

    For the Irish Cream Creme Anglaise:

    • 1 cup milk
    • 2 egg yolks
    • 1 tbsp cornstarch
    • 1/4 cup sugar, divided
    • 1/2 cup Irish Cream liqueur (I use Kerrygold)

    Directions

    Make the Creme Anglaise:

    In a small saucepan, heat the milk and half of the sugar over medium heat  Whisk the egg yolks, cornstarch, and remaining sugar and set aside.

    When the milk starts to simmer, remove from heat.  Slowly whisk the hot milk mixture into the egg mixture, a little bit at a time.  Return the mixture to the saucepan and cook over medium heat until the mixture thickens (about 2-3 minutes).

    Remove from heat and strain mixture through a fine mesh strainer, then stir in the Irish Cream.  Allow to cool completely, then refrigerate until ready to use.

    Can be made a day in advance.

    Make the molten puddings:

    Grease 6 4oz ramekins and set side.  Pour 1 cup of water into the liner of your pressure cooker.

    Melt the chocolate and the butter in a microwave-safe bowl in 20-30 second bursts until all of the chocolate is melted and the mixture is smooth.  Set aside.

    Whisk the eggs and the sugar together until combined, then add the flour and whisk until few clumps remain.  Gradually whisk in the chocolate mixture, then the stout.

    Divide the batter evenly among the 6 ramekins.  Arrange them in 2 layers on a trivet in the liner of your pressure cooker, then cook on Manual (High Pressure) for 7 minutes.  When the timer is up, manually release the remaining pressure.

    Remove ramekins from the pressure cooker and serve by inverting the puddings onto a plate.  Serve with Creme Anglaise.

    Makes 6 servings.

  • Seven Layer Ice Cream Cake

    Seven Layer Ice Cream Cake

    Skip to Recipe
    I think that ice cream cake might be one of my favorite kinds of cake EVER.  In fact, a Carvel ice cream cake remains the ONLY store bought cake that is acceptable for my birthday.  For a long time, trying to recreate the magic of my favorite ice cream cake was on my to-do list.  When I finally worked up the nerve to give it a shot, I decided that recreating it was not enough.  No, I didn’t want to just reproduce that combination.  I wanted to up the ante.  Let’s add some additional texture with some crushed candy in there.  Oh, and let’s add a brownie base for more flavors and some stability.  And, let’s drizzle it with caramel because caramel makes everything better.  By the time I was done, I had a seven layer ice cream cake on my hands.

    Yes, I said seven layers.  One layer of chewy brownie base.  Then, a layer of crushed candy bars.  Then, ice cream.  Then, cookie crunchies.  And then, MORE ice cream and MORE crushed candy bars.  And finally, whipped cream and caramel drizzle to finish it off.  An explosion of flavors and textures.

    The great thing about this seven layer ice cream cake recipe is that you can customize it to your tastes.  You can pick whatever flavors of ice cream you want, and whatever candy you like.  My version uses homemade caramel ice cream and crushed Heath bar pieces.  You can use store bought ice cream if you’re nervous about making your own ice cream.  Just make sure to soften it before you start assembling your cake.

    The first thing that you need to do is make your brownie base.  One fourth of the recipe for a 13 x 9 inch pan of brownies made in a 9in round pan makes the perfect thickness for the base.  Be sure to use a springform or removable bottom pan to make the brownie so that you have an easier time getting it all out in one piece.

    Freeze the brownie for at least an hour before you start to assemble.  It will help to keep the ice cream from melting too much while you’re trying to assemble the cake.  While the brownie is chilling, pulse the chocolate wafers in a food processor.  When they are broken up into large crumbs, add the chocolate shell topping and pulse until the crumbs moistened all the way through.

    Once the brownie is cool, the assembly process can begin.  I used a ring mold.  If you don’t have a ring mold, use a 9inch springform pan lined with parchment.  Place the brownie at the bottom of the mold.  Add half of the candy pieces, then 1 1/2 quarts of ice cream.  Spread the cookie crumb layer on top of that, then add the remaining ice cream.  Top with the rest of the crushed candy, then freeze for at least 4 hours (overnight is preferable) before you continue.

    When you’re ready, remove the ice cream cake from the mold and pipe dollops of whipped cream along the edges.

    Heat the butter, sugar, salt, and corn syrup in a small saucepan over medium heat.  Bring to a boil and continue to cook until the mixture turns an amber color.  Remove it from the heat and stir in the heavy cream.  Do this carefully, because it might splatter.  If the mixture looks thick enough at this point, add the vanilla extract.  Otherwise, put it back on the heat until it reaches the desired thickness, then remove it again and add the vanilla.  Keep in mind that the sauce will thicken more as it cools.  The sauce can be made in advance and stored in the fridge.  Just warm it up a tad in the microwave to get it back to pouring consistency.

    Right before you’re ready to serve the cake, drizzle it with the caramel sauce.

    To make your ice cream cake easier to cut, run your knife through hot water for a few seconds before eat cut.  It will make things a lot easier.

    This is a great make-ahead cake, so it’s perfect for events where you won’t have time for cake-making the day of.  I have made a seven layer ice cream cake a few days in advance and it is still fantastic.

    Seven Layer Ice Cream Cake

    Ingredients

    For the cake

    • 1/4 recipe for a 13 x 9 inch brownie (this recipe recommended)
    • 3 quarts of your ice cream of choice (can be homemade or store bought), softened
    • 2-3 cups of crushed candy pieces, divided
    • 1 9oz package of chocolate wafer cookies
    • 1 7-8oz bottle of chocolate shell ice cream topping
    • 1 1/2 cups sweetened whipped cream (or store bought whipped topping)

    For the caramel sauce

    • 1/4 cup (1/2 stick) butter
    • 1 tbsp light corn syrup
    • 1/2 cup white sugar
    • 1/2 tsp vanilla extract
    • 1/4 cup heavy cream
    • a pinch of salt

    Directions

    Preheat oven to 350 degrees.  Grease a 9in round springform or push-bottom pan.

    Prepare brownie batter according to the recipe directions.  Pour into prepared pan and bake for 12-15 minutes, or until a toothpick inserted in the center comes out with only frudgy crumbs.  Remove from oven and allow to cool completely on a wire rack.

    Place a 9in ring mold (or 9in springform pan lined with parchment) on a plate or cake board.  Remove the brownie from the pan and place at the bottom of the mold.  Freeze for at least one hour.

    In a food processor, pulse the chocolate wafer cookies into large crumbs.  Add the chocolate shell topping, then continue to pulse until the crumbs are moistened all the way through.

    Remove the mold with the brownie from the freezer.  Add half of the crushed candy over the brownie, spreading it evenly.  Add half of the ice cream over this, then the moistened cookie crumbs.  Add the other half of the ice cream, and then the remaining crushed candies.  Return to the freezer and freeze for at least 4 hours, or until firm.  Once firm, remove from mold and decorate with whipped cream.  Drizzle with caramel sauce right before serving.

    To make the caramel sauce:  Melt the butter, sugar, salt, and corn syrup over medium heat.  Bring to a boil, then cook until the mixture thickens and turns light brown.  Remove from heat and stir in the cream and vanilla extract.  Allow to cool to lukewarm before serving.

  • Pumpkin Spice Rum Cake

    Pumpkin Spice Rum Cake

    Skip to Recipe
    Two years ago, I came up with a red velvet rum cake to make at my boss’s request.  For the fun of it, I started looking into what other types of bundt cake would hold up to a generous soaking of rum syrup.  I tried chocolate pound cake, but it was kind of a mess.  My next attempt featured pumpkin, since it’s that season and all.  To my surprise, a Pumpkin Spice Rum Cake is just what the doctor ordered.  And, since I normally use spiced rum in my rum cakes anyway, it was like a perfect marriage of fall flavors and a boozy punch.  It would also be a nice change of pace from the pies that grace so many Thanksgiving tables.

    Start by sifting your dry ingredients, then beating the sugar and oil together until it’s well-combined.  Then add the eggs, one at a time.  Once all of the eggs are incorporated, mix in the pumpkin, then alternately add the flour mixture and rum until you have a smooth batter.  Pour into your well-greased bundt pan.

    About 15 minutes before the cake is done baking, start making your rum syrup by melting butter, sugar, and water in a pan over medium to medium-high heat.  Bring to a large simmer, stirring until all of the sugar dissolves, then remove from heat and carefully stir in the rum.  When the cake is done, remove from the oven, poke holes all over with a toothpick or skewer, then slowly pour the rum syrup over it.  You may have to pour the syrup in stages, waiting until the cake absorbs most of it before pouring more onto it.  Once you have poured all of the rum syrup over the cake, let it sit for about 5 to 10 minutes until it has absorbed all of the liquid.

    Once all of the liquid has been absorbed, flip your cake over onto a cake board of baking dish.  Do not wait until the cake cools completely, or it might stick to the pan and break while you are trying to get it out.  It won’t be any less delicious, but it won’t be very pretty.

    I have heard that rum cakes gets better as it ages, so it’s best to let it sit for a few days before enjoying.  I honestly can’t tell you whether or not that is true, because mine never last that long.  I do recommend to let it sit for at least a day, though.  This will give gravity time to do its thing and distribute that boozy goodness.  I think it also gives the cake time for the flavors to blend and mellow.

    Thanks to the alcohol in the cake, this cake stays pretty fresh for a while, so there is no need to refrigerate if you plan on serving it within a few days.

    Pumpkin Spice Rum Cake

    Ingredients

    For the Cake

    • 3 1/4 cups all purpose flour
    • 4 eggs
    • 1 1/2 cups granulated sugar
    • 1 1/4 cups brown sugar
    • 1 1/2 tbsp pumpkin pie spice
    • 1/2 tsp salt
    • 2 tsp baking powder
    • 1/2 tsp baking soda
    • 1 15oz can pumpkin puree
    • 1 cup vegetable oil
    • 1 tsp vanilla extract
    • 1/2 cup rum

    For the Rum Syrup

    • 1 cup sugar
    • 1/2 cup (1 stick) butter
    • 2 tbsp water
    • 3/4 cup rum

    Directions

    Preheat oven to 350 degrees Farenheit.  Generously grease a 12-cup bundt pan.  Set aside.  Sift together the flour, baking powder, baking soda, pumpkin pie spice, and salt.

    In the bowl of a stand mixer, mix the oil white, sugar, and brown sugar until the sugar is coated and there are no clumps.  Add the eggs, one at a time, beating well after each addition.  Mix in the pumpkin and vanilla extract.  Add the flour alternately with the rum, beginning and ending with the flour, beating well after each addition.  Do not overbeat. Pour batter into prepared bundt pan.

    Bake at 350 degrees for 65 to 80 minutes, or until a toothpick inserted near the center comes out clean.  About 10 minutes before the cake is done, start making the rum syrup (instructions in next paragraph) and set aside.  When the cake is done, remove it from oven and set on a wire rack.  Poke holes in the cake using toothpick or wooden skewer, then slowly pour the hot rum syrup over the cake while it’s still in the pan.  Let cake sit in the pan for 5-10 minutes to absorb the liquid, then remove from pan by inverting onto a cake board or serving dish.  Allow to cool completely before storing.

    To make the rum syrup: Heat butter, sugar, and water in a small saucepan over medium to medium-high heat, stirring constantly.  Once the butter has completely melted, continue cooking, stirring frequently, until the mixture comes to a simmer and the sugar is completely dissolved.  Remove from heat and carefully add the rum, stirring until combined.

  • Mango Madness in July – Part 4 (2017 Chapter)

    Mango Madness in July – Part 4 (2017 Chapter)

    My first year at my current job, I was amazed at the massive influx of mangoes during mango season.  It was like homeowners couldn’t get rid of them fast enough.  That’s how Mango Madness was born, and Mango Season every year since then has been dedicated to mango-fying anything that I can think of.  Mango Madness 2017 will be no different.

    Sadly, my most reliable and prolific mango supplier was relocated.  I expected this to make getting my hands on mangoes a little harder than usual.  Instead, I had quite a steady stream of mangoes headed my way.  I guess word has gotten around about my Mango Mad Scientist antics, so everyone knows that any surplus of mangoes will get put to good use in my house.  Ha!

    So, what new things did I make for Mango Madness 2017?  Here we go!

    Mango salsa goes great on a lot of savory dishes, including jerk chicken chili!  Just combine diced mango with lime juice, salt, pepper, cumin powder, and cilantro.  The sweetness of the mango really offsets the heat of the chili, and completes the chili’s Caribbean flair.

    Mango Suspiro Limeno is a deliciously innovative way to eat the classic Peruvian dessert.  It’s normally too sweet for me, but the mango seems to cut some of that sweetness out.

    If you’re looking for something to cool you down in hot weather, try mango creamsicles.  They are cool, creamy, refreshing, and oh so delicious.  And, if you don’t own any popsicle molds, disposable cups work just as well.

    If you’re feeling fancy, try filling some puff pastry shells with mango pastry cream.  All it takes is some fresh berries and a dollop of whipped cream to make an impressive presentation.  Pro-tip: Heat the baking pan before you bake the puff pastry shells.  It makes them puff up so much higher.

    Believe it or not, mango is a great addition to BBQ sauce if you’re into sweet sauces.  Try mango BBQ sauce on ribs or brisket.  A friend of mine even put it on pasta and liked it.

    Mango upside down cake is best made with mango that doesn’t have a lot of fiber because it is easier to slice.  But, if you only have fibrous mangoes, don’t let that deter you.  The buttery, brown sugary top of the cake really elevates the mango.

    Mango compote makes a great topping for pound cakes and ice cream.  Or, stir it into your yogurt!

    If compotes aren’t your thing, you can try caramelized mango.  They’re spiked with a little bit of rum and flecked with vanilla bean seeds.  You can make it in chunks or in slices.  Either way, it’s a treat!  It would probably go great on some waffles or pancakes.

    Mango brownies are a bit out-of-the-box, but the mango actually complements the chocolate better than you might think.  The mango puree in the brownie batter makes them extra moist and fudgy.  You don’t taste the mango very much, so most people that don’t know that there’s mango in them will probably just know that there’s “something different” in them that they can’t quite put their finger on.

    You could color me shocked when I found out how well mango works in curry.  This mango chicken curry used mangoes they are slightly under-ripe so that they don’t make the curry too sweet.  Though, if your mangoes are too sweet, you can just add more acid to the curry sauce.  I bet you could also use shrimp instead of chicken!

    Mango Madness 2017 was another prolific time, and I continue to surprise myself with how many new things can be made with mango.  And, having different suppliers helped me to discover the best ways to use different types of mangoes.  Stringy and fibrous mango?  Puree, strain, and and make something with mango puree.  Smooth and firm mango?  Slice or dice and use the pieces in sauces or cakes.  Every year is a learning experience, and I can’t wait until 2018!

  • Mango Upside Down Cake

    Mango Upside Down Cake

    Skip to Recipe

    Mango season is in full swing, and the creative juices are flowing!  Trying to figure out what to make with mango every year is often a challenge.  Often, however, an idea just pops into my head that makes me say “Why the heck didn’t I think of that before!?”  That was the case with this mango upside down cake.  While I was brainstorming with a coworker on what new things I could try making with mango this year, it just popped into my head.  I knew that I HAD to make it, and my brain wouldn’t let me stop thinking about it until I did.  My brain knows what it’s doing, because the cake turned out to be AWESOME.

    The mango upside down cake recipe makes a 13 x 9 inch pan, but I split it into two 9 inch round pans so that I could share with 2 separate groups of people.  Just be sure to split the topping ingredients between the two pans and adjust the baking time accordingly if you will be doing this.

    Stir some brown sugar into your pans of melted butter.  Spread it around as evenly as you can, and then lay your mango slices on top.  If your mangoes are too ripe, you might have some trouble getting clean mango slices like I did.  But, do the best that you can.  It will still taste great!

    Make the batter by creaming butter and brown sugar, then adding the egg.  Stir in the vanilla, and add your sifted dry ingredients alternately with mango pulp and milk.  Gently spread the batter into your prepared pans, and then bake.  Wait about 5 minutes, and then remove the cake from the pan.

    Don’t wait too long to unmold your cakes, or you run the risk if the brown sugar hardening.  Good luck getting your cakes out of the pan in one piece if that happens.

    I was initially kind of disappointed at the lack of height with the cake, until I realized that this meant that the mango topping to cake ratio made it so that the taste of the mango topping really stood out.  The buttery, sweet, caramelized mango topping is really what makes this cake stand out, so you don’t want to skimp on that.  I prefer mine warm, but it tastes good cold also.

    Mango Upside Down Cake

    Ingredients

    For the topping

    • 1/3 cup butter
    • 3/4 cup brown sugar
    • 5 cups mango slices (may be more of less depending on the size of the slices)

    For the cake

    • 2 cups all-purpose flour
    • 1 tbsp baking powder
    • 1/4 tsp salt
    • 1 cup packed brown sugar
    • 2/3 cup butter
    • 3 eggs
    • 2 tsp vanilla extract
    • 1/2 cup mango puree
    • 1/4 cup milk

    Directions

    Preheat oven to 350° F.

    While the oven is preheating, place an ungreased 13″ x 9″ baking pan with 1/3 cup of butter, allowing the butter to melt in the pan in the oven.  Remove the pan from the oven and stir in 3/4 cup brown sugar, then spread the mixture as evenly as possible around the pan.  Arrange the sliced mango on top of the brown sugar/butter mixture and set aside.  Sift together the dry cake ingredients.

    In the bowl of a stand mixer, cream the butter and brown sugar.  Add the eggs, one at a time, beating well with each addition.  Stir in the vanilla extract.  Add the dry ingredients alternately with the mango puree and milk, beating well with each addition.  Gently spread the batter over the mango slices in the pan.

    Bake in preheated oven for 35-40 minutes (25-30 minutes if using 9″ round pans), or until a toothpick inserted in the center comes out clean.  Let cake rest on a wire rack for about 5 minutes, then loosen the cake from the pan and invert the cake onto a serving platter.  Allow to cool at least 20 minutes before serving.

    Makes 1 13″ x 9″ rectangle cake or 2 9″ round cakes.

  • Red Velvet Lava Cake

    Red Velvet Lava Cake

    Another Fourth of July, approaches.  In addition to another year to celebrate our nation’s independence, it’s yet another reason to eat things that are red, white, blue, or a combination of all three.  Normally, this means flag cakes or tri-color jello molds, but I am thinking out of the box this year.  I’m thinking red velvet lava cake. This definitely isn’t the type of dessert that you’d plan to bring to a neighborhood barbecue or cookout, but it will impress nonetheless.  Besides, who ever really wants to eat a boxed cake mix sheet cake topped with Cool Whip, anyway?

    You can make red velvet lava cake in your oven or in your Instant Pot (pressure cooker).  I personally prefer the texture of an oven-baked lava cake, but I know that others prefer the moist, custard-like consistency of an Instant Pot lava cake.  Make sure that you play around with the cook times until you get the center as runny as you like it.

    If you REALLY want to stick to the red velvet theme, this treat is best enjoyed with a scoop of cream cheese ice cream.  Yes, it does exist.  Otherwise, vanilla ice cream also works.

    I was tempted to add a few blueberries to the plate to tie it in with the red, white, and blue, but I just didn’t think that the flavors would come together for this one.

    Red Velvet Lava Cake

    (adapted from Gretchen’s Bakery)

    Ingredients

    • 4 tbsp (1/2 stick) butter
    • 3 tbsp buttermilk
    • 2 eggs
    • 3 egg yolks
    • 1 1/4 cups bittersweet chocolate,chopped
    • 1/2 cup flour
    • 1/2 cup powdered sugar
    • a pinch of salt
    • red gel food coloring as needed

    Directions

    Preheat oven to 375°.  Generously grease 5 4oz ramekins.

    Melt the chocolate and the butter in the microwave or over a double boiler.  Stir in the buttermilk.  Sift the flour, salt, and sugar together and set aside.

    In a separate bowl, whisk the eggs and yolks.  Gradually add in the chocolate mixture to the egg yolks, a little bit at a time to keep from scrambling the eggs.  Add in the food coloring until the mixture is the desired color.  Stir in the flour mixture and whisk until smooth.

    Divide batter evenly between the greased ramekins.  Bake in the preheated oven for 14-18 minutes.  Serve immediately by inverting onto a plate to remove from the ramekin.

    To make in the Instant Pot, fill the pot with 1 cup of water, place the ramekins on a trivet, and cook on Manual (High Pressure) for 5-7 minutes.

    Makes 5 servings

  • Caramel Apple Bundt Cake

    Caramel Apple Bundt Cake

    Skip to Recipe

    Lately, I have been rethinking my aversion to cooked fruit.  Those of you that are close to me know that I am always complaining about mushy fruit in desserts, like apple or berries.  And, those of you that only know me through this blog are probably now just realizing why this blog has so few pies, tarts, etc.  I am slowly starting to realize that my issue isn’t necessarily with all types of cooked fruit, but with canned fruit or the fruit in mass-produced pastries and pies (which is probably also canned).  It’s very much a texture thing with me, so cooking fruit at home gives me greater control over the texture and any other aspects that may make the fruit unpleasant for me.

    Before my gradual acceptance of including cooked fruit in desserts, there were a few exceptions.  Apples cooked in “apple pie filling” were meh, but apples cooked in CARAMEL SAUCE were a win.  I would normally serve it over cheesecakes or ice cream, but one day I found myself wondering if I could incorporate the caramel apples into a cake.  To be more specific, I decided to make a caramel apple bundt cake.  After a few experiments, several of which were failures, I came up with a recipe that worked for me.  The caramel apples still sink to the bottom of the pan, meaning that they end up at the top of the bundt cake.  But, I decided that it doesn’t matter.   The cake is delicious anyway.

    Make Caramel Apple Filling

    The first step is to make the caramel apple filling.  Melt some butter in a pan, then add chopped apples (sprinkle them with cinnamon, if you want).  Cook until they start to soften and are coated in butter, then add the sugar and continue cooking until the sugar melts.  Use a slotted spoon or strainer to strain the apples out of the pan and set aside.  Continue cooking until it starts to turn dark amber, then remove from heat and add the cream.  If it looks thin, you can return it to the heat and keep cooking after that so that it continues to thicken.  Once it’s done, remove from heat and stir in the apples.

    It’s best to make this a day in advance and refrigerate so that it gets firm.  It will be easier to fill the bundt with a firmer filling.

    makecaramelapplecake

    Once you’re ready, you can make your batter for the caramel apple bundt cake.  Cream the butter and sugar until fluffy, then add the eggs one at a time until combined.  Add your (pre-sifted) dry ingredients alternately with your liquid, then pour all but about 1 cup of the batter into your greased bundt pan.  Using the back of a spoon or a small spatula, trace a small “moat” in the center of the bundt.  Fill it with the apple filling, taking care that it doesn’t spill over towards the edges of the pan.  Top with the remaining batter and gently spread it across.  It doesn’t have to cover all of the apples.  The cake rises during baking, and that will take care of that.

    DSCN4538

    Into the oven it goes!

    DSCN4531

    When it’s done, let the caramel apple bundt cake cool in the bundt pan for no more than 10 mins before inverting.  If any of the caramel apple filling leaked out, you don’t want it to harden and make your cake get stuck to the pan.

    Plated caramel apple bundt cake

    You can see parts of the caramel apple filling had started to poke out, but who cares?  It’s delicious!

    Sliced caramel apple bundt cake

    I could never get the apples to stay in the middle of the cake, but it tastes great regardless!

    Slice of caramel apple bundt cake

    Check out those thinly sliced apples floating around up there!  The caramel apple bundt cake can be served warm or at room temperature.  I have never had issues storing this cake at room temperature, but feel free to refrigerate if you are squeamish about that sort of thing.

    Caramel Apple Bundt Cake

    Ingredients

    For the Caramel Apple Filling

    • 1/2 cup ((1 stick) butter
    • 1 cup granulated sugar
    • 4 medium Granny Smith apples, peeled and chopped
    • 1/2 cup heavy cream
    • 1/2 tsp cinnamon (optional)

    For the cake

    • 1 cup butter, softened
    • 2 cups brown sugar
    • 4 eggs, room temperature
    • 1 cup buttermilk (or regular milk)
    • 1 teaspoon vanilla extract
    • 3 cups all-purpose flour
    • 1/2 teaspoon baking powder
    • 1/2 teaspoon baking soda
    • 1 pinch salt


    Directions

    Make the caramel apples

    Melt the butter in a large skillet over medium-high heat. Add the apples and cinnamon (if using).  Cook, stirring, until they are coated with butter, about 2 minutes. Add the sugar and stir until the sugar dissolves and the liquid starts to boil, about 3 minutes.

    Using a slotted spoon, transfer the apples to a bowl. Reduce the heat to medium and cook the remaining liquid, stirring often, until it turns a deep amber. Remove the skillet from the heat to stop the cooking and add the cream. Be careful, as the cream may splatter. Return the skillet to the heat and bring it to a boil, whisking constantly. Remove the sauce from the heat and stir in the apples. Allow to cool until lukewarm.  Store in an airtight container in the refrigerator until ready to use.

    Make the cake

    Preheat oven to 350°F.  Generously grease your bundt pan (or spray with cooking spray)

    Sift together flour, baking powder, baking soda, and salt. Set aside.

    Beat butter and brown sugar until fluffy. Add eggs, one at a time, mixing well after each addition. Mix in the vanilla.

    Gradually add flour mixture, alternating with buttermilk. Begin and end with flour mixture. Mix just until combined.  Do not overmix!

    Transfer batter to prepared bundt pan, reserving about 1 cup of matter. Trace a small trench in the center of the cake batter and fill with chilled caramel apple filling (you will have some left over).  Top with remaining cake batter and gently spreading to cover most of the filling.  Bake for 55-70 minutes, or until a toothpick inserted into center comes out clean.  Remove from oven and allow to cool in pan for no more than 10 minutes before inverting.


  • Heath Bar Pound Cake

    Heath Bar Pound Cake

    Skip to recipe
    When I was younger, Heath bars were one of my mother’s favorite candy bars.  I am pretty sure that I inherited my love of caramel from her, and chocolate covered crunchy toffee is right up her alley.  She has always had an obsession with crunchy things.  She likes her cookies crunchy instead of chewy, and chews ice so much that I often joked that she probably has undiagnosed Pica.  I prefer caramel over toffee, but that certainly doesn’t mean I will turn down a Heath bar if it’s presented to me.  And, it definitely won’t stop me from grabbing a bag of Heath bars to make into a pound cake.

    As with most recipes that contain candy, I came up with this recipe around Halloween as a means to use up by abundance of leftover Halloween candy.  It worked out so well that I have made it several times since, and always to rave reviews.  It’s basically just a caramel pound cake batter with Heath bar pieces mixed in for a double dose of buttery caramel goodness.  And, since it’s a pound cake, there’s no frosting to mess around with.  It doesn’t NEED any.

    heathbarcake1

    Start with your oils and your sugars.  Beat them until they are soft and creamy, and then incorporate the eggs, one at a time.  Beat after adding each egg.  While you’re doing this, you can sift your dry ingredients and crush your candy bars.  I unwrapped them and put them in a ziploc bag, then crushed them with a rolling pin.

    heathbarcake2

    Add the dry ingredients alternately with the milk, mixing to get a smooth batter.  Once all of the dry and wet ingredients are mixed in, fold in the Heath bar pieces.

    dscn4004

    Heath bar goodness!  Pour this batter into a greased Bundt pan and bake.

    dscn4005

    You want to let it cool for about 10 minutes before removing from the pan, but not more more than that.  It will be easier to take it out of the pan while the chocolate pieces are still kind of melty, so that it’s less likely that they will stick to the pan and make it difficult to unmold.

    dscn4012

    You can’t tell from the photo, but this cake smells AMAZING!  I find it best served warm, but it also tastes just fine at room temperature.  I hope you like this cake as much as I do!

    Heath Bar Pound Cake

    Ingredients

    • 1 cup butter, softened
    • 1/2 cup vegetable oil
    • 2 cups packed brown sugar
    • 1 cup white sugar
    • 5 eggs
    • 3 cups all-purpose flour
    • 1/2 tsp baking powder
    • 1 tsp vanilla extract
    • 1 cup milk (or buttermilk, if you have it)
    • 1-2 cups chopped Heath bar pieces

    Directions

    Preheat oven to 325° F. Grease and flour a large Bundt pan, or spray with nonstick cooking spray.

    Cream together the butter, oil, brown sugar, and white sugar. Add eggs one at a time, beating well after each addition. Stir in 1 teaspoon vanilla.

    Sift the flour and baking powder. Add alternately with milk to the creamed mixture. Gently fold the Heath Bar pieces into the batter. Pour into prepared pan.

    Bake in preheated oven for 60 to 90 minutes, or until a toothpick inserted into the center comes out clean. Let stand in pan 10 minutes, and then turn out onto a wire rack and cool completely.