Tag: chicken

  • Pressure Cooker Jerk Chicken Chili

    Pressure Cooker Jerk Chicken Chili

    Skip to recipe

    For the second year in a row, my job has organized a chili cook-off.  Now, chili isn’t really my forte, and it’s not something that I make often or ever.  But, ever since I got this Instant Pot I have gotten a lot more adventurous with my cooking.  So, I figured “why not?”

    I wanted to do something that was not only unique, but that had cultural significance.  Living in South Florida, chili is not something that is really huge like it would be in a place like Texas.  Plus, I have been cutting down on the red meat for health reasons and wanted a chicken chili.  I had been working on some different variations of “Latin” inspired chilis when a lightbulb went off.  We’re practically in the Caribbean…so why not make jerk chicken chili?

    Sure enough, I wasn’t the first person to have thought of this, and I came across a great recipe to use as a starting point.  Of course, the challenge became converting it into a pressure cooker recipe, but it worked out fairly well.  I added a few adjustments of my own based on my own experiences eating Caribbean food in South Florida.  And, I wound up winning First Place!  Woohoo!

    One thing to note is that I made this chili in a 6qt pressure cooker and had a lot of issues with it coming to pressure that I suspect may have been from the pressure cooker being too full.  So, the bottom would start to scorch before the pot could actually come to pressure.  If you have an 8qt pressure cooker, I think that you will be fine, but if you’re using a 6qt or smaller than I recommend scaling the recipe down to avoid this issue.

    UPDATE 3/19/2017:  As a test, I halved the recipe and cooked it in my 6qt pressure cooker, and still had the same issue where the pot would not come to pressure before the bottom would scorch.  Once I scraped the burnt bits from the bottom of the pot, it started to simmer pretty furiously and the pot pressurized after I sealed it again.  So, the trick seems to be bring the chili to a simmer prior to sealing so that it will come to pressure.  Also, scotch bonnet peppers vary in heat by color.  I used an orange one in my first batch and a red one in my second batch, and it was SO MUCH hotter.  So, choose your peppers wisely.

    Jerk chicken chili ingredients

    I got my ingredients together, including the tiny atomic bomb known as a scotch bonnet pepper.  Scotch bonnet pepper is a key component of Jamaican jerk, so of course it needs to be included in jerk chicken chili!  I mixed all of the spices and seasonings together to form a paste to make it easier to add in later.

    DSCN4590

    First, you want to cook your beans.  While they are cooking, prep all of your veggies so that they are ready to go.

    DSCN4593

    Once the beans are done, drain and set aside.

    prepthepot

    Saute your veggies until soft, then add your seasoning paste.  Add the tomatoes, beans, and chicken.  I added the tomatoes last in this case, but I would recommend adding those before the beans and chicken.  Then, seal the pot and cook on Beans/Chili setting or on High for 30 minutes.

    DSCN4612

    Let the pressure release naturally, then open and remove the chicken.  Set the pot to Saute to reduce the chili to the desired thickness, then shred your chicken and return to the pot.  Stir in the scallions.

    Finished jerk chicken chili

    Yup…good stuff!

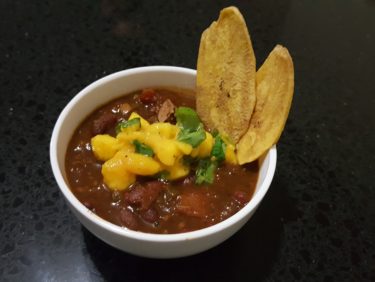
    Plated Jerk Chicken Chili

    I served this jerk chicken chili with mango salsa and plantain chips for dipping, but it also tastes good over rice or scooped up with naan or roti.  It’s great on its own as well.  This can be made on the stovetop or slow cooker with some adjustments if you don’t have a pressure cooker.  It will just take a bit longer.  You can also save some time by using canned beans instead of dried.

    Pressure Cooker Jerk Chicken Chili

    Ingredients

    • 3 lbs bone-in chicken legs and thighs
    • 14oz dried red chili beans
    • 1/2 cup jerk seasoning (I used Mild.  Use Hot at your own risk!)
    • 2 Tbsp vegetable oil
    • 1 medium onion, diced
    • 1 red bell pepper, diced
    • 1 green bell pepper, diced
    • 1 yellow bell pepper, diced
    • 1 Tbsp fresh ginger, grated
    • 5 garlic cloves, minced
    • 1 scotch bonnet or habanero pepper, de-seeded minced (keep the seeds if you like extra spicy)
    • 1½ tsp all-spice
    • 2 tsp smoked paprika
    • 2 tsp thyme
    • 1 Tbsp cumin
    • 1 Tbsp ground cinnamon
    • 1 Tbsp chili powder
    • ¼ cup molasses
    • 1 1/2 tsp liquid smoke
    • 2 tbsp soy sauce
    • 1 tbsp cider vinegar
    • 1 cup chopped scallion
    • 2 15oz cans fire-roasted diced tomatoes (or 1 28oz can also works)
    • 1 cup chicken or vegetable stock
    • salt and pepper to taste

    Directions

    Add the beans to the inner bowl of the pot with 4 cups of water.  Cover and set the pressure valve to Sealing.  Cook on Manual (High Pressure) for 17 minutes, then allow the pressure to release naturally.  Drain and set aside.  In a bowl or measuring cup, combine the jerk seasoning, ginger, allspice, paprika, thyme, cumin, cinnamon, chili powder, molasses, liquid smoke, soy sauce, and salt and pepper so that it forms a loose paste.

    Clean the inner bowl (or, use a new bowl) and set the cooker to Saute/Brown setting.  When hot, add the vegetable oil and saute the onions and peppers until they start to turn translucent.  Add the garlic and continue to saute until fragrant, then add the spice paste and stir until it coats the vegetables.  Add the tomtatoes, beans, chicken/vegetable stock, and chicken.  Stir to combine.

    Turn off the pressure cooker, cover and set the release valve back to Sealing, and set to Beans/Chili function (or Manual High for 30 minutes).  When the timer runs out, allow the pressure to release naturally.

    Once the pressure has been release, open the pot and remove the chicken using tongs and shred it with a form.  Set the cooker back to the Saute setting and cook until the chili until it is reduced to your liking, then return the shredded chicken to the pot.  Stir in the chopped scallions.  Serve the jerk chicken chili immediately or store in an airtight container in the refrigerator until ready to consume.

    Enjoy!

  • Chicken Karaage

    Chicken Karaage

    Skip to recipe
    Anime and people who watch anime often get a bad rap.  Anime fans are often associated with weirdos or basement dwellers.  Anime itself is often written off as either childish or too “adult.”  Granted, they can be both, and sometimes at the exact same time!  Still, every now and then, an anime comes along that sticks some tidbits of knowledge into its plot, whether subtly or shoving it in your face.  That is one of my favorite things about animes about food and cooking.  Most cooking shows on TV nowadays have devolved into circus sideshows of contests to see how horribly they can mess with cooks and still get them to make something edible.  It’s not really about the food anymore, which is a shame.

    So, when Shokugeki no Soma (Food Wars in English) came along, I was eager to check it out.  The story centers around the son of a diner owner that is sent to a highly elite culinary school at the start of his high school career.  Given anime’s penchant for making even the most mundane tasks appear epic and grandiose, hilarity ensures.  Soma, the titular hero, often creates food so delicious that it elicits borderline NSFW reactions from anyone that eats it.  There’s plenty of shots of delicious-looking animated food, amusing gags, and even tentacles (if you’re into that sort of thing).  But, most of all, there are loads and loads of recipe ideas and tips.  Which brings us to this post…

    Towards the end of the first season, our hero is pitted against an evil chicken karaage (fried chicken) franchise that is threatening to put the shopping district where his father’s diner resides out of business. Naturally, it’s up to our plucky hero and his high school friends to save the day for the helpless adult business owners.  In order to see what they’re up against, they decide to check out their competitor.  In an episode aptly named “Sensual Fried Chicken,” they discover the wonder that is this juicy and tender chicken as the manager gleefully gloats about how awesome her chicken is.  After some experimentation, they manage to “defeat” this fried chicken by transforming it into a fried chicken wrap that can be eaten “on the go,” but the flavors of the chicken itself gave them a run for their money.

    Watching the reactions to the chicken both made my mouth water and made me want to try making this at home.  And, after investing in an extra-fancy deep fryer, I found the perfect excuse to give it a shot.  This web page gave me a starting point, and I made a few educated guesses as to the quantities of each ingredients that wound up working very well.  I started with making the competitor’s chicken recipe, because it looked less complicated than Soma’s “winning” recipe.  The chicken ended up being so good that I don’t think I will ever bother trying the other one.  I did tweak it a bit to match my tastes, but it’s still great.  My first attempt at this chicken was made using chicken breast, and it was the absolute juiciest chicken breast that I have ever made or eaten.  Once I crunched through the crispy exterior, the chicken juices basically danced in my mouth.  Since then, I have switched to chicken thighs, but I wouldn’t be against using chicken breast again if that’s the only thing that I could get my hands on.

    makemarinade

    The marinade is simple to make and doesn’t contain any ingredients that are hard to find.  Just throw everything in a blender or food processor and whir until it’s all pulverized.

    cutchicken

    I used boneless skinless chicken thighs for this.  You are welcome to use chicken breast as well.  Both will yield tender and juicy results, but I just find that chicken thighs are extra succulent when paired with this marinade.  Cut the chicken into bite sized pieces (think chicken nugget sized) and place in a plastic freezer bag.  Pour the marinade into the bag and shake so that all of the chicken gets covered in the marinade.  Refrigerate this for at least 4 hours, but ideally overnight.

    breadandfry

    About 30 minutes prior to frying, remove the marinated chicken from the fridge and allow to sit at room temperature.  Preheat your fry oil.  In a bowl, season your potato starch with salt and pepper and stir to combine.  Dredge the chicken pieces on the potato starch.  There’s no need to dip them in egg or milk, as the marinade is moist enough to get the starch to cling.  So, just roll then in the starch and keep moving.

    The frying process is in two parts.  You fry them once, then remove them from the oil and let them rest for a few minutes before frying them again.  This is the key to an extra-crispy exterior.  Note that you don’t need a deep fryer with a basket to make this chicken, as long as wherever you are frying has a way for you to monitor the temperature of the frying oil.  No one wants a greasy, soggy crust.

    dscn4197

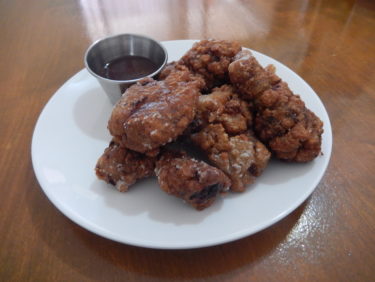
    These crunchy and juicy tidbits of chicken are delicious enough to stand on their own, but also pair well with a dipping sauce.  Sweet chili garlic dipping sauce is a personal favorite, but don’t take my word for it.  Try it for yourself!

    Who says anime is only for kids!?

    Chicken Karaage (AKA Sensual Fried Chicken)

    Ingredients

    • 1/2 large white onion
    • 1/2 medium apple
    • 3 cloves garlic
    • 3/4 cup soy sauce
    • 1 1in piece of fresh ginger
    • 1/4 tsp nutmeg
    • 1/2 tsp chili powder
    • 1 tsp ground black pepper
    • 2 lbs boneless skinless chicken thighs, fat trimmed
    • 1-2 cups potato starch (or corn starch)
    • salt and pepper to taste

    Directions

    Combine the first 8 ingredients in a blender or food processor (chop the apple and onion as needed to make it fit) and blend until mostly smooth.

    Cut the chicken into bite sized pieces (about 2 inches) and place in a freezer bag.  Pour the marinade over the chicken pieces, seal the bag, and shake to combine.  Refrigerate until ready to use, at least 4 hours.

    About 30 minutes prior to frying, remove chicken from refrigerator and allow to sit at room temperature.  Add potato starch to a bowl and season with salt and pepper.

    Preheat frying oil to 375 degrees.  Dredge the chicken pieces in the potato starch and fry for 2 minutes.  Remove from oil and allow to rest 3-5 minutes, then fry for an additional 2 minutes.  Drain on wire rack or paper towels and serve hot.


  • Adventures in Pollo a la Brasa

    Adventures in Pollo a la Brasa

    Skip to Recipe
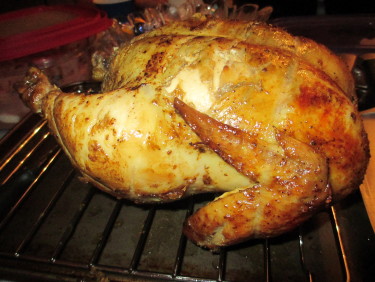
    About a year and a half ago, I was introduced to Peruvian-style pollo a la brasa (rotisserie chicken), and have been hooked ever since.  Even now, I crave it at least once a week.  It’s really not a taste that can be put into words if you are accustomed to store-bought or fast-food rotisserie chickens.  The skin is usually kind of wet and sticky, instead of dry and crispy.  You just have to try it for yourself.

    So, when I finally decided that I wanted to try making it on my own, I tasked a Peruvian friend of mine with getting me a recipe.  She nabbed the recipe from The Daring Gourmet and told me that it sounded fairly close.  So, it was time to experiment!  I made a few modifications to her recipe. (more…)