Category: Appetizers

  • Pressure Cooker Buffalo Chicken Dip

    Pressure Cooker Buffalo Chicken Dip

    Skip to Recipe

    I love dips, but I hate mayo. So, whenever someone brings buffalo chicken dip to a party, I get excited for a brief moment before I remember that it is almost always made with mayo.

    So, what is a mayo-averse blogger to do? Make her own version, of course! So, mayo haters can rejoice. You can now have your buffalo chicken dip, and eat it, too! I make mine in the Instant Pot for ease, but you can also do it on the stove top if that is your preference.

    Before getting started, get your ingredients ready. You will want about 1lb to 1 1/2lbs of boneless skinless chicken breast. My local latino grocery store sells huge breasts, so I only needed one.

    First, cook the chicken breast. Add 1 cup of water to the liner of your pressure cooker, then add the chicken breast. Cook on High Pressure for about 20 minutes. If your chicken breasts are especially big, you might need to add a few extra minutes.

    While the chicken is cooking, you can cube your cream cheese and shred your cheddar so that it’s ready when the chicken is done. Once the timer goes off, let the pressure release naturally, but do not turn off the pressure cooker. Let it stay on “Keep Warm.”

    After all of the pressure is released, open the pressure cooker, drain all of the liquid, and shred the chicken.

    After you shred the chicken, add the buffalo sauce. Add the cubed cream cheese next, and stir until all of the cream cheese has melted. Add the shredded cheddar cheese, a little bit at a time, making sure each time that the cheese is completely melted before you add more.

    Once all of the cheddar is melted in, add the blue cheese dressing and the crumbled blue cheese. Stir until it is all combined.

    Served dip

    Buffalo chicken dip is best served hot. The dip can be made in advance and frozen until ready to use. I like to serve it with crackers or bagel chips, but I have also seen it served with tortilla chips. If you’re keeping it low-carb, try eating it with carrot or celery sticks, or in lettuce wraps.

    Pressure Cooker Buffalo Chicken Dip

    Ingredients

    • 1-1 1/2lbs boneless skinless chicken breasts
    • 1 cup of water
    • 8oz of cream cheese, cut into cubes
    • 8oz cheddar cheese, shredded
    • 4oz blue cheese, crumbled
    • 1/4 cup blue cheese dressing
    • 1 cup buffalo sauce

    Directions

    Add the chicken broth and the water to the liner of your electric pressure cooker. Cover, seal, and cook on High Pressure for 20 minutes (large pieces of chicken may need additional time). Allow the pressure to release naturally. Leave the pressure cooker on the Keep Warm setting.

    Strain the water and shred the chicken. Add the buffalo sauce and stir until combined. Add the cream cheese and stir until the cream cheese is melted.

    Stir in the shredded cheddar cheese, a little bit at a time, until all of the cheese has been added and mixture is smooth. Add the blue cheese sauce, and then the crumbled blue cheese. Serve the buffalo chicken dip hot.

  • Asian Appetizer Meatballs

    Asian Appetizer Meatballs

    Skip to Recipe

    I had been looking for a good appetizer to bring to a party, and several people recommended meatballs. Asian appetizer meatballs sounded more appealing to me than Italian or any other kind, so that is what I decided to make. I couldn’t find a single recipe that sold me 100%, so I decided to make my own.

    This recipe is actually a combination of several recipes. I just took what I liked about each one and put them together. The end result turned out a lot better than I had hoped. I love the taste of these meatballs. Hopefully, you will too.

    Gather all of your ingredients before you begin. I used a microplane grater to grate my ginger, but you can mince it if you want. Chop your scallions. Mince your garlic. When, throw all of the meatball ingredients into a large bowl and combine.

    If you have kitchen gloves, this is a good time to use them. I sprayed them lightly with oil before getting started. This helped to keep the meat mixture from sticking. Mush the meat mixture together until just combined. Do not work it too much or it may affect the texture of the meatballs. When it’s nicely combined, form them into small, appetizer-sized balls. I used a cookie scooper to help them stay uniform.

    Bake the meatballs on a foil or parchment lined baking sheet for 10-15 minutes. While the meatballs are baking, you can start your sauce.

    If you have a wok or a stir-fry pan, this is a good use for it. Otherwise, a skillet works fine.

    Heat the sauce ingredients in your pan over medium-high heat. When it starts to bubble (but not boil), reduce the heat to medium and stir in a cornstarch slurry. Do this little by little, until your sauce is as thick as you want it. Add the meatballs, then stir until coated. If the coating looks a little thin, you can try to increase the heat or add more cornstarch slurry until the sauce thickens enough to coat the meatballs.

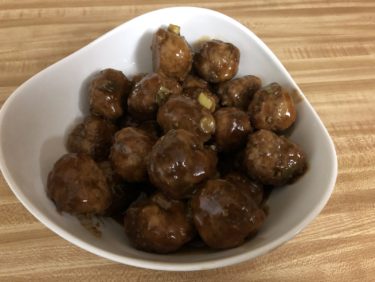
    When you’re satisfied with how coated the meatballs are, remove them from the heat. I threw in some chopped scallions at this point, but you don’t have to.

    You can serve these in a pretty bowl, or in a crock pot to keep them warm. Either way, they will be delicious!

    Asian Appetizer Meatballs

    Ingredients

    For the meatballs:

    • 1 lb ground beef
    • 1 lb ground pork
    • 1 cup panko bread crumbs
    • 1/2 tbsp fresh ginger, minced
    • 2-3 cloves garlic
    • 2 scallions, finely chopped
    • 2 eggs
    • 1 tsp salt
    • 2 tsp sesame oil

    For the sauce:

    • 3/4 cup water, divided
    • 2/3 cup low-sodium soy sauce
    • 1/4 cup rice vinegar
    • 3 tbsp brown sugar
    • 2 tsp chili paste
    • 1/2 tbsp fresh ginger, minced
    • 1/2 tbsp garlic, minced
    • 2 tbsp cornstarch
    • chopped scallions for garnish (optional)

    Directions

    Make the meatballs:

    Preheat oven to 400 degrees F. Line a large baking sheet with foil or parchment paper.

    Combine all of the meatball ingredients together in a large bowl. Be careful not to overwork the mixture. Take about 2tbsp at a time and roll into balls (I used a medium cookie scoop). Arrange on the lined baking sheet, leaving some space in between each meatball.

    Bake for 10-15 minutes, until meatballs are browned.

    Make the sauce:

    In a stir fry pan or skillet, combine 1/2 water, soy sauce, rice vinegar, brown sugar, chili paste, ginger, and garlic. In a small bowl, combine the remaining water and the cornstarch. Stir to combine, then set aside.

    Heat the soy sauce mixture in the pan over medium to medium-high heat until the mixture is about to come to a boil. Reduce the heat and stir in the cornstarch mixture, a little bit at a time, until the sauce is the desired thickness.

    Add the meatballs and stir to coat. Continue to cook until the sauce thickens and thickly coats the meatballs. Remove from heat. Serve hot and garnish with chopped scallions, if desired.

    Makes about 4 dozen bite-sized meatballs

  • Bacon Wrapped Mashed Potatoes

    Bacon Wrapped Mashed Potatoes

    Skip to Recipe
    I don’t watch nearly as much anime as I used to in my younger days, but a show still gets me hooked occasionally.  Right now, Shokugeki no Soma (Food Wars) is that show.  This isn’t the first time that this show has inspired me to run to my kitchen to recreate one of the dishes featured on the show (chicken karaage, anyone?), but these bacon wrapped mashed potatoes were the gateway to the wonderful world of animated food cravings.  The protagonist makes a large one in the first episode and serves it with a soy-based sauce.  I took the general idea and made it into smaller loaves, and put an American spin by basting them in barbecue sauce.

    Now, wrapping potatoes in bacon is not a new thing, but what sets these apart is the addition of the onion and mushrooms into the mashed potato mix.  The mushrooms help the potato absorb all of the flavor from the fat that drips off of the bacon as these cook, infusing the potato loaves with that baconey goodness that all sane people love.

    First, you want to saute your onions, mushrooms, and garlic.  You want to cook them until they have released most of their liquid.

    Next, take some peeled and cooked potatoes and mash them in a bowl.  You can cook them however you wish.  I steamed mine, but you can also boil or bake them.

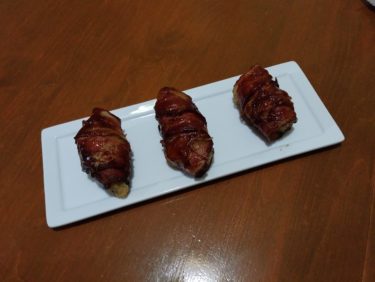
    Mix the sauteed mushrooms and onions into the mashed potatoes, then form them into little potato-shaped loaves.  Gently wrap each loaf in bacon.  Remember that bacon will shrink once it releases some fat, so don’t wrap them too tightly.  Give them some room to shrink without squishing the potato mixture underneath.  Tie the bacon (gently!) onto each loaf, then bake in your preheated oven until the bacon is the desired color.

    At this point, you can baste your loaves in your choice of barbecue sauce, then return to the oven for 10 minutes or so to let the sauce caramelize.

    So delicous!

    Now, I know that bacon wrapped mashed potatoes aren’t the healthiest thing around, but these are still great for the occasional treat.  They are always well-received at parties or gatherings.  They are a little time-consuming and require some patience, but that just means you won’t be tempted to make them often and run yourself to an early grave.  One day, I might try adding cheese to them.

    Bacon Wrapped Mashed Potatoes

    Ingredients

      • 2 lbs bacon
      • 2 lbs russet potatoes
      • 1 1/2 cups onion, diced
      • 1 1/2 cups crimini mushrooms, diced
      • 1 tbsp oil
      • 3 cloves garlic, minced
      • 1 cup of your favorite barbecue sauce (more or less to taste)
      • Salt and pepper to taste

    Directions

    Cook your potatoes using your preferred cooking method.  Remove the peels (if this wasn’t done prior to cooking), place in a bowl, and mash.  Set aside.

    Heat the oil in a medium skillet over medium to medium-high.  Add the onions and saute until they start to soften, about 3-5 minutes.  Add the garlic and cook until fragrant (about 1 minute), then add the mushrooms and cook until the mushrooms have softened and released most of their liquid.  Season with salt and pepper.  Set aside to cool slightly for 5-10 minutes.

    Preheat oven to 375 degrees.  Stir the onion mixture to the mashed potatoes, then season with salt and pepper to taste.  Form into about 12 equal loaves, then wrap lightly in bacon.  Gently fasten the bacon with kitchen twine.

    Bake on a wire rack over a cookie sheet for 45 minutes to an hour (turning every 15 minutes), or until the bacon has rendered and browned sufficiently.  Baste with barbecue sauce and continue to bake for an additional 10-15 minutes  Allow to cool on wire rack for 5-10 minutes before serving.

    Makes about 12 servings


  • Chicken Karaage

    Chicken Karaage

    Skip to recipe
    Anime and people who watch anime often get a bad rap.  Anime fans are often associated with weirdos or basement dwellers.  Anime itself is often written off as either childish or too “adult.”  Granted, they can be both, and sometimes at the exact same time!  Still, every now and then, an anime comes along that sticks some tidbits of knowledge into its plot, whether subtly or shoving it in your face.  That is one of my favorite things about animes about food and cooking.  Most cooking shows on TV nowadays have devolved into circus sideshows of contests to see how horribly they can mess with cooks and still get them to make something edible.  It’s not really about the food anymore, which is a shame.

    So, when Shokugeki no Soma (Food Wars in English) came along, I was eager to check it out.  The story centers around the son of a diner owner that is sent to a highly elite culinary school at the start of his high school career.  Given anime’s penchant for making even the most mundane tasks appear epic and grandiose, hilarity ensures.  Soma, the titular hero, often creates food so delicious that it elicits borderline NSFW reactions from anyone that eats it.  There’s plenty of shots of delicious-looking animated food, amusing gags, and even tentacles (if you’re into that sort of thing).  But, most of all, there are loads and loads of recipe ideas and tips.  Which brings us to this post…

    Towards the end of the first season, our hero is pitted against an evil chicken karaage (fried chicken) franchise that is threatening to put the shopping district where his father’s diner resides out of business. Naturally, it’s up to our plucky hero and his high school friends to save the day for the helpless adult business owners.  In order to see what they’re up against, they decide to check out their competitor.  In an episode aptly named “Sensual Fried Chicken,” they discover the wonder that is this juicy and tender chicken as the manager gleefully gloats about how awesome her chicken is.  After some experimentation, they manage to “defeat” this fried chicken by transforming it into a fried chicken wrap that can be eaten “on the go,” but the flavors of the chicken itself gave them a run for their money.

    Watching the reactions to the chicken both made my mouth water and made me want to try making this at home.  And, after investing in an extra-fancy deep fryer, I found the perfect excuse to give it a shot.  This web page gave me a starting point, and I made a few educated guesses as to the quantities of each ingredients that wound up working very well.  I started with making the competitor’s chicken recipe, because it looked less complicated than Soma’s “winning” recipe.  The chicken ended up being so good that I don’t think I will ever bother trying the other one.  I did tweak it a bit to match my tastes, but it’s still great.  My first attempt at this chicken was made using chicken breast, and it was the absolute juiciest chicken breast that I have ever made or eaten.  Once I crunched through the crispy exterior, the chicken juices basically danced in my mouth.  Since then, I have switched to chicken thighs, but I wouldn’t be against using chicken breast again if that’s the only thing that I could get my hands on.

    makemarinade

    The marinade is simple to make and doesn’t contain any ingredients that are hard to find.  Just throw everything in a blender or food processor and whir until it’s all pulverized.

    cutchicken

    I used boneless skinless chicken thighs for this.  You are welcome to use chicken breast as well.  Both will yield tender and juicy results, but I just find that chicken thighs are extra succulent when paired with this marinade.  Cut the chicken into bite sized pieces (think chicken nugget sized) and place in a plastic freezer bag.  Pour the marinade into the bag and shake so that all of the chicken gets covered in the marinade.  Refrigerate this for at least 4 hours, but ideally overnight.

    breadandfry

    About 30 minutes prior to frying, remove the marinated chicken from the fridge and allow to sit at room temperature.  Preheat your fry oil.  In a bowl, season your potato starch with salt and pepper and stir to combine.  Dredge the chicken pieces on the potato starch.  There’s no need to dip them in egg or milk, as the marinade is moist enough to get the starch to cling.  So, just roll then in the starch and keep moving.

    The frying process is in two parts.  You fry them once, then remove them from the oil and let them rest for a few minutes before frying them again.  This is the key to an extra-crispy exterior.  Note that you don’t need a deep fryer with a basket to make this chicken, as long as wherever you are frying has a way for you to monitor the temperature of the frying oil.  No one wants a greasy, soggy crust.

    dscn4197

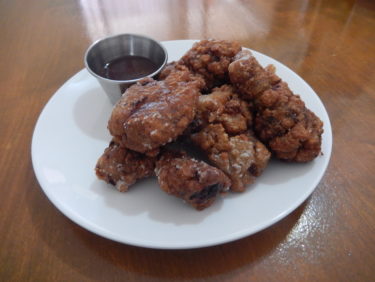
    These crunchy and juicy tidbits of chicken are delicious enough to stand on their own, but also pair well with a dipping sauce.  Sweet chili garlic dipping sauce is a personal favorite, but don’t take my word for it.  Try it for yourself!

    Who says anime is only for kids!?

    Chicken Karaage (AKA Sensual Fried Chicken)

    Ingredients

    • 1/2 large white onion
    • 1/2 medium apple
    • 3 cloves garlic
    • 3/4 cup soy sauce
    • 1 1in piece of fresh ginger
    • 1/4 tsp nutmeg
    • 1/2 tsp chili powder
    • 1 tsp ground black pepper
    • 2 lbs boneless skinless chicken thighs, fat trimmed
    • 1-2 cups potato starch (or corn starch)
    • salt and pepper to taste

    Directions

    Combine the first 8 ingredients in a blender or food processor (chop the apple and onion as needed to make it fit) and blend until mostly smooth.

    Cut the chicken into bite sized pieces (about 2 inches) and place in a freezer bag.  Pour the marinade over the chicken pieces, seal the bag, and shake to combine.  Refrigerate until ready to use, at least 4 hours.

    About 30 minutes prior to frying, remove chicken from refrigerator and allow to sit at room temperature.  Add potato starch to a bowl and season with salt and pepper.

    Preheat frying oil to 375 degrees.  Dredge the chicken pieces in the potato starch and fry for 2 minutes.  Remove from oil and allow to rest 3-5 minutes, then fry for an additional 2 minutes.  Drain on wire rack or paper towels and serve hot.