Category: Low-Carb

  • Pressure Cooker Buffalo Chicken Dip

    Pressure Cooker Buffalo Chicken Dip

    Skip to Recipe

    I love dips, but I hate mayo. So, whenever someone brings buffalo chicken dip to a party, I get excited for a brief moment before I remember that it is almost always made with mayo.

    So, what is a mayo-averse blogger to do? Make her own version, of course! So, mayo haters can rejoice. You can now have your buffalo chicken dip, and eat it, too! I make mine in the Instant Pot for ease, but you can also do it on the stove top if that is your preference.

    Before getting started, get your ingredients ready. You will want about 1lb to 1 1/2lbs of boneless skinless chicken breast. My local latino grocery store sells huge breasts, so I only needed one.

    First, cook the chicken breast. Add 1 cup of water to the liner of your pressure cooker, then add the chicken breast. Cook on High Pressure for about 20 minutes. If your chicken breasts are especially big, you might need to add a few extra minutes.

    While the chicken is cooking, you can cube your cream cheese and shred your cheddar so that it’s ready when the chicken is done. Once the timer goes off, let the pressure release naturally, but do not turn off the pressure cooker. Let it stay on “Keep Warm.”

    After all of the pressure is released, open the pressure cooker, drain all of the liquid, and shred the chicken.

    After you shred the chicken, add the buffalo sauce. Add the cubed cream cheese next, and stir until all of the cream cheese has melted. Add the shredded cheddar cheese, a little bit at a time, making sure each time that the cheese is completely melted before you add more.

    Once all of the cheddar is melted in, add the blue cheese dressing and the crumbled blue cheese. Stir until it is all combined.

    Served dip

    Buffalo chicken dip is best served hot. The dip can be made in advance and frozen until ready to use. I like to serve it with crackers or bagel chips, but I have also seen it served with tortilla chips. If you’re keeping it low-carb, try eating it with carrot or celery sticks, or in lettuce wraps.

    Pressure Cooker Buffalo Chicken Dip

    Ingredients

    • 1-1 1/2lbs boneless skinless chicken breasts
    • 1 cup of water
    • 8oz of cream cheese, cut into cubes
    • 8oz cheddar cheese, shredded
    • 4oz blue cheese, crumbled
    • 1/4 cup blue cheese dressing
    • 1 cup buffalo sauce

    Directions

    Add the chicken broth and the water to the liner of your electric pressure cooker. Cover, seal, and cook on High Pressure for 20 minutes (large pieces of chicken may need additional time). Allow the pressure to release naturally. Leave the pressure cooker on the Keep Warm setting.

    Strain the water and shred the chicken. Add the buffalo sauce and stir until combined. Add the cream cheese and stir until the cream cheese is melted.

    Stir in the shredded cheddar cheese, a little bit at a time, until all of the cheese has been added and mixture is smooth. Add the blue cheese sauce, and then the crumbled blue cheese. Serve the buffalo chicken dip hot.

  • Pressure Cooker Creamy Chicken Soup

    Pressure Cooker Creamy Chicken Soup

    I’m at that age where your doctor starts telling you that you’re going to kill yourself if you don’t start treating your body better. So, I’ve been trying to stick to low carb, high protein meals lately. There are some hits and some misses, but overall I am enjoying everything that I am eating, like this creamy chicken soup.

    Although it’s not as thick and creamy as a roux-based soup, it is actually really delicious. You can probably thicken it with xantham gum if you are so inclined. If you don’t care about the carbs, then roux away!

    Pressure Cooker Creamy Chicken Soup

    (Adapted from this recipe)

    Ingredients

    • 2 lbs boneless skinless chicken breast
    • 5oz sliced shitake mushrooms
    • 2 cloves of garlic
    • 6 slices of thick cut bacon
    • 4oz celery, chopped
    • 1/3 cup white cooking wine (or use water)
    • 4oz cream cheese, cut into cubes
    • 1/2 cup heavy cream
    • 3 cups chicken stock
    • 1/2 tbsp dried parsley
    • salt and pepper to taste

    Directions

    Set the liner of your electric pressure cooker to the Saute/Browning setting. When it’s hot, add the bacon and cook until crispy. Remove from the pressure cooker, crumble, and set aside.

    Drain all but 1 tbsp of bacon grease from the pressure cooker liner. Add the garlic and saute until it starts to turn brown. Add the celery and mushrooms and cook until they start to soften. Add the wine (or water) and cook until the most of the liquid has evaporated, scraping the browned bits from the bottom of the pan. Season with salt and pepper.

    Add the chicken breast, chicken stock, and parsley. Cover, seal, and cook on High Pressure for 25 minutes. When the timer is up, allow the pressure to release naturally.

    Uncover the pot and add the cream cheese and the heavy cream. Stir until the cream cheese has all melted. Taste and adjust seasoning as needed, then stir in the crumbled bacon. Serve hot.

    Makes 6 servings

  • Thai Red Chicken Curry

    Thai Red Chicken Curry

    Thai food is one of those things that I THOUGHT that I dislike, until friends started dragging me to Thai restaurants with them.  This was before I figured out that I don’t hate coconut milk when it’s in curry form, but Thai food eventually grew on me.  Now that I’m back on a diet and watching my carb intake, one of my go-to entrees is this Thai Red Chicken Curry.  It’s not insanely high in fat or carbs, so you can probably fit it into most meal plans.

    After posting a picture of my weekly meal prep, I got a lot of requests for the recipe for the Thai Red Chicken Curry.  So, happy to oblige!  Though, since I wasn’t expecting to post this, there are no pictures of the step-by-step process.

    This recipe is actually pretty flexible.  You can increase or reduce ingredients to suit your tastes without much of a fuss.  If you want to add vegetables to it, I recommend cooking them separately and then adding them at the end.  In previous experiences, the addition of vegetables made my sauce too watery.

    If carbs are not your enemy, then feel free to serve this with a side of white rice.  Yum!

    Thai Red Chicken Curry

    Ingredients

    • 1 3/4 lb boneless skinless chicken (I used breast, but you can also use thighs), cubed
    • 1 tbsp oil
    • 2 cloves garlic
    • 2 tbsp minced ginger (add more or less to taste)
    • 2 tbsp red curry paste (I used this one)
    • 1 can full-fat coconut milk
    • 4 oz onion, chopped
    • 1/2 cup fresh basil, chopped
    • 1/2 tbsp fish sauce (optional)
    • salt and pepper to taste

    Directions

    Season chicken with salt and pepper and set aside.

    Head oil in a medium to large skillet over medium-high heat.  Add the onions and saute for about 5 minutes, until they start to turn translucent.  Add the garlic and ginger and cook for an additional minute or until fragrant.  Add the red curry paste.

    Add the chicken pieces, stirring to coat all sides with the seasoning mixture in the pan.  Add the coconut milk, stirring until the seasoning has dissolved in the liquid.  Season with salt and pepper.  Bring to a simmer.

    Reduce heat and cook, uncovered, for 20-30 minutes, or until the chicken has cooked through and the sauce is the desired thickness.  Taste and adjust salt and pepper as needed before serving.

    Makes 4 servings.

  • Pressure Cooker Bacon and Cheese Bites

    Pressure Cooker Bacon and Cheese Bites

    Skip to Recipe
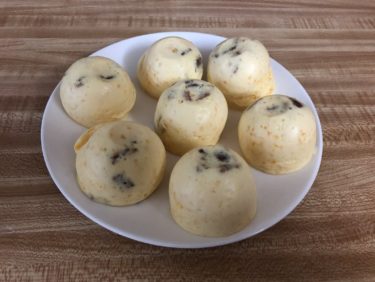
    I know, I know…there are a million and one recipes out there for egg bites.  This was why I hesitated to post a recipe for a while.  But, last week a coworker forgot her breakfast at home, so I offered her some of my egg bites.  She recently started a diet, and I had actually made some adjustments to the popular egg bite recipes to make them a little bit healthier.  She liked them so much that she asked for the recipe, so here it is!

    I use the silicone egg bite molds that are popular for egg bites nowadays.  I have tried in mason jars and cupcake molds to make the egg bites, but they do not come out the same. The texture is different.

    Crumble 1/2 strip of cooked bacon in each cavity.  Combine the rest of the ingredients in a blender, then blend until smooth.  Pour into the egg mold cavities.  Cover, then place on a trivet in your pressure cooker and cook on the Steam setting for 8 minutes.  After the time is up, allow the pressure to release naturally for 5 minutes before releasing the remaining pressure.

    Your egg bites might explode a little bit sometimes, but that’s okay.

    The egg bites can keep in the fridge for up to one week.  I hear that you can freeze them also, but I have not had any luck with that (they get all weird and watery for me).  I may try it again eventually, and will update this post accordingly if it works.

    Pressure Cooker Bacon and Cheese Egg Bites

    Ingredients

    • 4 eggs
    • 1/2 cup cottage cheese
    • 2 oz shredded cheese (I use cheddar)
    • 1/4 tsp salt
    • 3 1/2 strips thick-cut bacon, cooked
    • A dash of hot sauce (optional)
    • Equipment used: Silicone egg bite mold (such as this one)

    Directions

    Crumble 1/2 strip of bacon into the each cavity of the egg bite mold.  Set aside.  Add 1 cup of water to the liner of your electric pressure cooker.

    Combine the eggs, cottage cheese, shredded cheese, salt, and hot sauce (if using) in a blender.  Blend until smooth.

    Divide the mixture evenly between the 7 cavities.  Cover with foil, then place on a trivet in the liner of the pressure cooker.  Cover, seal, and cook on the Steam setting for 8 minutes.  When the timer is up, allow the pressure to release naturally for 5 minutes before removing the remaining pressure.

    Makes 7 egg bites

  • Buffalo Chicken Meatloaf

    Buffalo Chicken Meatloaf

    Skip to Recipe
    Meatloaf is not really a big thing in Hispanic households.  Growing up, my exposure to meatloaf was mainly through frozen dinners or from visiting American friends’ houses.  In fact, here I am at the ripe old age of 37 and had NEVER even made a meatloaf before.  But, because I’m me, I couldn’t settle for just any meatloaf.  It had to be buffalo chicken meatloaf.  This is a great recipe for when you’re trying to eat low-carb, because there is no flour or breadcrumbs in the meatloaf mixture.  And, you get all of the delicious flavors of buffalo wings without the guilt.

    I got the idea while I was following a low carb diet and came across a recipe for buffalo chicken meatballs.  I tweaked a few things on that recipe, but I still found it a little tedious to try to form that wet, sticky mixture into balls.  The most obvious solution to me was to make it as a meatloaf instead.  Less work, and less mess.  I can dig it.

    There are not a whole lot of ingredients, so this recipe is pretty straightforward.  Combine all of your ingredients in a bowl.  It mixes best for me when I use my hands (I wear gloves to keep my hands clean for this).  When everything is good and mixed, gently pat the mixture down into your meatloaf pan.  If you’re using a pan with a perforated bottom, make don’t press it down too hard or you might push the mixture down through the holes.

    After that, bake it until the internal temperature reaches 170 degrees.  That took about an hour and 10 minutes for me, but start checking the meatloaf after an hour.  You don’t want it to dry out.

    After the meatloaf is done, let it cool in the pan for about 15 minutes before you take it out.  Since there are no breadcrumbs in this meatloaf, it will crumble easily when you slice it if you’re not careful.

    I like to serve it drizzled with some additional buffalo sauce.  Add a steamed vegetable as a side, and you’ve got a healthy and delicious meal!

    You can use

    Buffalo Chicken Meatloaf

    Ingredients

    • 2-2 1/2 lbs ground chicken (or ground turkey)
    • 4 oz finely diced onion
    • 4oz crumbled blue cheese
    • 3/4 cup hot sauce or buffalo sauce (can be homemade or store-bought)
    • 1/2 tsp salt
    • 2 eggs
    • Recommended materials: meatloaf pan (I used this one)

    Directions

    Preheat oven to 350 degrees.

    In a large bowl, combine all of the ingredients.  Gently pat down into your meatloaf pan.  Bake until the internal temperature of the meatloaf reaches 165 degrees (about 60-70 minutes).

    Allow meatloaf to cool on a rack for at least 10 minutes before removing from pan.  Slice and serve drizzled with extra hot sauce, if desired.


  • Pressure Cooker Turkey Meatball and Spinach Soup

    Pressure Cooker Turkey Meatball and Spinach Soup

    Skip to Recipe
    After I learned how to make turkey stock using my Instant Pot, I was thrilled.  At the time, though, I had no idea what to do with my newfound stash of turkey stock.  I came across a turkey soup recipe that caught my eye.  I had been low-carbing it for a while, and it seemed easy enough to adjust to cut out some of those pesky carbs.  That’s how this turkey meatball and spinach soup came to be.

    Truth be told, I never did learn how to make anything else with my homemade turkey stock.  Anytime I get my hands on some, I wind up making more turkey meatball and spinach soup.  And, it’s super easy to make!  The hardest part is forming the meatballs.

    Mix your meatball ingredients together, either by hand or using a wooden spoon.  Once everything is combined, form your meatballs.  I used a cooker scooper to scoop the meat mixture and get them to be close to the same size.

    Brown the meatballs on both sides using butter or ghee in the liner of your electric pressure cooker.  You will have to do this in batches.  Once they are all brown, set them aside.  Sometimes, I saute a little bit of onions and garlic after this part, but this is entirely optional.  The soup still tastes good without them.

    Add about 1 cup of the turkey stock and stir it around to loosen the browned bits at the bottom of the liner.  Add the rest of the turkey stock, along with the meatballs.  Cook on Manual (High Pressure) for 10 minutes, then manually release the pressure.  Stir in the mushrooms and let them sit for about 5 minutes or until they’re cooked.  Your soup should still be plenty hot enough to cook them.  After they’re cooked, stir in the spinach until it’s wilted.

    Your turkey meatball and spinach soup is now ready to serve.

    This turkey meatball and spinach soup is great for so many reasons.  It is low in carbs, so it’s great for people watching their carb intake (or who just want something lighter after a Thanksgiving binge).  It freezes wonderfully, so you can make a big batch and save some for a rainy day.  And, it tastes almost too good to be good for you.  I call that a win!

    Pressure Cooker Turkey Meatball and Spinach Soup

    Adapted from recipe at Savory Lotus

    Ingredients

    For the meatballs

    • 2lbs ground turkey
    • 1/2 cup Parmesan cheese, grated
    • 2 eggs
    • 4 gloves garlic, crushed
    • 2 tsp Italian seasoning
    • 1 1/2 tsp salt
    • 1/2 tsp black pepper

    For the soup

    • 3 quarts turkey stock (you can also use chicken or vegetable stock)
    • 10 oz spinach leaves
    • 16oz sliced baby bella mushrooms
    • 2 tbsp butter or ghee
    • salt and pepper to taste
    • 1/2 cup diced onion (optional)
    • 2 cloves garlic, crushed (optional)

    Directions

    In a medium bowl, combine all of the meatball ingredients.  Form the mixture into balls, approximately 1in each.

    Preheat your pressure cooker on the Saute/Browning setting.  When hot, add 1tbsp of butter or ghee and brown the meatballs on both sides, working in batches and adding more butter/ghee as needed.  When the meatballs are browned, set them aside.

    Quickly saute the onions and garlic (if using) until fragrant, then add 1 cup of turkey stock.  Stir to loosen the browned bits stuck to the bottom of the liner.  Add the remaining turkey stuck.

    Return the meatballs to the pot. Cover, seal, and cook on Manual (High Pressure) for 10 minutes.  When the timer is up, manually release the pressure.

    Stir in the sliced mushrooms and let sit for about 5 minutes.  The soup should be hot enough to cook the mushrooms through.  Stir in the spinach until wilted.

    Makes 6-8 servings

  • Pressure Cooker Boneless BBQ Pork Ribs

    Pressure Cooker Boneless BBQ Pork Ribs

    Skip to Recipe
    When you’re a working adult, you sometimes don’t have time to prepare an elaborate meal.  Sure, I would love to have the time and energy to make a lasagna from scratch on a weeknight, but the reality is that it’s a miracle that I even pack tomorrow’s lunch before bed some days.  Let’s face it, there are just going to be some days where your need for a hot meal can be overridden if it means putting in more effort than just opening a few jars and dumping things in a pot.  That’s where these boneless BBQ pork ribs come in.

    Originally, I had picked up a pack of boneless pork ribs at the grocery store to make some bacon wrapped ribs.  Well, when the weekend rolled around, I decided that I really didn’t feel like babysitting a smoker (and then cleaning it afterward).  So, I wound up cooking them in the pressure cooker instead.  As it turns out, they were pretty tasty and flavorful when cooked this way, and came together with hardly any effort.

    Arrange your dry-rubbed ribs in the liner of your pressure cooker.  Add some apple cider vinegar and your favorite barbecue sauce, then seal and cook for 15-20 minutes.  When the timer goes off, let the pressure release naturally for about 10 minutes before you release any remaining pressure.

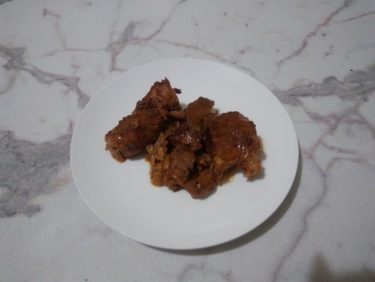
    When they are done, your ribs will have released a lot of liquid.  Just set the pot to Saute (Browning) and let the liquid reduce for a few minutes.  For me, it usually takes about 10 minutes to get the right consistency.

    Check out that thick, bubbling goodness!

    And there you have it.  Easy, right?  Just serve with your favorite side, and you’re good to go!

    Pressure Cooker Boneless BBQ Pork Ribs

    Ingredients

    • 1 1/2 lbs boneless pork ribs (I get the ones labeled “country style”)
    • 2 tbsp of your favorite BBQ rub (more or less to taste)
    • 1/4 cup apple cider vinegar
    • 1/2 cup of your favorite BBQ sauce

    Directions

    Sprinkle seasoning over pork ribs, turning to cover all sides.  Place in a single layer in the liner of your pressure cooker.  Add the vinegar and BBQ sauce on top.

    Cover and seal the pressure cooker.  Cook on Manual (High Pressure) for 15-20 minutes (depending on the thickness of the ribs).  Allow the pressure to release naturally for about 10 minutes before releasing the remaining pressure.  Uncover and set the pressure cooker to the Saute setting.  Let the ribs simmer until the sauce has reduced.

    Makes about 4 servings

    Note: To make this low-carb, use low-carb BBQ rub and low-card BBQ sauce

  • Cauliflower Pizza Crust

    Cauliflower Pizza Crust

    So, I’ve been on a diet for a few weeks, and it’s been rough at times.  We all know how much I love good food, so there’s been one heck of an adjustment period.  Still, it’s been interesting to try and find ways to enjoy a food that you crave but can no longer have, such as pizza.  I mean, when you’re off carbs, it really limits your options.  That’s where cauliflower pizza crust comes in.

    I came up with this recipe by taking what I liked about a handful of cauliflower crust recipes that I found online, and tweaking them so that they fit into my macro allotment on the current plan that I am on.  It’s still a work in progress, but I am sharing because a few people have asked for the recipe.  So, here it is!  I will try to update this post at a later date with pictures of the actual process.  I just wasn’t expecting requests for this recipe.

    Cauliflower Pizza Crust

    Ingredients

    • 3 cups frozen riced cauliflower
    • 1/4 cup shredded mozzarella cheese
    • 1/4 cup grated parmesan cheese
    • 1/2 tsp Italian seasoning
    • 1/2 tsp garlic powder
    • 1 egg
    • salt and pepper to taste

    Directions

    Cook the cauliflower rice according to the package directions (I used the microwave).  Let it cool for about 10 minutes.

    Preheat your oven to 400 degrees.  Line a baking sheet with parchment paper.

    Wrap your cauliflower in cheesecloth or a kitchen towel, then squeeze all of the liquid out until you are left with a slightly firm ball of cauliflower mush.  Transfer to a bowl and mix in your cheeses, egg, and seasonings.  Your mixture should resemble a loose dough.

    Spread the cauliflower mixture on your baking sheet, making a circular shape if you’d like.  Bake in the pre-heated oven for 25-30 minutes, or until the crust is slightly golden (you might need to flip it over to brown both sides).  Remove from oven, add desired toppings, then bake for another 7-10 minutes.

    Note: The macros for the entire crust are 13.4g protein, 7.9g fat, and 4.1g net carbs.  I usually eat half and save the other half for the next day.

  • Avocado Pickles

    Avocado Pickles

    Skip to Recipe
    Growing up in a Hispanic household, avocado is a mealtime staple.  My mother would often give us sliced avocado with lime and salt to go with our meals.  Now that I am an adult, eating avocado without an acidic component never tastes quite right to me.  The rich fattiness of this fruit just begs for that refreshing zing.  That is why, when someone introduced me to avocado pickles, I was sold.

    These are best made with Hass avocados.  I have tried them with other kinds, but the watery Florida avocados lacked the creamy fattiness required to cut through the acidic brine.  Make sure that you’re also using slightly firm avocados to make your avocado pickles, or they might break apart in the brine.

    To make the brine, heat all of your ingredients (except the avocado) in a small saucepan.  If you want your pickles to have more of a kick, you can open your chiles up to let out the seeds.  Otherwise, leave them whole.  Once it starts to simmer and all of the salt and sugar (if using) has dissolved, remove it from the heat and let it cool down.

    While your brine is heating, prep your avocados.  I cut these in slices, but sometimes I also do them in chunks.  Put the sliced or chopped avocado in a glass jar of your choice.  I find that two average-sized Hass avocados fit in one 16oz mason jar.

    After the brine has cooled enough, gently pour it over the avocados in the jars.  Fill it just enough so that the liquid reaches almost to the top of the jar when you put the lid on, but doesn’t spill out.  Remember that if your avocados are poking up out of the jar a little, they will push the brine level up when you press the lid down.  So, plan accordingly to avoid a mess.

    You’ll want to refrigerate the avocado pickles for at least an hour, but they will keep for up to a month in the refrigerator.  I find that I like them best after they sit for a few days.

    Avocado Pickles

    Ingredients

    • 4 firm Hass avocados, sliced or chopped
    • 1 cup apple cider vinegar
    • 1 cup water
    • 2 tbsp pickling salt (or kosher salt)
    • 2 tsp sugar (you can omit or substitute with your sweetener of choice)
    • 2 tbsp coriander seeds
    • 1 1/2 tsp whole black peppercorns
    • 2 dried chile de arbols

    Directions

    In a small saucepan, combine all of the ingredients except for the avocado.  Bring to a simmer, allowing the salt and sugar to dissolve, then remove from heat and allow to cool.

    Place the avocado pieces in 2 16oz mason jars (or 1 32oz jar), then pour the cooled brine over the avocado.  Seal, then refrigerate for one hour or until ready to consume.

  • Pressure Cooker Puerco Pibil

    Pressure Cooker Puerco Pibil

    Skip to Recipe
    Puerco Pibil, also known as Cochinita Pibil, is Yucatan-style barbecued pork.  The name comes from the cooking method of the pork.  Traditionally, it’s cooked in a Mayan oven called a pib, a hole in the ground lined with hot stones.  My first exposure to puerco pibil was watching a Robert Rodriguez movie (you might already know which one I’m talking about), in which one of the characters raves about the dish.  Mr. Rodriguez even shares a recipe for it in the DVD commentary.  Naturally, not everyone has access to a hole in the ground to roast a pork, so the recipe typically roasted the pork in the oven.  My first attempt left me with tasty pork that was kind of dry.  My subsequent attempts swapped the oven for my slow cooker, which made a much more tender pork.  However, I got rid of my slow cooker once I bought my Instant Pot, and I was just too scared to try to reproduce this dish in there.  Until now.

    What was usually several hours of waiting for my puerco pibil took about 90 minutes in the pressure cooker, and that includes the time to come to pressure and then to release the pressure.  Best of all, it comes together very easily, despite the fairly long list of ingredients.  If you wanted to, you could also swap out the spices for premade Achiote paste, but I haven’t found that in my area.

    You’ll want to marinate your pork for at least 4 hours, but preferably overnight.  Once you’re ready to cook, line your pressure cooker with about 3 layers of banana leaves.   Stagger them as much as possible, because you want to keep as much water out.  Add your chunks of pork, then fold the leaves over so that they cover the pork.  Pour 1 cup of water into the pot, then cover and seal.

    Tender, juicy, and delicious puerco/cochinita pibil!  You can serve it with pickled onions and tortillas, or sometimes I just eat it with rice.

    If you can’t find sour oranges, you can mix equal parts orange juice and vinegar to use in this recipe.  I have also used lemon juice in this and it’s still very tasty.

    Pressure Cooker Cochinita Pibil

    Ingredients

    • 2 1/2 lbs boneless pork butt (Boston Butt roast)
    • 2 1/2 tbsp annatto seeds
    • 1 tsp cumin seeds
    • 1/2 tbsp black peppercorns
    • 4-5 allspice berries
    • 3 whole cloves
    • 1 habanero pepper (can use jalapeno for less spicy)
    • 1 tbsp salt
    • 4 cloves garlic
    • 1/2 cup Seville orange juice (naranja agria/bitter orange)
    • 3 limes, juiced
    • 1 tbsp tequila
    • 3-4 banana leaves

    Directions

    Cut the pork into 2in chunks.  Place in a large ziploc bag or shallow baking dish.

    Using a spice or coffee grinder, grind the annatto seeds, cumin seeds, peppercorns, allspice, and cloves to a powder.  Add this, along with the remaining ingredients (minus the banana leaves) to a blender and blend until combined.  Pour over the pork, then allow to marinate at least 4 hours, but preferably overnight.

    When the meat is finished marinating, line the pressure cooker liner with 3-4 banana leaves.  They should be along enough to hang over the sides of the pot.  Place the pork with the marinade in the center of the leaves, then fold them over until the pork is completely covered.  Pour 1 cup of water into the pressure cooker.

    Cover and seal the pressure cooker, then cook on Manual (High Pressure) for 60 minutes.  Afterwards, allow the pressure to release naturally for 15 minutes, then release any remaining pressure.  Uncover, remove the pork, and serve with pan juices.

    *NOTE: you can substitute the spices for pre-made Achiote paste, if you prefer.
    To make this lower in carbs, you can replace the Seville orange juice with lemon juice