Category: Cheesecakes

  • Pressure Cooker Oreo Cheesecake

    Pressure Cooker Oreo Cheesecake

    Skip to Recipe

    Several of my loved ones are obsessed with Oreo. So, when I had a fight with one of them recently, I knew that whatever I made as a peace offering should have Oreos in it. I looked at a few recipes for Oreo cheesecakes online, but none looked like they would make a cheesecake with the exact texture that I like. So, I decided to make my own. I wound up getting a bunch of requests for my Oreo cheesecake recipe, so I decided to record it for posterity.

    I get a lot of questions from people about why I use such a small amount of butter in my Oreo crusts. Oreo filling is basically sweetened shortening. When it gets hot, it will melt. This creates additional melted fat to make up for the rest of the butter that would typically go in a graham cracker crust. If you’re removing the filling or using another type of non-filled cookie for your crust, definitely add an extra 2 tbsp of melted butter. Otherwise, the crust for your Oreo cheesecake might end up too oily. Take it from someone who’s had to wipe grease off of the bottom of her cheesecakes.

    Pressure Cooker Oreo Cheesecake

    Ingredients

    For the crust:

    • 1 cup crushed Oreo crumbs (don’t remove the cream filling)
    • 1 tbsp butter, melted

    For the cheesecake:

    • 16 oz cream cheese, softened
    • 1/2 cup granulated sugar
    • 2 eggs, room temperature
    • 1/3 sup sour cream
    • 1/2 tsp vanilla extract
    • 1/2 cup crushed Oreo crumbs (or chopped Oreo pieces, if you prefer chunks in your cheesecake)

    To decorate (optional):

    • Stabilized whipped cream (recipe here)
    • 4 Oreo cookies, cut in half

    Directions

    Make the crust

    Combine the melted butter and the Oreo crumbs in a small bowl. Press onto the bottom of a 7″ cheesecake pan. Grease the sides of the pan, then set aside.

    *Note: If desired, bake the crust in a pre-heated oven at 350 degrees for 8 minutes.

    Make the cheesecake

    Cream the cream cheese and sugar until smooth (best to use a stand mixer for this). Add the eggs, one at a time, beating well with each addition.

    Mix in the sour cream and vanilla, mixing until just combined. Do not overmix!

    Gently fold in the Oreo crumbs, then pour into your prepared cheesecake pan. Set aside.

    Pour 1 cup of water into the liner of your electric pressure cooker, then set to the Saute/Browning setting. When the water begins to simmer, place the cheesecake in pot on a trivet or silicone sling.

    Cook the Oreo cheesecake on High Pressure for 20 minutes. When the timer stops, allow for a 15-minute Natural Release before releasing any remaining pressure.

    Remove the cheesecake from the pot. Blot any condensation built up on top of the cheesecake with paper towel. Allow to cool completely, then cover and refrigerate for at least 4 hours (preferably overnight). Remove the Oreo cheesecake from the pan and decorate with Oreo pieces and whipped cream, if desired.

  • Pressure Cooker Guava Cheesecake

    Pressure Cooker Guava Cheesecake

    Skip to Recipe

    For Latinos, guava and cream cheese go together like milk and cookies. One of my mother’s favorite after-dinner treats was eating canned guava shells over a slice of cream cheese. We also grew up eating guava paste over sliced cheese as a snack. So, I’m not sure why it never occurred to me until now to make guava cheesecake.

    I used crushed Maria cookies for the crust, but you can also use graham crackers if you are unable to find Maria cookies in your area.

    Melt the guava paste in the microwave with a little bit of rum (or water). I like to do this right before I start making the cheesecake batter. This way, it has a few minutes to cool so that you’re not adding bubbling hot guava paste to your batter.

    As usual, I prefer to make my cheesecake batter in the blender. I have heard people say that this adds too many air bubbles and ruins the texture. That has never been my experience. Just be careful not to overmix.

    After the batter is done, it’s 20 minutes of High Pressure and then 15 minutes of Natural Release to have a delicious guava cheesecake on your hands!

    The addition of the guava gives the cheesecake a nice mauve color. My taste testers agreed that the guava flavor was noticeable in each bite. I call that a win!

    Like with most cheesecakes, it is best to make the guava cheesecake at least one day before serving for best flavor.

    Pressure Cooker Guava Cheesecake

    Ingredients

    For the Crust:

    • 1 cup crushed Maria cookies (or graham cracker crumbs)
    • 3 tbsp butter, melted
    • 1 tbsp sugar

    For the Cheesecake:

    • 1lb of cream cheese, softened
    • 2 eggs, room temperature
    • 2 tbsp sugar
    • 1/4 cup sour cream
    • 7oz guava paste
    • 1 tablespoon rum (or water)
    • 1/2 tsp vanilla extract

    Directions

    Mix the cookie crumbs, butter, and sugar in a small bowl until all of the crumbs are moistened. Press onto the bottom of a greased 7in springform pan. Set aside, or pre-bake the crust if desired.

    In a microwave-safe bowl, heat the guava paste and the rum in the microwave in 20-second intervals on High until the paste has melted and resembles jam. Set aside.

    Combine the remaining ingredients in a blender and blend on until just combined. Add the melted guava paste and blend until no streaks of guava remain. Be careful not to overmix. Pour the mixture into the prepared springform pan.

    Pour 1 cup of water in the liner of your electric pressure cooker. Place the springform pan on a trivet in the pressure cooker. Cover, seal, and cook on High Pressure for 20 minutes. When the cooking time is done, allow the pressure to release naturally for an additional 15 minutes before you release any remaining pressure.

    Remove the cheesecake from the pressure cooker and use paper towel to blot any excess moisture that collected on the cheesecake. Allow to cool completely on a wire rack, then refrigerate for at least 4 hours before unmolding and serving.

    Makes 8 to 12 servings.

  • Pressure Cooker Twix Cheesecake

    Pressure Cooker Twix Cheesecake

    Skip to Recipe

    Right after Halloween, a good friend of mine gave me a bunch of her leftover Halloween candy. She had a condition, though. I was only allowed to take the candy if I agreed to use it for baking, NOT if I was just going to eat it or fill my candy jar at work. When I was throwing around ideas of what to make, her eyes lit up at the thought of a Twix Cheesecake.

    Challenge accepted.

    I used my Snickers Cheesecake as the blueprint for this cheesecake, and just made a few adjustments to make it more Twix-like. There are Twix pieces in the cheesecake batter, so you enjoy the goodness of Twix in almost every bite.

    I used an Oreo crust for mine, but using a shortbread crust would make it even more reminiscent of Twix. There is a layer of caramel sandwiched between the cheesecake and the crust, and it’s topped with a satiny chocolate ganache.

    Pressure Cooker Twix Cheesecake

    Ingredients

    • 1 cup crushed Oreo cookie crumbs (can substitute with shortbread crumbs)
    • 1 tbsp butter (increase to 2 if using shortbread crumbs)
    • 16oz cream cheese, room temperature
    • 1/2 cup sugar
    • 2 large eggs, room temperature
    • 1/4 cup sour cream
    • 1 cup chopped Twix pieces (I used about 12 Twix minis)
    • 1/2 tsp vanilla extract
    • 1/2 cup caramel sauce (I used homemade)
    • 2 1/2 oz chopped semisweet chocolate
    • 1/4 cup heavy cream
    • Additional Twix for garnish, if desired

    Directions

    In a bowl, combine melted butter and cookie crumbs until moistened through.  Press cookie crumbs firmly on the bottom of a greased 7in cheesecake pan.  If you’d like, bake at 350° for 6-7 minutes before preparing the batter.  Pour the caramel sauce over the crust and set aside.

    In the bowl of a stand mixer, beat the cream cheese and sugar until smooth.  Add the eggs, one at a time, beating well with each addition.  Add the sour cream and vanilla extract, and beat until just combined.  Fold in the chopped Twix pieces.

    Add 1 cup of water to the liner of your electric pressure cooker and set to Saute/Brown setting. Let the water come to a simmer.

    Pour batter into prepared cheesecake pan, then set the pan in your pressure cooker on a trivet over the simmering water (add a little bit more water if too much has evaporated).  Hit cancel, then seal the pressure cooker and cook on Manual (High pressure) for 20-25 minutes.  Allow the pressure to release naturally, which should take 10-15 minutes.  Remove the cheesecake from the pressure cooker and allow to cool completely on a wire rack.   Refrigerate at least 4 hours, but preferably overnight, before removing from the pan.

    Melt the chopped semisweet chocolate and the heavy cream together in the microwave in 15-second bursts, stirring after each burst until most of the chocolate has melted. Continue stirring until all of the chocolate has melted and the mixture is smooth. Pour over the cooled Twix cheesecake. Allow the ganache to set before serving, then garnish with additional Twix pieces.

    Makes 1 7-inch cheesecake

  • Pressure Cooker White Chocolate Raspberry Cheesecake

    Pressure Cooker White Chocolate Raspberry Cheesecake

    Skip to Recipe
    After last week’s Halloween shenanigans, I had some leftover raspberry sauce.  Now, I hate letting stuff go to waste, even if it’s just a tiny bit of raspberry sauce.  I considered pouring it over ice cream, but I had all of that white chocolate left over from my failed attempts at white chocolate panna cotta that was firm enough to hold a shape.  It seemed like making white chocolate raspberry cheesecake was the inevitable conclusion.

    This was actually my first time making white chocolate raspberry cheesecake in my Instant Pot, but I have made enough cheesecakes in the past that I was pretty sure that I could figure out the recipe adaptation.  As it turns out, I was right!  And, since I got so many requests for the recipe, here it is!

    Start by preparing your cheesecake pan.  Combine the Oreo crumbs with the melted butter and press onto the bottom of your greased cheesecake pan.  Pop it in the freezer while you make the cheesecake batter.  Melt the white chocolate with the half and half (I used the microwave, but you can also use a double boiler if you’re more comfortable with that method), then set it aside.  Combine the cream cheese, eggs, sugar, and vanilla extract in a blender.  Blend until smooth, then add the white chocolate mixture and blend until just combined.
    Don’t overmix your cheesecake batter.  You’ll introduce too many air bubbles, which can lead to cracked cheesecakes.

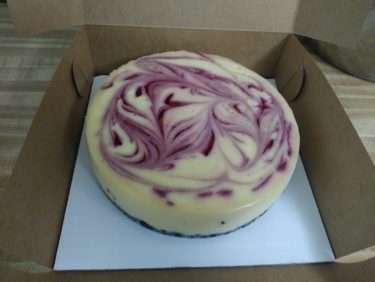
    When your cheesecake batter is done, pour half of it into your prepared cheesecake pan.  Drizzle some raspberry sauce over it, then pour in the rest of the cheesecake batter and drizzle more raspberry sauce.  Use a thin spatula or dull knife to gently marble the sauce into the cheesecake.  Place the cheesecake on a trivet and place over simmering water in your pressure cooker.  Cook on Manual (High Pressure) for 26 minutes, then Natural Release.  Take your cheesecake out and blot any moisture that collected on the surface of the cheesecake.  Let it cool on the trivet completely, then cover it with foil and refrigerate for at least 4 hours before serving.

    I strongly recommend letting your cheesecake sit at least overnight.  Like custards, cheesecakes benefit from giving them some time to “mature” to get the best flavor.  I normally make mine a day or two in advance.

    There you have it!  You should now have a cheesecake that is delicious and beautiful enough to impress at any dinner party or potluck.  Or, just make it for yourself.  I won’t judge.

    The recipe for the raspberry sauce makes more sauce than you will actually need for one cheesecake.  It’s great on ice cream and panna cotta.  I bet it would also be good on a slice of pound cake.  Or, if your cheesecake disappears too quickly and you need to make another one.

    Pressure Cooker White Chocolate Raspberry Cheesecake

    Ingredients

    For the Cheesecake

    • 1 cup Oreo crumbs
    • 1 tbsp butter, melted
    • 16oz cream cheese, softened
    • 2 large eggs, room temperature
    • 1/4 cup sugar
    • 8 oz white chocolate, chopped (See note at the end of this post)
    • 1/4 cup half and half
    • 1/2 tsp vanilla extract
    • 3-4 tbsp raspberry sauce
    • Required equipment: a 7-inch cheesecake pan (the one I am using is this one)

    For the raspberry sauce

    • 5oz frozen raspberries
    • 1/4 cup water
    • 1 tbsp granulated sugar
    • 1 tsp cornstarch

    Directions

    Make the raspberry sauce

    In a small saucepan, combine your raspberries, water, corn starch, and sugar.  Bring to a boil.

    Continue to boil for about 5 minutes or until thickened, stirring constantly.  Remove from heat and strain sauce through a mesh strainer to remove the seeds.

    Make the cheesecake

    Grease a 7in round cheesecake pan. Mix the Oreo crumbs and melted butter until the crumbs are moistened all the way through. Press the mixture onto the bottom of your prepared cheesecake pan, then freeze until ready to use.

    Place the white chocolate and half-and-half in a small, heat-proof bowl.  Melt the chocolate in the microwave by microwaving in 15 second bursts, stirring after each burst, until the chocolate is melted and smooth.  Set aside to cool slightly. (NOTE: You can also melt the chocolate over a double boiler, if you prefer)

    Place the cream cheese, eggs, sugar, and vanilla extract in a blender or food processor.  Blend until smooth, but do not overmix.  Add the white chocolate mixture and continue to blend until just combined.

    Pour half of the cheesecake batter into your prepared cheesecake pan.  Drizzle with 1 1/2 to 2tbsp of raspberry sauce, then pour the remaining cheesecake batter over it and drizzle the remaining raspberry sauce.  Using a small spatula or dull knife, gently swirl the raspberry sauce through the cheesecake batter.

    Pour 1 cup of water in the liner of your electric pressure cooker and set it to the Saute/Browning setting.  When the water starts to simmer, place the cheesecake on a trivet and lower it into the pressure cooker.  Turn it off, cover and seal, then cook the cheesecake on Manual (High Pressure) for 26 minutes.  When the time is up, allow the pressure to release naturally for an additional 15 minutes.  Remove cheesecake and blot the surface with paper towel to remove moisture buildup.  Allow to cool completely, then cover and refrigerate for at least 4 hours before removing from pan and serving.

    Makes about 8 servings

    NOTE: Make sure that you use actual white chocolate for this recipe.  Most of the commercial brand chips are no longer made out of actual white chocolate, and will affect the taste of your cheesecake.  The package should say “White chocolate” on it, or it is not real chocolate.

  • Pressure Cooker Kahlua Dulce de Leche Cheesecake

    Pressure Cooker Kahlua Dulce de Leche Cheesecake

    Skip to Recipe
    When I learned how to make dulce de leche in my Instant Pot, the floodgates were wide open for a time.  Any time that I caught a sale on condensed milk, some of it wound up becoming dulce de leche.  This, of course, meant that I needed to find a use for all of it.  I have never been the kind that can just eat it with a spoon.  I experimented all sorts of ways with it.  I even made some with coffee.  The coffee and dulce de leche combo is actually pretty delicious.  So, I combined them in cheesecake form and came up with this Kahlua and dulce de leche cheesecake.

    Prepare your cheesecake crust by combining Oreo crumbs and melted butter.  Press that into a prepared cheesecake pan, then stick it in the freezer.  Add 1 1/2 cups of water to the liner of your pressure cooker and set to the Saute/Browning setting.

    Combine cream cheese, sugar, vanilla extract, and eggs in a blender or food processor.  Blend them until they are smooth, but do not overmix them.  Set aside 1/2 cup of the cheesecake mixture and fold in 1/2 cup of dulce de leche into it.  Add the Kahlua to the rest of the batch of cheesecake batter, then pour it into the cheesecake pan.  Plop the dulce de leche mixture in spoonfuls over the batter, then use a dull knife to gently swirl it through the batter.  Place the pan on a trivet (you can also add a foil sling) and lower it into the pressure cooker.  The water in the pressure cooker should be simmering by now, so turn off the pressure cooker.  Cover, seal, and set to cook on Manual (High Pressure) for 23 minutes.

    Once the time is up, allow the pressure to release naturally for 12 minutes before you release the remaining pressure.  Remove the cheesecake and let it cool completely, then cover and refrigerate it for at least 4 hours before serving.


    You can swap out the Kahlua with another liqueuer, if you like.  Or, with plain espresso if you don’t want the alcohol.  This cheesecake will still be delicious!

    Pressure Cooker Kahlua Dulce de Leche Cheesecake

    Ingredients

    • 1 cup crushed Oreo crumbs
    • 1 tbsp butter, melted
    • 16oz cream cheese, softened
    • 1/2 cup granulated sugar
    • 2 eggs, room temperature
    • 1/2 tsp vanilla extract
    • 1/4 cup Kahlua coffee liqueur
    • 1/2 cup dulce de leche (can be homemade or store-bought)

    Directions

    Grease a 7in round cheesecake pan. Mix the Oreo crumbs and melted butter until the crumbs are moistened all the way through. Press the mixture onto the bottom of your prepared cheesecake pan, then freeze until ready to use.

    In a blender or food processor, combine the cream cheese, sugar, eggs, and vanilla extract until smooth.  Do not overmix.

    Remove 1/2 cup of the cheesecake batter and mix it with the dulce de leche.  Add the Kahlua to the remaining mixture, then pour that into the prepared cheesecake pan.  Gently drop spoonfuls of the dulce de leche mixture over the mixture in the pan, then swirl gently with a knife or thin spatula.

    Add 1 1/2 cups of water to the liner of your electric pressure cooker, then set to the Saute/Browning setting. When the water comes to a simmer, set your cheesecake on a trivet and lower it into the pressure cooker. Cover, seal, and change the setting to cook on Manual (High Pressure) for 23 minutes. When the time is up, allow the pressure to release naturally for 12 minutes, then release any remaining pressure. Remove the cheesecake from the pressure cooker and allow to cool completely, then refrigerate for at least 4 hours

  • Pressure Cooker Peanut Butter Cheesecake

    Pressure Cooker Peanut Butter Cheesecake

    Skip to Recipe
    I hosted my first “Instant Pot Party” recently for a few friends that wanted some pointers on how to make the most out of their appliance.  One of my friends wanted to make a peanut butter cheesecake, and already had a recipe in mind.  Having made that same recipe before with some changes, I told her the changes that I recommended on the recipe.  Surprisingly, she trusted me enough to go along with them.  Not only was she pleased with the results, but she asked me to document the adjusted recipe so that she could have it handy.

    You can add chocolate chips to the peanut butter cheesecake if you want and it doesn’t affect the cook time.  I prefer smooth cheesecakes, so I typically leave them out unless I am bringing the cheesecake to a group event.  Cheesecakes always taste best after they sit in the fridge for at least a day, so be sure you plan on making this at least a day in advance.

    Prepare your crust, press it into your prepared cheesecake pan, and then pop it into the freezer while you prepare your cheesecake batter.  Start with the cream cheese and sugar.  Cream it with your electric mixer until fluffy, then mix in the eggs.  Next, add the peanut butter and vanilla extract, then mix until just combined.  Pour the batter into your cheesecake pan, place the pan on a trivet, then lower it into your pressure cooker filled with about 1 1/2 cups of simmering water.  Cook on Manual for 23 minutes, then natural release for 12 more minutes before releasing the rest of the pressure and removing the peanut butter cheesecake from the pressure cooker.

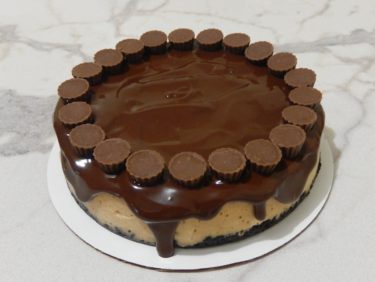
    When the cheesecake is completely cool, you’ll want to refrigerate it for several hours before removing it from the pan.  At this point, you can make the ganache.  I make it by heating my cream and chocolate in the microwave in 20-second bursts until the chocolate is almost completely melted, then let it melt the rest of the way while I stir.  If you prefer to make ganache the traditional way, just bring your cream to a boil on the stove, pour the boiling cream over your chopped chocolate in a heatproof bowl, then stir until all of the chocolate is melted and the mixture is creamy.  Let the ganache sit until it’s fairly thick, but still pourable.  This is what will get you those attractive drips when you pour it over the cheesecake.

    As a finishing touch, you can garnish with mini peanut butter cups.  You can also chop them up and sprinkle them on top of your peanut butter cheesecake.

    You can also double the cheesecake ingredients and oven-bake this in a 9in round springform pan if you’re feeding a crowd.  Bake in a hot water bath at 350 degrees for about an hour, or until the center is only slightly jiggly.

    Pressure Cooker Peanut Butter Cheesecake

    (Adapted from this recipe from Pressure Cooking Today)

    Ingredients

    • 1 cup crushed Oreo crumbs
    • 1 tbsp butter, melted
    • 16oz cream cheese, softened
    • 1/2 cup white sugar
    • 2 eggs, room temperature
    • 1/2 cup creamy peanut butter
    • 1/2 tsp vanilla extract
    • 3/4 cup semisweet chocolate chips (optional)
    • 3/4 cup bittersweet chocolate pieces
    • 1/2 cup heavy cream
    • peanut butter cups for garnish (optional)

    Directions

    Grease a 7in round cheesecake pan.  Mix the Oreo crumbs and melted butter until the crumbs are moistened all the way through.  Press the mixture onto the bottom of your prepared cheesecake pan, then freeze until ready to use.

    Cream the sugar and cream cheese using an electric mixer.  Add the eggs, one at a time, beating well with each addition.  Add the peanut butter and vanilla extract and continue mixing until just combined.  Do not overmix.  Fold in the semisweet chocolate chips, if using.  Pour mixture into your prepared baking pan.

    Add 1 1/2 cups of water to the liner of your electric pressure cooker, then set to the Saute/Browning setting.  When the water comes to a simmer, set your cheesecake on a trivet and lower it into the pressure cooker.  Cover, seal, and change the setting to cook on Manual (High Pressure) for 23 minutes.  When the time is up, allow the pressure to release naturally for 12 minutes, then release any remaining pressure.  Remove the cheesecake from the pressure cooker and allow to cool completely, then refrigerator at least 4 hours.

    Place heavy cream and bittersweet chocolate in a microwave-safe dish or measuring cup.  Microwave for 20-second intervals, stirring gently between intervals, until the chocolate is almost completely melted, then continue stirring until the chocolate melts completely.  Allow mixture to cool until thick before pouring onto your peanut butter cheesecake, then garnish with peanut butter cups if desired.

    Makes about 8 servings.

  • Pressure Cooker Snickers Cheesecake

    Pressure Cooker Snickers Cheesecake

    Skip to Recipe

    Oh, if there were any two words sweeter than “Snickers Cheesecake,” I can’t think of them right now.  All I can say that, after making this only once, it became a favorite.  How can you really go wrong with cheesecake with a chocolate crust and chunks of Snickers floating in there!?

    I have been having a lot of fun playing with my Instant Pot brand pressure cooker, in case you couldn’t tell.  And, I have to admit that it does make certain things way better and easier than the traditional way.  Converting a “conventional” recipe into a pressure cooker recipe isn’t always intuitive, but cheesecake is an exception.  Practically any cheesecake recipe can be turned into a pressure cooker cheesecake with the proper adjustments to scale and cook time.  True, making cheesecake in a pressure cooker means you have to make a smaller cheesecake, but it’s not a big deal for someone that lives by themselves or hosts small dinner parties.  And, when you have something as decadent as a SNICKERS cheesecake, it’s much safer not to keep large quantities of it lying around the house.

    Get your ingredients together.  It’s always best to start by having everything you need ready and available.

    Mix the Oreos and butter together and press into your greased cheesecake pan.  I like to pre-bake my crust for 6-7 minutes at 350° in the oven, but this is not necessary.

    To make the batter, cream the cream cheese and brown sugar until combined.  Add the eggs, one at a time, and then the sour cream and vanilla.  Once your batter comes together, fold in your chopped Snickers pieces and pour into your prepared cheesecake pan.

    The water in your pressure cooker should be simmering before you put the cheesecake in.  Then, cook for 20-25 minutes and then natural release for 10-15 minutes.  Let the cheesecake cool in the pan completely, then refrigerate at least several hours before you remove from your pan.

    So, it has a small crack, but we’ll fix that.

    Note that I made enough crust to go all the way up the side of the cheesecake.  This was a bad idea, as the condensation from the pot made the outer rim of the crust soggy.  The recipe is adjusted to account for crust on the bottom only.

    Melt some caramels on the stove with a little bit of milk or half and half, then pour over the cake.  Sprinkle with some salted peanuts.  Both of these are optional, but when has extra caramel EVER been a bad idea?

    Snickers Cheesecake

    I learned the hard way that caramel covered cheesecakes don’t travel well.  So, if you’re not eating it at home, use less liquid when melting your caramels, or don’t pour the sauce over the cheesecake until you are ready to serve.Check out all of that delicious Snickers goodness!  Cheesecake alone is great, but Snickers Cheesecake is like a glimpse of heaven in every bite.  Note that you can also make this in the oven by doubling the ingredients and baking in a 9in springform pan.  Set your pan in a water bath and bake at 350° for about an hour to an hour and a half.

    If you have a family member with a peanut allergy, try making this with Almond Snickers!

    Pressure Cooker Snickers Cheesecake

    (adapted from this recipe)

    Ingredients

    • 1 cup crushed Oreos
    • 1 1/2 tbsp butter, melted
    • 2 8oz packages cream cheese, softened
    • 1/2 cup brown sugar
    • 2 eggs, room temperature
    • 1/4 cup sour cream
    • 1/2 tsp vanilla extract
    • 1 cup chopped Snickers Baking Bites (about 1/2 of a 10oz bag)
    • 1/2 bag (7oz) caramels, unwrapped (optional)
    • 1-2 tbsp milk or half-and-half (optional)
    • Salted peanuts (optional)

    Directions

    In a bowl, combine melted butter and Oreo crumbs until moistened through.  Press Oreo crumbs firmly on the bottom of a greased 7in cheesecake pan.  If you’d like, bake at 350° for 6-7 minutes before preparing the batter.  Add 1 cup of water to the liner of your electric pressure cooker and set to Saute/Brown setting.

    In the bowl of a stand mixer, beat the cream cheese and brown sugar until smooth.  Add the eggs, one at a time, beating well with each addition.  Add the sour cream and vanilla extract, and beat until just combined.  Fold in the Snickers pieces.

    Pour batter into prepared cheesecake pan, then set the pan in your pressure cooker on a trivet over the simmering water (add a little bit more water if too much has evaporated).  Hit cancel, then seal the pressure cooker and cook on Manual (High pressure) for 20-25 minutes.  Allow the pressure to release naturally, which should take 10-15 minutes.  Remove the cheesecake from the pressure cooker and allow to cool completely on a wire rack.   Refrigerate at least 4 hours, but preferably overnight, before removing from the pan.

    To make the optional topping, melt the caramels with the milk in a small saucepan over low to medium-low heat, stirring frequently.  When the caramel is completely melted, pour over the cheesecake, then sprinkly with salted peanuts.

    Makes 1 7in cheesecake

  • Pressure Cooker Red Velvet Cheesecake

    Pressure Cooker Red Velvet Cheesecake

    This is a quickie post due to popular demand.  I made this red velvet cheesecake last week with mixed results, but Valentine’s Day is right upon us and I REALLY wanted to have this cheesecake as my go-to.  So I tried again today with a few adjustments and got it just right!  I posted a picture to an Instant Pot group on Social Media and got several requests for the recipe, so here it is!

    If you don’t know what an Instant Pot is, you’re missing out!  I won’t bore you with the details, mostly because everything there is to know is already available online and said more eloquently.  Google is your friend.  Suffice to say that making cheesecake in the Instant Pot (or any electric pressure cooker) is something that I only discovered a month or two ago, but it’s been GREAT!  If you’re new to making cheesecakes in an Instant Pot, I recommend checking out this link for reference.  It will point you in the right direction.
    [Skip to recipe]

    DSCN4432

    Start by preparing your pan.  Mix your cookie crumbs with melted butter and press onto the bottom of a well-greased cheesecake pan.  This is a 7in cheesecake pan with a removable bottom.  It fits perfectly into the Instant Pot!

    preparecheesecakebatter

    Then, make your cheesecake batter.  Use your preferred method.  I like using a blender or food processor because I am lazy, but some people do it with a stand mixer of by hand.  That is also fine.  Once you have your smooth batter, pour it into your prepared baking pan.  While you’re making your batter, prepare your Instant Pot by pouring about a cup of water into the pot and placing the trivet in there, then press the Saute button to allow the water to come to a simmer.  Fashion a sling out of foil and place it underneath your pan, then use it to lower your cheesecake into the Instant Pot.

    DSCN4446

    Once your pan is in the pot, turn the Instant Pot off, cover and seal it, and then set it to Manual for 20-25 minutes, depending on your preferred texture.  I set it to 23 minutes and then did a 15 minute Natural Release.

    DSCN4451

    Once time is up, you can open your Instant Pot and use the foil sling as handles to pull the red velvet cheesecake out.  Make sure you check for doneness.  If it’s still wobbly, you can put it back in and cook for a few more minutes.  Blot any condensation on the surface of the cheesecake with paper towels.  Afterwards, allow it to cool completely and then refrigerate until firm.

    Red velvet cheesecake

    There you have it!  Beautiful and delicious Instant Pot red velvet cheesecake!  Top with dollops of whipped cream for a dessert to impress, and it will look like you slaved all day over it!  Don’t worry, I won’t tell.

    Red velvet cheesecake

    Ingredients

    • 1 cup Oreo cookie crumbs
    • 1 tbsp butter, melted
    • 2 8oz packages cream cheese, room temperature
    • 2 eggs, room temperature
    • 1/2 cup sugar
    • 1/2 cup buttermilk, room temperature
    • 1 1/2 tbsp Dutch processed cocoa powder
    • 1/2 tsp vanilla extract
    • 1 tbsp red food coloring
    • 1/2 tsp white vinegar

    Directions

    Prepare the Instant Pot by adding 1 cup of water and a trivet or steaming rack to the inner pot.

    Combine the cookie crumbs and melted butter and press onto the bottom of a 7in springform or cheesecake pan.  If you’d like, you can pre-bake for 5 minutes at 350°, but this is not required.

    Set the Instant Pot to the Saute function.  In a food processor, combine the cream cheese, eggs, sugar, and cocoa powder.  Blend until almost combined.  Add the buttermilk, food coloring, and vanilla extract and mix until smooth.  Mix in the vinegar.

    Pour the cheesecake batter into the prepared baking pan.  When the water in the Instant Pot has started to simmer, place the cheesecake pan in the inner pot.  Press cancel.  Cover and seal the Instant Pot and set it to Manual for 20-25 minutes, then Natural Release for 15 minutes.  Open the lid carefully to avoid water dripping onto the cheesecake.  Remove cheesecake from pot and blot the cheesecake with paper towels to remove condensation.

    Allow to cool completely on a wire rack, then refrigerate the red velvet cheesecake at least 4 hours before serving.


  • Snickers Cheesecake Cake

    Snickers Cheesecake Cake

    Skip to Recipe
    I honestly don’t think that I need to say anything about this cake.  The name says it all.  But, I’ll say something anyway.  You take three things that make the world a better place (chocolate cake, cheesecake, and Snickers bars), put them together, and create magic.  This cake is one of a few of the “cheesecake cake” cakes that I have made, and I am sure that it won’t be the last.

    I found this recipe for Snickers cheesecake cake when I was looking for things to do with the bags of Halloween candy that I had amassed during the post-holiday clearance sales.  I have made it twice since then, and both times it got rave reviews.  I did have to tweak the recipe a bit, but I almost always do that anyway.

    makecheesecake

    Start by making your cheesecake.  Beat the cream cheese and sugar until it’s smooth.  Add the eggs, one at a time, and then the sour cream.  Add the vanilla extract, then fold in the chopped Snickers pieces.  Pour the batter into your prepared pan and bake until almost set.  Let cool completely on a wire rack, then chill.  You will want to do this at least a few hours in advance, but preferably a day before.  Cheesecake actually freezes very well, so you could even make it a week in advance and freeze it.  The more firm the cheesecake is, the easier it will be to handle when assembling your cake.

    assemblecakeBake two chocolate cake layers in pans of the same size as the cheesecake.  Let them cool completely, then place one layer on a cake tray or serving dish.  Spread a thin layer of chocolate ganache over it, and then place the cheesecake layer on top.  Spread some ganache over the cheesecake and then place the second cake layer over it.  Pour the remaining chocolate ganache over the cake, letting it run over the sides.


    snickersfrosting

    One of the things that sets this cake apart is the Snickers frosting.  It’s made by melting Snickers and butter together, and then adding this melted Snickers mixture into powdered sugar with a little bit of milk.  This is where I made the biggest change to the original recipe, I think.  Following the Snickers frosting recipe exactly gave me a cake that looked like this…

    DSCN1711

    The frosting was just a runny mess.  Refrigeration didn’t help much, and neither did the whipped cream that I tried to use to hide the unsightliness of the cake.  However, halving the Snickers frosting recipe, and reducing the amount of milk added, let to my second attempt looking like THIS…

    Snickers Cheesecake Cake

    What a difference, right?!!

    This Snickers cheesecake cake is definitely a lot of work to make, but the end-result is a piece of heaven in every bite.  I suggest trying to make it at least once.  You won’t be disappointed.

    Snickers Cheesecake Cake

    (adapted from recipe on IAmBaker.net)

    Ingredients

    For the Cake

    • 1 recipe for 2-layer chocolate cake (recommended recipe here)

    For the Cheesecake

    • 2 8oz packages of cream cheese, softened
    • 1/2 cup granulated sugar
    • 1/4 cup sour cream
    • 1/2 tsp vanilla extract
    • 2 cups chopped Snickers pieces (about 16 Fun Size bars)

    For the Ganache

    • 4.5oz bittersweet chocolate, chopped
    • 1/2 cup heavy cream
    • 1/2 tbsp coffee liqueur (optional)

    For the Snickers Frosting

    • 5 Fun Size Snickers bars
    • 1/2 stick butter
    • 1 1/2 cups powdered sugar
    • 1-2 tbsp milk

    Directions

    Make the cheesecake

    Pre-heat the oven to 350° F.  Grease your round baking pan.

    In the bowl of a stand mixer, beat the cream cheese and sugar until smooth.  Add the eggs, one at a time, beating well after each addition.  Stir in the vanilla extract and sour cream, then fold in the chopped Snickers.  Pour into the prepared baking pan.

    Bake for about 30 minutes, or until the center is set.  Allow to cool completely, then refrigerate or freeze until ready to use.

    Make the cake

    Bake your chocolate cake according to recipe indications, then allow to cool completely on a wire rack.

    Make the Ganache

    Place the chopped chocolate in a heat-proof bowl.  In a small saucepan, heat the cream until it is just about to boil.  Pour the heated cream over the chopped chocolate, then gently stir until all of the chocolate is melted and the mixture is smooth.  Stir in the coffee liqueur, if using.

    Make the Snickers Frosting

    Sift the powdered sugar into a medium bowl.  In small saucepan, melt the Snickers and butter over low heat, stirring often.  Pour the melted Snickers mixture over the powdered sugar, then stir until the sugar dissolves.  Add 1 tbsp of milk and stir.  If your frosting is still too thick, add the second tbsp of milk.

    Assembly

    Place one chocolate cake layer on a cake board or cake platter.  Spread a thin layer of chocolate ganache over the top of the cake, then remove the Snickers cheesecake from the milk and place it on top.  Spread another thin layer of chocolate ganache over the cheesecake layer, then quickly place the second chocolate cake layer on top (if you don’t work quickly, the ganache might harden before you can place the cake on top, and then the layers won’t stick together as well). Pour the remaining ganache over the top of the cake, allowing it to run over the sides, and then pour the Snickers frosting over that.  Garnish with whipped cream and additional Snickers pieces, if desired.  Refrigerate until ready to serve, preferably overnight.

  • Malted Chocolate Cheesecake

    Malted Chocolate Cheesecake

    Skip to Recipe
    After Halloween, I did something really stupid.  I went to the store and perused the racks with the clearance Halloween candy, and ended up leaving with enough candy to last me several months.  Normally, this isn’t really a problem.  I have a candy jar at my desk at work that was always in constant need of refills.  But, then they moved me to an isolated cubicle on a mostly empty floor, and the candy jar remained untouched.

    What’s a woman to do with a bunch of leftover Halloween candy?  Eating it would be a simple answer, but so pedestrian.  Besides, I easily had at least 20 bags of candy lying around.  So, I decided to start getting creative.  This malted milk ball cheesecake was inspired by the Whoppers candies that I sifted out of a giant variety bag of candy.  The cheesecake itself doesn’t contain any Whoppers, but it’s a light chocolate cheesecake flavored with malt. (more…)