Category: Breakfast Foods

  • Passion Fruit Sticky Buns

    Passion Fruit Sticky Buns

    Skip to Recipe

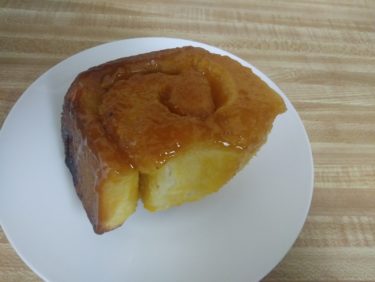
    Yes, you read that title correctly.  Passion Fruit STICKY BUNS.

    These buns are as unique as they are delicious.  They’re like a traditional sticky bun, but instead of a cinnamon-sugar filling they are filled with a tart passion fruit curd. Each bite is like a tropical paradise and a down-home comfort food met, fell in love, and had the most delicious baby.  The sweetness of the passion fruit glaze balances the tartness of the passion fruit curd, which also has a hint of passion fruit flavor.

    I used my bread machine to make the dough for the passion fruit sticky buns.  You can do it by hand if you feel more comfortable, or if you have no bread machine.  Doughs are not my forte, so I take shortcuts where I can.

    The first thing that you want to do is make the passion fruit curd filling. Combine all of the filling ingredients (except the butter) in a small saucepan. Use an immersion blender to blender until fully combined. If you do not have an immersion blender, you can use a regular blender and then pour the blended mixture into your saucepan.

    Cook the mixture on medium-low heat. Whisk it frequently. It will start to thicken. When it reaches a pudding-like consistency, remove it from the heat.

    Whisk the cubed butter into the passion fruit mixture. When all of the butter has been incorporated, pass the mixture through a fine-mesh strainer to remove any solid bits. Set it aside to cool. You can cover it with plastic wrap to keep it from forming a skin.

    Because we are using a bread machine to make the dough, you can make the caramel while the bread machine is running. If you are making the dough by hand, you will want to make the caramel beforehand.

    Combine all of the caramel ingredients in a heavy bottomed saucepan. Heat over medium to medium-high heat until the mixture is combined and comes to a boil. Boil for 5-10 minutes, then remove from the heat and pour directly into a 13″ x 9″ rectangular pan.

    To make the dough, add the dough ingredients to your bread machine according to the manufacturer’s directions. Set it to the Dough cycle and let it run.

    When the dough cycle completes, turn the dough out onto a lightly floured surface. Roll into a 22″ by 16″ rectangle. Spread the passion fruit curd over the top of the dough rectangle, then gently roll the dough up into a cylinder. Resist the urge to roll it tightly, or your filling will get pushed out.

    Cut the dough cylinder into 12 even pieces and arrange in your prepared pan. Cover with a clean dish towel and let them rise in a warm place until they double in size. This took 45 minutes to an hour for me.

    Once they are risen, bake them in a preheated oven at 350 degrees for 25-30 minutes, or until the tops have browned. When they are done, let them cool on a wire rack for about 5 minutes, then invert the pan onto a serving dish or tray. I use a foil-lined baking sheet for easy cleanup.

    These sticky buns are fantastic while still hot from the oven, but they also reheat well. Because of the curd filling, it’s safer to refrigerate any leftover buns. You can reheat them by microwaving them for 20 to 30 seconds and they still taste great!

    Passion Fruit Sticky Buns

    For the passion fruit filling:

    • 1 large egg
    • 2 egg yolks
    • 1/2 cup granulated sugar
    • 1/2 cup passion fruit puree, strained of seeds
    • a pinch of salt
    • 1-2 tbsp cornstarch
    • 1/4 cup (1/2 stick) butter, cut into cubes

    For the dough:

    • 1 cup warm milk (around 110 degrees F)
    • 2 eggs, room temp
    • 1/3 cup melted butter
    • 1/2 cup sugar
    • 1 tsp salt
    • 4 1/2 cups bread flour
    • 2 1/2 tsp bread machine yeast

    For the glaze:

    • 1/2 cup (1 stick) butter
    • 1 cup brown sugar
    • 1/4 cup heavy cream
    • 1/4 cup passion fruit juice
    • 2 tbsp corn syrup

    Directions

    Make the passion fruit curd:

    Combine all of the curd ingredients (except the butter) in a blender.  Blend until smooth.  Transfer mixture to a small saucepan and cook over medium to medium-low heat, whisking constantly, until the mixture thickens to a pudding like consistency.

    Remove from heat and whisk in the butter, one cube at a time, until fully incorporated.  Cover with plastic wrap and set aside to cool.  You can strain through a fine mesh strainer to remove any lumps, if you wish.

    (Curd can be made in advance.  Store in refrigerator until ready to use, then bring to room temperature.)

    Make the dough:

    Combine the dough ingredients in your bread machine according to the manufacturer’s specifications.  Set the bread machine to the Dough cycle and allow the cycle to complete.

    Make the glaze (make while dough is in progress):

    In a medium saucepan, combine all of the ingredients.  Cook over medium-high heat until butter has melted and mixture comes to a boil.  Boil for approximately 5 minutes, then pour the mixture evenly into a 13 x 9 inch baking pan.  Set aside to cool until ready to use.

    Assembly:

    Turn completed dough out onto a lightly floured surface. Roll into a 22″ by 16″ rectangle.

    Spread the passion fruit curd over the dough, then gently roll into a cylinder. Cut the cylinder into 12 equal pieces and arrange in your prepared baking pan. Cover and allow to rise in a warm place until doubled in size, about 45-minutes to an hour.

    Bake in a preheated oven at 350 degrees until tops are golden, 25-30 minutes. Cool on a wire rack for 5 minutes before inverting onto a heat-proof serving tray or dish. Serve warm.

  • Lemon Rolls

    Lemon Rolls

    Skip to Recipe

    Not long ago, I came across a great sale on lemons at my local grocery store.  I grabbed a whole bunch, fully intending to make a lemon bars with them.  That never happened, and the lemons were nearing the end of their life when I decided to try to make lemon rolls.

    I wasn’t sure what to expect when I decided to try these lemon rolls, but I had just binge watched The Great British Baking Show and was feeling gutsy.  Thankfully, they turned out great.  They are essentially a cinnamon roll with the cinnamon sugar filling replaced with lemon curd.  I added a little bit of lemon juice to the cream cheese icing to put on top for some extra zing.

    I have used stovetop and pressure cooker lemon curds to make these rolls.  I am including the stovetop lemon filling recipe, but feel free to use whatever lemon curd recipe is your favorite to make these.

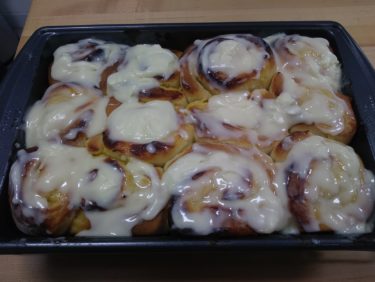
    Here, you can see the baked rolls pre-icing.  Check out all of that lemony goodness!

    The icing really rounds them out.  It provides just enough richness to offset the sweet-tart taste of the lemon filling.

    You can also “cold rise” these rolls overnight by preparing and rolling the dough the night before, then placing the pan with the filled rolls in the pan in the refrigerator overnight.  In the morning, bake in a non-preheated oven at 350 degrees and add a few minutes to the baking time.

    You don’t need a bread machine to make these rolls, but it makes life a lot easier.  This article shows how to convert bread machine recipes into hand-kneaded recipes.

    Lemon Rolls

    Adapted from this recipe

    Ingredients

    For the dough

    • 1 cup warm milk
    • 2 eggs, room temperature
    • 1/3 cup butter, melted
    • 1 tsp salt
    • 1/2 cup granulated sugar
    • 4 1/2 cups bread flour
    • 2 1/2 tsp bread machine yeast or instant yeast

    For the filling (you can replace this with about 1 1/2 cups of your favorite store-bought or homemade lemon curd)

    • 1/2 cup fresh squeezed lemon juice
    • 1/2 cup sugar
    • 3 eggs
    • 1 tbsp cornstarch
    • a pinch of salt
    • 1 tsp lemon zest (optional)
    • 1/4 cup (1/2 stick) butter

    For the icing:

    • 4oz cream cheese, softened
    • 4tbsp (1/2 stick) butter, softened
    • 1 cup confectioner’s sugar
    • 1/2 tsp vanilla extract
    • 1 tbsp lemon juice

    Directions

    Place ingredients in the pan of the bread machine in the order recommended by the manufacturer, then use the Dough cycle to prepare the dough.

    When the dough cycle is complete, turn it out onto a lightly floured surface.  Roll into a 16″ x 21″ rectangle

    Spread the lemon curd evenly over the surface of the dough, then gently roll into a log.  Cut the log into 12 even pieces and place in a grease 13″ x 9″ baking pan.  Cover and let rise in a warm place until doubled in size (about 45 minutes).  Meanwhile, preheat oven to 350 degrees F.

    Bake the risen rolls for 30 minutes or until golden brown.  Remove from oven and top with icing while still hot.

    To make the icing:

    Cream together the butter and cream cheese until smooth.  Add the confectioner’s sugar and beat until combined.  Add the vanilla and lemon juice.

    Note: If your icing is too thick, you can thin it out with a bit of milk until you have the desired consistency.

  • Pressure Cooker Bacon and Cheese Bites

    Pressure Cooker Bacon and Cheese Bites

    Skip to Recipe
    I know, I know…there are a million and one recipes out there for egg bites.  This was why I hesitated to post a recipe for a while.  But, last week a coworker forgot her breakfast at home, so I offered her some of my egg bites.  She recently started a diet, and I had actually made some adjustments to the popular egg bite recipes to make them a little bit healthier.  She liked them so much that she asked for the recipe, so here it is!

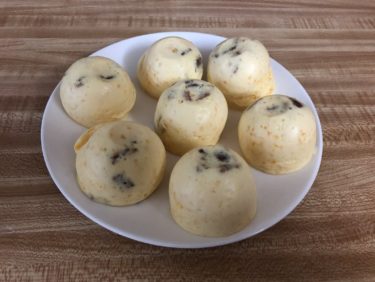
    I use the silicone egg bite molds that are popular for egg bites nowadays.  I have tried in mason jars and cupcake molds to make the egg bites, but they do not come out the same. The texture is different.

    Crumble 1/2 strip of cooked bacon in each cavity.  Combine the rest of the ingredients in a blender, then blend until smooth.  Pour into the egg mold cavities.  Cover, then place on a trivet in your pressure cooker and cook on the Steam setting for 8 minutes.  After the time is up, allow the pressure to release naturally for 5 minutes before releasing the remaining pressure.

    Your egg bites might explode a little bit sometimes, but that’s okay.

    The egg bites can keep in the fridge for up to one week.  I hear that you can freeze them also, but I have not had any luck with that (they get all weird and watery for me).  I may try it again eventually, and will update this post accordingly if it works.

    Pressure Cooker Bacon and Cheese Egg Bites

    Ingredients

    • 4 eggs
    • 1/2 cup cottage cheese
    • 2 oz shredded cheese (I use cheddar)
    • 1/4 tsp salt
    • 3 1/2 strips thick-cut bacon, cooked
    • A dash of hot sauce (optional)
    • Equipment used: Silicone egg bite mold (such as this one)

    Directions

    Crumble 1/2 strip of bacon into the each cavity of the egg bite mold.  Set aside.  Add 1 cup of water to the liner of your electric pressure cooker.

    Combine the eggs, cottage cheese, shredded cheese, salt, and hot sauce (if using) in a blender.  Blend until smooth.

    Divide the mixture evenly between the 7 cavities.  Cover with foil, then place on a trivet in the liner of the pressure cooker.  Cover, seal, and cook on the Steam setting for 8 minutes.  When the timer is up, allow the pressure to release naturally for 5 minutes before removing the remaining pressure.

    Makes 7 egg bites

  • Mango Creme Brulee Donuts

    Mango Creme Brulee Donuts

    Skip to Recipe
    I know that I am usually done with the mango recipe posts by now, but these mango creme brulee donuts just couldn’t wait until next year!

    Mango-filled donuts had been on my list of things to try during Mango Madness since last year.  I simply ran out of time (and mangoes) when I finally felt like I was ready to give it a shot.  Fast forward to this year, and the mangoes were coming so quickly that I really had no excuse NOT to try making donuts.  I’m a lazy baker, so of course I made my donuts dough in the bread machine.  Still, the combination of a fluffy fried dough, creamy mango filling, and crunchy burnt sugar crust made the mango creme brulee donuts an instant hit among my friends.

    I was so proud of how these mango creme brulee donuts turned out that I entered them in the mango dessert competition at the South Beach Mango Festival.  Sadly, I didn’t win the contest, but I did get props and handshakes from some of the event organizers and guest chefs.  I’d still call that a win!  And, because I have such a warm reception wherever I bring these donuts, I think that this recipe is worth passing along.

    The first part is pretty straightforward.  I made the dough in the bread machine, rolled it out on a floured surface when it was ready, then cut out my donut circles using a biscuit cutter.  Let them rise in a warm place until they double in size.  That will take about 45 minutes.

    Preheat the oil in your deep fryer (or your preferred stovetop frying vessel) until it reaches 375 degrees.  Fry 3 or 4 donuts at a time for 35-40 seconds per side.  They should be puffy and golden.  Drain them on a wire rack (I also blot them with paper towels afterwards).  After that, allow them to cool completely.

    After they have cooled, use a pastry bag fitted with a pastry filling tip to fill your donuts with the mango pastry cream.  Then, spoon a layer of sugar over each donut and use a kitchen torch to heat the sugar until it liquefies and melts.  I usually do about 3 layers of sugar so that the donuts have a thick layer of sugar crunch.

    Homemade donuts are best eaten the same day that they are made.  I have been told, however, that these donuts are still tasty and fluffy after a day in the refrigerator.  They rarely last that long, though.

    Mango Creme Brulee Donuts

    Ingredients

    • 1 1/4 cups warm milk
    • 2 1/4 tsp (1 package) bread machine yeast
    • 2 eggs
    • 1/2 cup butter, melted and cooled slightly
    • 1/4 cup granulated sugar, plus more for torching
    • 1 tsp salt
    • 4 1/4 cups bread flour
    • 1 recipe batch of Mango Pastry Cream
    • Oil for frying

    Directions

    Add all of the ingredients except for the pastry cream and the frying oil to the pan of your bread machine according to the manufacturer’s directions.  Set the machine to the Dough cycle and allow to run.

    When the Dough cycle is complete, turn the dough out onto a lightly floured surface.  Roll the dough out to about 1/2 inch thickness.  Cut circles out of the dough using a 2 2/4 inch biscuit cutter.  Transfer circles to a baking sheet, leaving space for the dough to rise.  Cover and allow to rise in a warm place until they are doubled in size, about 45 minutes.

    Just before the donuts have completed their second rise, preheat your frying oil in a deep fryer (or the stove-top frying vessel of your choice) to 375 degrees F.  Fry the donuts, 3 or 4 at a time (depending on the size of your frying vessel).  Allow to cool on a wire rack, then blot on paper towels to remove excess oil.

    Using a pastry bag fitted with a filling tip, fill the donuts with mango pastry cream.  Set the filled donuts on a wire rack over a baking sheet.  Top the donuts with sugar, then use a kitchen torch to melt the sugar until the donut is coated in an amber glaze.  Repeat 2 or 3 more times until the sugar coating is the desired thickness.  Allow the donuts to rest for at least 10 minutes before serving.

  • Pressure Cooker Apple Risotto

    Pressure Cooker Apple Risotto

    Skip to Recipe
    Okay, so I know that I posted a recipe inspired by an anime last month, but I have to do it again.  In fact, this apple risotto is yet another recipe that came from the same anime (Shokegeki no Soma), which the protagonist makes in a breakfast-themed cooking duel against his father.  Although he loses the match to his father’s ramen bowl, the risotto definitely left a bigger impression.  The protagonist does it the “long and painful” way, AKA on the stovetop, but I was determined to make this in my Instant Pot.  “Work smarter, not harder”, right!?

    I made this for my friends recently, and didn’t have very high hopes.  Sweet and savory is typically not my jam, but I figured that apple risotto with bacon was basically just a fancy take on pork chops and applesauce.  Boy, did this blow my expectations out of the water!  Such a rich, creamy treat doesn’t deserve to be reserved just for breakfast.  The sweet and savory tones in the components of the dish seem to strike a perfect balance, so it doesn’t taste like a dessert that is trying to be an entree or vice versa.  Best of all, making it in a pressure cooker makes it so much easier to make!

    Start by gathering all of your ingredients.  Melt the butter in the liner of the pressure cooker on the Saute/Browning setting, then saute your onions in the butter.  When they are softened, add the rice and stir until the rice is coated in the melted butter.  Cook the rice/onion mixture until the rice becomes fragrant and starts to change color, then add some white wine and continue to cook until the rice has absorbed the wine.  Next, add the apple juice and your broth/stock of choice, then season with salt and pepper.  Cover, seal, and cook on Manual (High Pressure) for 6-7 minutes.  While the risotto is pressure-cooking, prep your apples.  Peel, core, and dice them, then toss them with the juice of a lemon.  When the pressure cooker timer goes off, release the pressure manually, then stir in your apples.  Last, stir in your mascarpone cheese and continue to stir until all of the cheese has melted into the risotto.

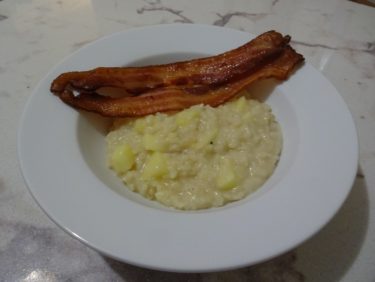
    Serve your risotto with some slices of crispy bacon, which adds a salty punch to counterpoint the sweet undertones of the apple in the risotto.  You can also sprinkle on some parmesan cheese, if you’d like.

    Risotto is usually best eaten fresh.  However, if you MUST reheat it, you can add a little bit of water before warming it in the microwave to keep it from getting too dry.

    Pressure Cooker Apple Risotto

    Ingredients

    • 2 Apples (I used Golden Delicious)
    • 1 lemon, juiced
    • 1 onion, diced
    • 2 cups Arborio rice
    • 3 cups of unfiltered apple juice
    • 3 cups chicken broth or stock
    • 4 tablespoons butter
    • 1/2 cup white wine
    • 4 oz mascarpone cheese
    • grated parmesan cheese (optional)
    • 1lb thick cut bacon
    • salt and pepper to taste

    Directions

    Cook the bacon according to your preferred cooking method (I use the oven).  Set aside.

    Set pressure cooker to Saute/Browning setting. When hot, add the butter. When the butter has melted, add the onions and saute until translucent, about 5 minutes. Add the rice, and stir to coat.  Continue cooking, stirring, until the rice starts to turn fragrant.

    Add the wine and continue to stir until the wine is absorbed.  Add the apple juice and chicken broth/stock, then season with salt and pepper to taste..  Cover, seal, and cook on High Pressure for 6-7 minutes.  Meanwhile, peel, core, and dice your apples.  Toss them in a bowl with the lemon juice, and set aside.

    When the pressure cooker timer goes off, release the pressure manually.  Stir in the apples, and then mascarpone cheese.  Continue to stir until the mascarpone cheese has fully melted and the apple risotto is creamy.  Serve immediately with a side of cooked bacon and topped with grated Parmesan cheese (if desired).

    Makes about 6 servings

  • Red Velvet Rolls

    Red Velvet Rolls

    Skip to recipe
    Valentine’s Day is just around the corner, and LOVE is in the air.  In my case, it’s love of delicious things.  For me, food has always been a very emotional experience.  As such, making food is one of the ways that I express myself.  Nothing makes me happier than to feed the people close to me and see them enjoy my cooking.  But, on the same note, the thought of someone that I don’t like enjoying something that I made is absolutely intolerable.  Food is love.  MY love.  You can’t have any of it.  So there.

    Valentine’s Day, of course, means all manner of red and pink treats flying around.  And, when a baker thinks of things that are red, red velvet is usually one of the first things that comes to mind.  And, since they’re red, these morsels of red-velvety goodness are PERFECT for a post on the month of a holiday that is associated with this color.  I have been meaning to post this recipe for quite some time, but anytime I made them I would forget to take pictures.  So, “Valentine’s Day post” became “Independence Day post,” which became “Okay, Christmas post for sure!”  And, well, you see how well that went.

    But, here they are!  Lovely red velvet rolls with a sweet cocoa filling that are perfect for a Valentine’s Day breakfast or brunch.  Make them for your sweetie.  Make them for your friends.  Heck, even make them for yourself!  Hint: they freeze well.

    DSCN4362

    I love my bread machine because it takes most of the work out of these types of undertakings.  Just toss all of your dough ingredients in the machine, and let the Dough cycle run its course.

    DSCN4363

    While the bread machine is working on your dough, you can start getting the ready for the next step.  Have your pan, sugar mixture, and softened butter ready to go.

    DSCN4366

    Once the bread machine has done its work, you are rewarded with vibrant red dough!

    rolloutdough

    Turn out your dough on a lightly floured surface and roll into a rectangle.  Spread your rectangle with butter about 1/2 inch away from the edges all around, and then sprinkle your sugar mixture evenly over that.

    letthemrise

    Carefully roll the dough (starting from one of the shorter sides) so that you get a cylinder shape.  Cut the roll of dough into 12 pieces.  Get them as close to the same size as possible. Lay them in your greased baking pan.

    At this point, you could let the red velvet rolls rise for about an hour and then bake.  However, my favorite strategy is to make them the night before and then let them rise in the refrigerator overnight.  Just cover your pan and put it in the fridge until the next morning.

    Baked red velvet rolls

    Using the cold rise method, I bake the red velvet rolls for half an hour.  I start with a cold oven.  That is, you do not preheat the oven before you bake them.  Just pop them in the cold oven, THEN turn it on.  Once they’re done, frost them with cream cheese icing while they’re still hot.

    Red Velvet Rolls

    Aaaaand DIG IN!

    There are a lot of steps to making any type of “roll,” but it’s easier than it looks.  Plus, the waiting is rewarded with something warm and amazing that makes people go “Mmmmmm.”  Don’t be afraid.  It’s totally worth it!  Make these red velvet cocoa rolls and I’m sure they will be added to your permanent recipe book.

    Red Velvet Rolls

    Ingredients

    For the dough:

    • 4 1/2 tsp bread machine yeast
    • 3/4 cup buttermilk, warm
    • 1/4 cup warm water
    • 1 large egg
    • 1 tbsp red food coloring
    • 3 tbsp cocoa powder
    • 1/3 cup granulated sugar
    • 4 tbsp melted butter
    • 1/2 tsp salt
    • 4 cups all-purpose flour

    For the filling:

    • 1/3 cup white sugar
    • 1/3 cup brown sugar
    • 2 tbsp cocoa powder
    • 4 tbsp butter, softened

    Additional ingredients:

    • 1-1 1/2 cups cream cheese icing

    Directions

    Add the dough ingredients to the bowl of your bread machine according to the manufacturer’s directions.  Select the Dough cycle and press Start.  While the dough is being prepared, combine the white sugar, brown sugar, and cocoa powder for the filling and set aside.  Grease a 13″ x 9 ” baking pan.

    When the Dough cycle is complete, turn the dough out onto a lightly floured surface.  Roll the dough to an approximately 12″ x 16″ rectangle.  Brush with the softened butter and then sprinkle with the sugar mixture.  Starting with the shorter side, roll the dough into a cylinder and cut into 12 equal pieces.  Arrange in your prepared baking pan, then cover and refrigerate overnight.

    Bake at 350°(do not preheat the oven first) for 25-30 minutes, or until rolls are lightly browned. Top with cream cheese icing as soon as they come out of the oven.  Serve warm.

    Makes 12 rolls

  • Pumpkin Cinnamon Rolls

    Pumpkin Cinnamon Rolls

    Skip to recipe
    I owe all of you a sincere apology.  I really wanted to have this recipe posted before Thanksgiving, because it’s such an ideal breakfast for the holiday.  Unfortunately, things happened, and here we are.

    I originally made these to get rid of some leftover pumpkin that I had been using for another project.  They were so good that I decided that I wanted to post them to the blog as a special Thanksgiving post.  Well, Thanksgiving has come and gone, but I still think that this recipe is worth a post.  In fact, I did make these for my sister’s family as I am visiting them in Phoenix as a special After Thanksgiving breakfast treat.  Needless to say, my nieces love me.

    Special thanks to my sister and her family for allowing me to take over their kitchen.  Also, because I am the first one to use the bread machine that I bought her as an early Christmas gift.  I don’t think she minded at all, though.

    20161126_073434

    Add the ingredients in the bread machine according to the manufacturer’s directions. Then, set it to the Dough Cycle and let the machine do its thing.

    20161126_083036

    When the dough is almost done, mix together the brown sugar and the spices.

    20161126_090556

    Once the dough cycle is complete, your dough will be ready for rolling.

    20161126_090836

    Drop the dough onto a floured surface and sprinkle with more flour.

    20161126_091236

    Roll the dough out into a rectangle.  Or, as close to a rectangle as you can get.

    20161126_091708

    Then brush with softened butter…

    20161126_092000

    …and sprinkle evenly with the brown sugar and spice mixture.

    20161126_092435

    Roll the dough into a cylinder and cut into 12 equal pieces.  Unfortunately, my part-time photographer for the day was one of my nieces, who wasn’t exactly honest when she told me that she knew how to take photos.  So, we missed the pictures of me rolling and cutting the dough.

    20161126_100008

    Let them rise in a warm place until doubled in size.  This should take about an hour.

    20161126_102648

    Bake them for about 20 minutes, or until lightly browned.

    20161126_103051

    Top the rolls with cream cheese icing while they are still hot.  I once also topped them with a caramel icing to accommodate someone that hates cream cheese. That was also good, but I think that the cream cheese icing is better.

    If you don’t have a bread machine, you can still make these by replacing the bread machine yeast with active dry yeast and kneading/rising by hand.  The process will be a little more involved, but it can be done!  I sometimes also use pre-mixed Pumpkin Pie Spice instead of the individual spices with great results.

    Pumpkin Cinnamon Rolls

    (Adapted from Taste of Home Recipe)

    Ingredients

    • 3-3 1/2 cups flour
    • 1 package (2 1/4 tsp) bread machine yeast or instant yeast
    • 3/4 cup pumpkin puree
    • 1/2 cup warm milk
    • 2 tbsp sugar
    • 2 tbsp butter, melted
    • 1/2 tsp salt
    • 1 egg, lightly beaten
    • 1 cup brown sugar
    • 4 tbsp butter, softened
    • 1 tbsp ground cinnamon
    • 1/2 tsp ground nutmeg
    • 1/4 tsp ground cloves
    • 1/4 tsp ground allspice
    • 1-1 1/2 cups cream cheese icing

    Directions

    Add the first 8 ingredients to the bowl of the bread machine according to manufacturer’s directions.  Set the machine to the Dough cycle and turn on.  Meanwhile, combine the brown sugar, cinnamon, nutmeg, cloves, and allspice.

    When the dough cycle is complete, turn the dough out onto a floured surface.  Sprinkle with additional flour and roll into a rectangle approximately 12″ x 16″.  Brush with the softened butter, then sprinkle with the brown sugar and spice mixture.

    Roll the dough into a log and cut into 12 equal pieces.  Place the pieces in a greased 13″ x 9″ baking pan.  Cover and allow to rise in a warm place until doubled in size, about 1 hour.

    Once risen, bake at 350° for 20-25 minutes, or until golden brown.  Top hot rolls with cream cheese icing.  Serve warm.

    Makes 12 servings

  • Mango and Cheese Pastries (Pastelitos)

    Mango and Cheese Pastries (Pastelitos)

    Skip to Recipe
    This is my third Mango Season working in a place that affords me access to a large supply of mangoes during this time of the year in Miami.  I had been racking my brain for ideas on what to make with mango that I had never made before, and my brain reserves were getting low.  Then, during a conversation with one of my sisters, she asks “Why not make mango pastelitos?”  Mango pastries!?  My head exploded.

    For those of you that are not “in the know,” a pastelito is a Cuban pastry that is typically made with puff-pastry type of dough and can be filled with sweet or savory fillings.  Pretty much any Latin bakery or cafeteria worth its salt in South Florida will sell them, so it’s completely mind-boggling as to why it never even occurred to me to try a mango spin on these popular treats.  The most popular fillings are guava, guava and cheese, cheese, and ground beef.  My absolute favorite is the guava and cheese, which is the one that inspired this recipe.  Since guava is super-sweet, just like mango, it seemed to make sense to just swap out the guava with mango.  It sounded crazy at first, but it WORKED.  The sweetness of the mango was offset by the cream cheese, which also gave a creamy richness to complement the buttery flakiness of the puff pastry.  Best of all, they’re super-easy to make.

    20160710_182843

    Start by cooking some diced mango with brown sugar and a little bit of lemon juice.  Simmer the mango mixture for 25-30 minutes, until the liquid thickens and becomes syrupy in consistency.  Remove from the heat and allow to cool completely.  You can even make this a day or two ahead of time and refrigerate until ready to use.

    20160710_200814

    After that, the only other things you need are some puff pastry and a brick of cream cheese.  Make your life easier by using cold cream cheese.

    20160710_204734

    Defrost the puff pastry per the package directions.  Lay the sheets of puff pastry out on your pan lined with parchment, a baking mat, or a floured surface.  Cut each sheet it into thirds, then add three small pieces of cream cheese evenly spaced apart on 3 of the thirds.  Leave room around the sides to close the pastry.

    20160710_204910

    Add a spoonful of mango filling on top of each piece of cream cheese.  If you didn’t cook your mango filling long enough, you might get some runoff.  Don’t worry, it won’t impact the pastries much.  Brush the edges and between the filling with egg wash or water.

    20160710_205201

    Place the other three pieces of puff pastry over the ones that have the filling.

    20160710_205545

    Cut them into squares and pinch them closed.  The egg wash should help the tops and bottoms stick together.  Brush them with additional egg wash or simple syrup, if desired.

    20160710_205719

    Then, into a preheated oven they go!

    20160710_212711

    Please resist the urge to dig in as soon as they come out of the oven.  The filling is HOT, and you might hurt yourself.  They do taste best when they are warm, though.

    mango pastries

    Simple, right?  But, so delicious.  These pastries just scream “Miami” in so many ways.  The recipe for the mango filling makes enough to fill about 27 pastries, so scale up or down accordingly.  You can easily find other uses for any leftover filling, but I bet you’ll simply wind up making more pastries once these disappear in mere moments.  I bet it would be great on pancakes or waffles, too.

    Mango and Cheese Pastries (Pastelitos de Mango y Queso)

    Ingredients

    For the Mango Filling:

    • 2 1/2 cups mango, diced small
    • 1/4 cup light brown sugar
    • 1/2 tsp lemon juice

    For the pastries:

    • 1 package frozen puff pastry sheets, thawed
    • 4oz cream cheese, cold
    • Egg wash (optional)

    Directions

    Make the mango filling:

    In a small saucepan, heat mango, brown sugar, and lemon juice over medium to medium-high heat until mixture is about to boil.  Reduce heat and simmer for 25-30 minutes, or until the liquid has thickened to a syrupy consistency.

    Remove from heat and allow to cool completely before using.

    Make the pastries:

    Preheat oven to 350°.  Line a large baking sheet with parchment paper.

    Lay out the puff pastry sheets on a flat, nonstick surface and cut each sheet into thirds.  Set three of the thirds aside.

    Cut small rectangles of cream cheese and add three to each third of puff pastry sheet, spacing them out evenly on the strip and leaving room around the edges of the dough.  Add a spoonful of mango on top of each piece of cream cheese.

    Brush the edges of dough and between each mound of filling with egg wash or water, then top with the remaining 3 sheets of puff pastry dough.  Cut each strip into thirds so that one mound of filling is at the center of each square, then pinch the sides down to seal.  Place the squares on the baking sheet lined with parchment, leaving space between the pastries.  Brush the tops with additional egg wash or simple syrup.

    Bake for 25-30 minutes, or until golden brown.  Remove from oven and allow to cool at least 20 minutes before eating.  Any leftover mango pastries can be stored in an airtight container after they cool completely.

    Makes 9 pastries

  • Mango Cinnamon Rolls

    Mango Cinnamon Rolls

    Skip to Recipe
    Do you ever get an idea that is just so crazy, you just HAVE to try it to see if it will actually work?  That happened to me one afternoon, as another bag of the endless supply of mangoes from my coworker’s tree appeared by my desk this Mango Season.  There I was, sitting at my desk, when something in my head just screamed “MANGO CINNAMON ROLLS” at me.  Well, there went anything else productive I could have done for the remainder of the day, because it was now the only thing I could think about.

    I thought about different ways to incorporate the mango into the cinnamon rolls.  I ruled out adding mango to the dough, because I was afraid that it wouldn’t get enough mango flavor that way.  Mango in the filling seemed like a good idea, and I opted to use diced mango instead of mango puree.  A piece of mango in a bite would be a pleasant surprise. (more…)

  • Chocolate Dulce De Leche Rolls

    Chocolate Dulce De Leche Rolls

    Skip to Recipe
    One of the plus sides of knowing your way around the kitchen is that food is quite often an acceptable form of currency in my social circle.  Oftentimes, people will happily trade goods and services for the right dish.  And, really, who ISN’T more likely to lend a helping hand if it means you will almost definitely get some good food out of it at some point?

    So, when one of my friends helped me out of a serious bind, I promised her something delicious in return.  Since dulce de leche is one of her absolute favorite things, I wanted to make something that had dulce de leche in it.  This recipe for chocolate dulce de leche rolls came to me in the morning of the day that she was scheduled to come and collect on my debt. (more…)