Tag: pressure cooker

  • Mojito Curd

    Mojito Curd

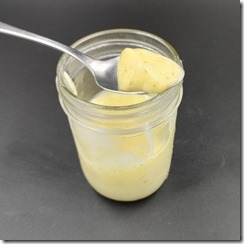
    A mojito is a traditional Cuban cocktail that is extremely popular here in Miami.  It generally consists of lime wedges and mint leaves muddled with sugar and topped off with rum and soda water.  I was thinking of ways to use the flavors of a mojito in a dessert or treat that went beyond cupcakes.  I came across a recipe for mojito curd, and thought that it would be fun to tweak it and convert it into a recipe that I could make in my Instant Pot.

    Mojitocurd

    Pressure Cooker Mojito Curd

    Ingredients

    • 1/2 cup fresh squeezed lime juice
    • 10 fresh mint leaves, chopped
    • 1 cup granulated sugar
    • 1/4 cup of white rum (I used Bacardi)
    • 3 eggs
    • 1/4 cup of butter, cut into cubes

    Directions

    Combine the lime juice and the mint leaves in a small bowl.  Gently muddle the mint leaves in the lime juice.  Cover and let sit for at least 1 hour.  You can also refrigerate for several hours, if desired.

    Combine the sugar, rum, and eggs in an oven-safe container.  Add the mint-infused lime juice (discard the leaves if you prefer a less-minty flavor).  Using an immersion blender, blend the mixture together until smooth.

    Cover, and place on a rack in the liner of your electric pressure cooker filled with 1 cup of water.  Seal and cook on High Pressure for 12 minutes.  When the timer is up, allow the pressure to release naturally for 12 minutes before releasing any remaining pressure.

    Remove the mixture from the pressure cooker and uncover.  Add the butter and blend again with your immersion blender until the mixture is smooth and all of the butter is melted.  Transfer the mojito curd to mason jars and keep refrigerated until ready to use.

    Makes about 2 1/2 cups

  • Pressure Cooker Twix Cheesecake

    Pressure Cooker Twix Cheesecake

    Skip to Recipe

    Right after Halloween, a good friend of mine gave me a bunch of her leftover Halloween candy. She had a condition, though. I was only allowed to take the candy if I agreed to use it for baking, NOT if I was just going to eat it or fill my candy jar at work. When I was throwing around ideas of what to make, her eyes lit up at the thought of a Twix Cheesecake.

    Challenge accepted.

    I used my Snickers Cheesecake as the blueprint for this cheesecake, and just made a few adjustments to make it more Twix-like. There are Twix pieces in the cheesecake batter, so you enjoy the goodness of Twix in almost every bite.

    I used an Oreo crust for mine, but using a shortbread crust would make it even more reminiscent of Twix. There is a layer of caramel sandwiched between the cheesecake and the crust, and it’s topped with a satiny chocolate ganache.

    Pressure Cooker Twix Cheesecake

    Ingredients

    • 1 cup crushed Oreo cookie crumbs (can substitute with shortbread crumbs)
    • 1 tbsp butter (increase to 2 if using shortbread crumbs)
    • 16oz cream cheese, room temperature
    • 1/2 cup sugar
    • 2 large eggs, room temperature
    • 1/4 cup sour cream
    • 1 cup chopped Twix pieces (I used about 12 Twix minis)
    • 1/2 tsp vanilla extract
    • 1/2 cup caramel sauce (I used homemade)
    • 2 1/2 oz chopped semisweet chocolate
    • 1/4 cup heavy cream
    • Additional Twix for garnish, if desired

    Directions

    In a bowl, combine melted butter and cookie crumbs until moistened through.  Press cookie crumbs firmly on the bottom of a greased 7in cheesecake pan.  If you’d like, bake at 350° for 6-7 minutes before preparing the batter.  Pour the caramel sauce over the crust and set aside.

    In the bowl of a stand mixer, beat the cream cheese and sugar until smooth.  Add the eggs, one at a time, beating well with each addition.  Add the sour cream and vanilla extract, and beat until just combined.  Fold in the chopped Twix pieces.

    Add 1 cup of water to the liner of your electric pressure cooker and set to Saute/Brown setting. Let the water come to a simmer.

    Pour batter into prepared cheesecake pan, then set the pan in your pressure cooker on a trivet over the simmering water (add a little bit more water if too much has evaporated).  Hit cancel, then seal the pressure cooker and cook on Manual (High pressure) for 20-25 minutes.  Allow the pressure to release naturally, which should take 10-15 minutes.  Remove the cheesecake from the pressure cooker and allow to cool completely on a wire rack.   Refrigerate at least 4 hours, but preferably overnight, before removing from the pan.

    Melt the chopped semisweet chocolate and the heavy cream together in the microwave in 15-second bursts, stirring after each burst until most of the chocolate has melted. Continue stirring until all of the chocolate has melted and the mixture is smooth. Pour over the cooled Twix cheesecake. Allow the ganache to set before serving, then garnish with additional Twix pieces.

    Makes 1 7-inch cheesecake

  • Pressure Cooker Tonkotsu Ramen Broth

    Pressure Cooker Tonkotsu Ramen Broth

    Skip to Recipe

    My favorite ramen place is a 45 minute drive from my house. On top of that, their bowls of tonkotsu ramen about about $30.00 nowadays. When I found out that someone had figured out how to make it in their pressure cooker, I was skeptical at first. But, I decided to give it a try, and it worked out great!

    Tonkotsu ramen broth in an electric pressure cooker is not significantly less labor-intensive. You still need to boil and clean your bones before you start the broth. This helps to remove the marrow and impurities that will alter the color of your finished broth. It does cut down on the total cook time significantly, though. Plus, no babysitting a boiling pot for an entire day.

    Traditional tonkotsu ramen broth is cooked for up to 18 hours, which is what gives the broth its signature “creaminess.” The fat and collagen in the bones breaks down and emulsifies in the broth. The pressure cooker doesn’t produce the rolling boil required to emulsify the broth. So, for using a pressure cooker, you need to add your own emulsifier after the broth is finished. I have also read that you can move the broth to the stove after pressure cooking and boil for about an hour to emulsify, but I have never tried this.

    If you REALLY want to go all-out with your tonkotsu ramen, you can also make chashu pork (braised pork belly) to top it with. You can add some of the leftover braising liquid to your ramen broth for flavoring.

    Once your broth is cooked, you can season it and pour over your cooked ramen noodles and serve with your choice of toppings. In addition to the base broth recipe, there are also recommendations for seasoning your broth and for toppings to serve the ramen with. Just play around with the ingredients and quantities until it tastes to your liking.

    You can refrigerate tonkotsu broth for up to a week, or freeze for a few months. The broth will separate when chilled, so be sure to bring it back to a boil when you reheat it to emulsify it again.

    Pressure Cooker Tonkotsu Ramen Broth

    Adapted from Pressure Eats Recipe

    **NOTE: I used an 8qt Instant Pot to make this quantity of broth, and it was a very tight squeeze. If you will be using a smaller pressure cooker, I recommend cutting the recipe in half.

    Ingredients

    For the broth

    • 3lbs pork hocks, cut into discs
    • 2bs chicken backs
    • 2 whole leeks, washed and roughly chopped
    • 1 3in piece of ginger, peeled and sliced
    • 12 cloves of garlic
    • 1 large onion
    • 6 dried shitake mushrooms (you can also use fresh)
    • 1 tsp salt
    • 1 slab pork fatback
    • 1/2 egg yolk or 2 tsp soy lecithin (I used a whole egg yolk with no issues)
    • Additional recommended equipment: an immersion blender

    For seasoning the broth (per 3 cups of broth)

    • 1 tbsp tahini
    • 2 cloves grated garlic
    • Salt and pepper to taste
    • 1 tbsp mirin
    • 1 tbsp chashu braising liquid
    • 1 tbsp toasted sesame seeds
    • a dash of fish sauce

    To serve

    • Cooked ramen noodles
    • Chopped scallions
    • Sliced chashu pork (I used this recipe)
    • Sliced mushrooms
    • Seaweed
    • Hard boiled or soya egg

    Directions

    Add the pork hocks and chicken backs to a large pot. Fill pot with water until the bones are fully submerged. Cover and refrigerate for at least 1 hour, but preferably overnight.

    Drain the water from the pot and add fresh water. Place the pot, uncovered, on a stove and bring to a boil. Boil for 3 minutes, then remove from heat and drain. Allow bones to cool for about 15 minutes, then rinse and clean with cold water.

    Optional step: Char the onions and garlic by placing them on a sheet pan and broiling them until some black spots appear (this took about 5 or 10 minutes for me)

    Add the cleaned bones to the liner of your pressure cooker. Add the leeks, onions, ginger, garlic, mushrooms, and salt. Add enough water to reach about 3/4 of the way up the pot. Cover, seal, and cook on High Pressure for 3 hours.

    When the time is up, release the pressure manually. Uncover, add the slab of fatback, then cover and seal again. Cook on High Pressure for 1 hour. At this point, you can release the pressure manually or naturally. I have done it both ways and both have been fine.

    Drain the broth to remove the solids. Add the soy lecithin or egg yolk (temper the yolk first with broth if using), using the immersion blender to blend completely. Broth should become translucent.

    Season broth to taste with seasonings of choice, then pour over cooked ramen noodles. Serve with your choice of toppings.

  • Pressure Cooker Chocolate Stout Molten Pudding

    Pressure Cooker Chocolate Stout Molten Pudding

    Skip to Recipe

    I had experimented with making molten puddings (AKA lava cakes) in the Instant Pot for a while.  This chocolate stout molten pudding is the result of such experiments.

    I was not on board with making lava cakes in my electric pressure cooker (Instant Pot) when I first heard that this was a thing.  Truth be told, I tried it.  In fact, I invited a few friends over to my house and we made a batch of lava cakes in the oven and nother batch in the Instant Pot to see which ones we liked better.  The decision was split fairly evenly, but I was firmly on Team Oven.  What finally changed my mind was a trip to the Epcot Food and Wine Festival last year, where the Ireland station was serving up “chocolate pudding” that was basically a lava cake.  But, that was when it hit me that what was REALLY bothering me was that I associate a certain texture to “cake.”

    When I stopped thinking about Instant Pot lava cakes as “cakes” and instead thought of them as “molten puddings,” I quickly warmed up to them.  It’s important to make the distinction, because molten puddings/lava cakes made in the Instant Pot do have a very different texture than their oven counterparts.  The exterior is more smooth and custard-like.  The oven gives you a drier, brownie-like crust.  You can also bake these in the oven if that is the texture that you prefer.

    Start by melting your chocolate and your butter, then set it aside.  Whisk the eggs with the sugar until foamy, then whisk in the flour until there are no clumps.  Slowly which the chocolate mixture into the egg mixture.  I did it in 4 rounds so that the heat from the chocolate mixture didn’t curdle the eggs.

    Once the chocolate mixture is thoroughly combined, gradually add the stout.  Doing it little by little ensures that it won’t make your batter separate.  After that is done, pour it into greased ramekins, then cook uncovered on High Pressure for 7 minutes.  When the timer is up, use Quick Release to release the pressure and remove the ramekins.

    Invert each pudding on a plate to serve.  You could eat it as is if you want.

    Since I was sticking to the St. Patrick’s Day theme, I served them with an Irish Cream Creme Anglaise.  The rich sweetness of the cream sauce paired perfectly with the bitterness of the chocolate and the stout.  Of course, this would also go great with ice cream.

    Because these stout molten puddings use both bittersweet chocolate and beer, the pudding itself does have some bitter notes.  You can use semi-sweet chocolate for a less bitter taste, or add more sugar to suit your taste.

    Pressure Cooker Chocolate Stout Molten Pudding

    Ingredients

    For the puddings:

    • 8 oz bittersweet chocolate, chopped (or semi-sweet chocolate)
    • 1/2 cup (1 stick) butter
    • 4 whole eggs
    • 1/2 cup Stout beer (I used Guinness)
    • 1/4 cup sugar
    • 5/8 cups flour

    For the Irish Cream Creme Anglaise:

    • 1 cup milk
    • 2 egg yolks
    • 1 tbsp cornstarch
    • 1/4 cup sugar, divided
    • 1/2 cup Irish Cream liqueur (I use Kerrygold)

    Directions

    Make the Creme Anglaise:

    In a small saucepan, heat the milk and half of the sugar over medium heat  Whisk the egg yolks, cornstarch, and remaining sugar and set aside.

    When the milk starts to simmer, remove from heat.  Slowly whisk the hot milk mixture into the egg mixture, a little bit at a time.  Return the mixture to the saucepan and cook over medium heat until the mixture thickens (about 2-3 minutes).

    Remove from heat and strain mixture through a fine mesh strainer, then stir in the Irish Cream.  Allow to cool completely, then refrigerate until ready to use.

    Can be made a day in advance.

    Make the molten puddings:

    Grease 6 4oz ramekins and set side.  Pour 1 cup of water into the liner of your pressure cooker.

    Melt the chocolate and the butter in a microwave-safe bowl in 20-30 second bursts until all of the chocolate is melted and the mixture is smooth.  Set aside.

    Whisk the eggs and the sugar together until combined, then add the flour and whisk until few clumps remain.  Gradually whisk in the chocolate mixture, then the stout.

    Divide the batter evenly among the 6 ramekins.  Arrange them in 2 layers on a trivet in the liner of your pressure cooker, then cook on Manual (High Pressure) for 7 minutes.  When the timer is up, manually release the remaining pressure.

    Remove ramekins from the pressure cooker and serve by inverting the puddings onto a plate.  Serve with Creme Anglaise.

    Makes 6 servings.

  • Pressure Cooker Turkey Stock

    Pressure Cooker Turkey Stock

    Once upon a time, before the magic of pressure cookers, my turkey carcasses went in the trash after the turkey was carved.  Seeing the craze with making “bone broth” and stocks at home, though, I decided to give it a go.  After my first batch of turkey stock, I vowed never to let a turkey carcass go to waste again.  The canned and boxed stuff just doesn’t compare.

    If you plan on using it within a few days, you can store your turkey stock in the refrigerator.  Otherwise, you can freeze it in any freezer-safe container.  I have kept containers of turkey stock in my deep freezer for around 3 months and it’s still good.

    Pressure Cooker Turkey Stock

    Ingredients

    • 1 cooked turkey carcass (from a 12lb turkey or larger)
    • 1 large onion, quartered
    • 3 carrots, peeled and cut into large chunks
    • 3 celery stalks, cut into large chunks
    • 4 cloves of garlic
    • 1 in piece of ginger, sliced into rounds
    • 3 bay leaves
    • salt and pepper to taste
    • 8 cups of water

    Directions

    Combine all of the ingredients in the liner of your electric pressure cooker (you may have to cut up the carcass to make it fit).  Cover, seal, and cook on Manual (High Pressure) for 30 minutes.  When the timer is done, allow the pressure to release naturally.  Strain the turkey stock to remove the solids before using.

    Store unused turkey stock in the refrigerator, or freeze for up to 3 months.


  • Pressure Cooker Mango Creme Brulee

    Pressure Cooker Mango Creme Brulee

    Skip to Recipe

    Mango creme brulee is a Mango Madness staple, and I have been making it since I first started experimenting with mango a few years ago.  Since I was getting so many mangoes anyway, I decided to try adapting the recipe to make in my Instant Pot electric pressure cooker.  It took a few tries, but I was able to get a smooth and creamy mango creme brulee!  You still need to do all of the stovetop work, but cooking them in a pressure cooker takes the guess work out of getting the perfect texture.

    Put your egg yolks in a measuring cup or small mixing bowl, then whisk them and set them aside.  Heat your cream, sugar, and mango chunks over medium to medium high heat.  As the cream heats, you will notice that it will start to change color as the mango releases juices into the cream.  When the cream starts to simmer, using a potato masher (or a fork, if you don’t have one) to gently mash the cooked mango so that it releases a little bit more flavor into the cream.  Then, remove the mango chunks using a slotted spoon and discard them.  Remove the cream from the heat and get your egg yolks ready.

    Temper the egg yolks by gradually adding some of the hot cream mixture into the yolks.   When you have incorporated about a third of the hot cream mixture into the yolks, whisk them into the pot with the rest of the cream mixture.  Strain the mixture into a heat-proof bowl, stir in the vanilla, then divide it evenly among 6 4oz custard cups.  Cover them with foil and arrange them in two layers in the liner of your pressure cooker (filled with 1 cup of water at the bottom).  Cover, seal, and cook on Manual (High Pressure) for  minute, and then allow the pressure to release naturally for 10 minutes before you release any remaining pressure.

    Remove the custards, uncover them, and allow them to cool completely on a wire rack.  When they’re cool, cover them and refrigerate for at least 4 hours or up to 3 days.

    When you are about to serve them, sprinkle about 1 teaspoon of sugar over the surface of the custard.  Tilt the custard cup around to make sure that the entire surface is covered, then use a torch to melt the sugar on the surface of the creme brulee until it bubbles and turns amber.  Let the custards cool for at least 5 minutes before you dig in.

    This is a great dessert if you want to impress!  Smooth, creamy, with just the right touch of mango flavor.

    Pressure Cooker Mango Creme Brulee

    Ingredients

    • 2 cups heavy cream
    • 2 cups fresh mango slices
    • 6 tbsp sugar, plus more for torching
    • 4 egg yolks
    • 1/2 tsp vanilla extract

    Directions

    Pour 1 cup of water into the liner of your pressure cooker.  Whisk your egg yolks in a heat-proof measuring cup or small bowl and set aside.

    Heat the cream, mango, and sugar in a saucepan over medium heat.  When the cream mixture is just about to simmer, lightly mash the mango, then allow the mixture to simmer for about 5 minutes (do not boil).  Remove from heat and use a slotted spoon to scoop out the mango pieces and discard them.

    Slowly add the hot cream mixture to your egg yolks, 1-2 tablespoons at a time, whisking constantly.  Once about 1/3 of the cream mixture has been added to the eggs, incorporate the egg mixture into the remaining hot cream mixture.  Strain using a fine mesh strainer, then stir in the vanilla.

    Divide the mixture equally among 6 4oz ramekins.  Cover with foil, then arrange in two layers on trivets in the pressure cooker.  Cover, seal, and cook on Manual (High Pressure) for 1 minute, and then allow the pressure to release naturally for 10 minutes.  Remove custards from pressure cooker and allow to cool completely on a wire rack, then cover and refrigerate for at least 4 hours.

    To serve, sprinkle a thin layer of sugar over the top of each custard, then use a kitchen torch to melt the sugar until it browns and forms a crispy top.  Allow the creme brulee to sit for 5 minutes after melting the sugar, then enjoy.

    Makes 6 servings