Blog

  • Peach Compote

    Peach Compote

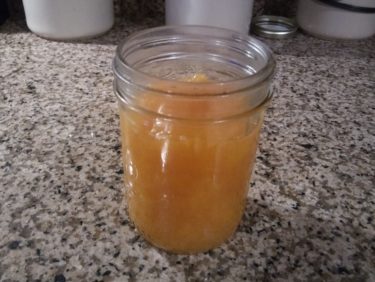
    Since getting my Instant Pot, I have discovered how easy it is to make yogurt at home.  I make about two weeks’ worth of yogurt at a time and portion it out in jar to take to work with me.  Sometimes, I add fresh fruit, but more frequently I eat it with fruit compote.  Peach compote is one of my favorites, and is on heavy rotation at my house these days.

    You can start with fresh or frozen peaches.  I’m lazy, so I start with frozen.  Throw them in a medium-sized saucepan and sprinkle with sugar.  If I have it, I may also add a bit of lemon juice.  Turn the heat to medium and cook, stirring occasionally.  Once the peaches start to soften and the liquid is simmering, mash them while you continue cooking.  I use a potato masher or firm spoon or spatula to do this.  Continue to cook until the peach compote is thickened.  You should be able to drag your spatula across the bottom of the pan and see the bottom of the pan for a few seconds before the compote settles back again.  Once it’s thickened, remove from heat and allow to cool, then store in a mason jar or container.

    This peach compote recipe works with different types of fruit.  I have made this with mango, strawberries, raspberries, and blackberries with success.

    Add some  peach compote to the bottom of a jar or container, then layer with homemade yogurt, and you’ve got a homemade snack that is way better than the store bought stuff!  Plus, you know exactly what’s in it.  Enjoy!

    Peach Compote

    Ingredients

    • 1 lb fresh or frozen peaches slices
    • 2 tbsp sugar (more of less to taste)

    Directions

    In a medium saucepan, add the peaches and sugar.  Cook over medium heat, stirring occasionally, until peaches start to soften and liquid is simmering.  Starting mashing the fruit as it cooks.  Continue stirring and mashing the fruit until the compote has reduced and thickened to the desired consistency.  Allow to cool completely, and then refrigerate in an airtight container.

    Makes about 2 cups.

  • The Parlor Pizzeria (A Review)

    The Parlor Pizzeria (A Review)

    I must admit that it came as a shock to me to find out that Phoenix, Arizona is kind of “on the map” as one of the go-to cities in the US for pizza lovers.  I expected it to shine in Southwestern food, but my few visits to my sister over there have left me a little underwhelmed in that regard.  So, when a pizza place in Phoenix made it on a Food Network list, I used the next visit to my sister and her family as an excuse to give them a try.  We made our way to The Parlor Pizzeria in a caravan of half adults and half kids.

    The walkway towards the entrance is decorated with a small garden.  According to the hostess, they try to get as much of their pizza ingredients from their outdoor garden.  That is one thing that stood out about this place.

    We started with a fritto misto (fried calamari and shrimp) and an order of arancini (fried saffron risotto balls).  We enjoyed both.  The fritto misto had a very light batter and was tender, not rubbery.  None of us were fans of romesco sauce, but discovered that it was fanastic when dipped in the pomodoro sauce that arancini were served with.  I expected the arancini to be cheesier, but it was a little bit dry and crumbly on the inside.  This probably helped the saffron stand out, but I’m used to risotto being creamy and cheesy.

    Unlike most pizza joints, The Parlor Pizzeria doesn’t have a “build your own pizza” option where you pick your size and toppings.  Instead, they have a fixed menu of available pizzas with pre-selected toppings.  I played it safe and ordered a Pepperoni.  It came with giant slices of pepperoni, house-made mozzarella cheese, and basil.  I can’t begin to describe how amazing it smelled when it was brought to the table.  Then I tasted it.  I think I finally understand why restaurants boast about local ingredients on their menus.  This pizza was unlike any mass-produced pie that I have ever eaten in my life.  Even the grease pooling up on top of the pizza was flavorful.  It tasted of all of the love and passion that was used to make every single ingredient.  It tasted like heaven.  Cheesy, greasy heaven.

    For the kids, they also had plain cheese pizza, as well as pepperoni pizza without the fancy cheese and basil.  The kids, picky as they are, all loved their pizza and were excited to come back when their aunt from Miami asked if there was time for a quick lunch before dropping her off at the airport on the day that she was scheduled to leave.  And, I definitely plan on visiting them again the next time that I’m in Phoenix.

    For more information on The Parlor Pizzeria, visit their web site at https://theparlor.us/

  • Pressure Cooker Snickers Cheesecake

    Pressure Cooker Snickers Cheesecake

    Skip to Recipe

    Oh, if there were any two words sweeter than “Snickers Cheesecake,” I can’t think of them right now.  All I can say that, after making this only once, it became a favorite.  How can you really go wrong with cheesecake with a chocolate crust and chunks of Snickers floating in there!?

    I have been having a lot of fun playing with my Instant Pot brand pressure cooker, in case you couldn’t tell.  And, I have to admit that it does make certain things way better and easier than the traditional way.  Converting a “conventional” recipe into a pressure cooker recipe isn’t always intuitive, but cheesecake is an exception.  Practically any cheesecake recipe can be turned into a pressure cooker cheesecake with the proper adjustments to scale and cook time.  True, making cheesecake in a pressure cooker means you have to make a smaller cheesecake, but it’s not a big deal for someone that lives by themselves or hosts small dinner parties.  And, when you have something as decadent as a SNICKERS cheesecake, it’s much safer not to keep large quantities of it lying around the house.

    Get your ingredients together.  It’s always best to start by having everything you need ready and available.

    Mix the Oreos and butter together and press into your greased cheesecake pan.  I like to pre-bake my crust for 6-7 minutes at 350° in the oven, but this is not necessary.

    To make the batter, cream the cream cheese and brown sugar until combined.  Add the eggs, one at a time, and then the sour cream and vanilla.  Once your batter comes together, fold in your chopped Snickers pieces and pour into your prepared cheesecake pan.

    The water in your pressure cooker should be simmering before you put the cheesecake in.  Then, cook for 20-25 minutes and then natural release for 10-15 minutes.  Let the cheesecake cool in the pan completely, then refrigerate at least several hours before you remove from your pan.

    So, it has a small crack, but we’ll fix that.

    Note that I made enough crust to go all the way up the side of the cheesecake.  This was a bad idea, as the condensation from the pot made the outer rim of the crust soggy.  The recipe is adjusted to account for crust on the bottom only.

    Melt some caramels on the stove with a little bit of milk or half and half, then pour over the cake.  Sprinkle with some salted peanuts.  Both of these are optional, but when has extra caramel EVER been a bad idea?

    Snickers Cheesecake

    I learned the hard way that caramel covered cheesecakes don’t travel well.  So, if you’re not eating it at home, use less liquid when melting your caramels, or don’t pour the sauce over the cheesecake until you are ready to serve.Check out all of that delicious Snickers goodness!  Cheesecake alone is great, but Snickers Cheesecake is like a glimpse of heaven in every bite.  Note that you can also make this in the oven by doubling the ingredients and baking in a 9in springform pan.  Set your pan in a water bath and bake at 350° for about an hour to an hour and a half.

    If you have a family member with a peanut allergy, try making this with Almond Snickers!

    Pressure Cooker Snickers Cheesecake

    (adapted from this recipe)

    Ingredients

    • 1 cup crushed Oreos
    • 1 1/2 tbsp butter, melted
    • 2 8oz packages cream cheese, softened
    • 1/2 cup brown sugar
    • 2 eggs, room temperature
    • 1/4 cup sour cream
    • 1/2 tsp vanilla extract
    • 1 cup chopped Snickers Baking Bites (about 1/2 of a 10oz bag)
    • 1/2 bag (7oz) caramels, unwrapped (optional)
    • 1-2 tbsp milk or half-and-half (optional)
    • Salted peanuts (optional)

    Directions

    In a bowl, combine melted butter and Oreo crumbs until moistened through.  Press Oreo crumbs firmly on the bottom of a greased 7in cheesecake pan.  If you’d like, bake at 350° for 6-7 minutes before preparing the batter.  Add 1 cup of water to the liner of your electric pressure cooker and set to Saute/Brown setting.

    In the bowl of a stand mixer, beat the cream cheese and brown sugar until smooth.  Add the eggs, one at a time, beating well with each addition.  Add the sour cream and vanilla extract, and beat until just combined.  Fold in the Snickers pieces.

    Pour batter into prepared cheesecake pan, then set the pan in your pressure cooker on a trivet over the simmering water (add a little bit more water if too much has evaporated).  Hit cancel, then seal the pressure cooker and cook on Manual (High pressure) for 20-25 minutes.  Allow the pressure to release naturally, which should take 10-15 minutes.  Remove the cheesecake from the pressure cooker and allow to cool completely on a wire rack.   Refrigerate at least 4 hours, but preferably overnight, before removing from the pan.

    To make the optional topping, melt the caramels with the milk in a small saucepan over low to medium-low heat, stirring frequently.  When the caramel is completely melted, pour over the cheesecake, then sprinkly with salted peanuts.

    Makes 1 7in cheesecake

  • Pressure Cooker Irish Cream Flan

    Pressure Cooker Irish Cream Flan

    This is a haphazard post.  I hadn’t really been planning on posting this recipe to the blog, but I have had a lot of requests for Irish Cream Flan recipe that I just couldn’t refuse.  The public asks, and I deliver.  🙂

    For some reason, I have been on a Bailey’s kick lately, so I’ve been trying to come up with ways to incorporate Irish Cream into desserts.  I made Irish Cream ice cream with mixed success, as the alcohol in the Bailey’s made the ice cream too soft and melted quickly.  So, what else is creamy and whose texture will not suffer from the addition of alcohol?  Flan!  And, an Irish Cream Flan sounded like too good of an idea to pass up.  Best of all, it worked on the first try!

    The outside of the flan had me a little worried that I had overcooked it, but the inside was as smooth and creamy as I like my flans to be.  I was afraid that using too much Irish Cream would make the flan taste too heavily of booze, so I replaced some of the liqueur with Irish Cream flavored coffee creamer.  Feel free to play around with the ratios of booze and creamer to get your preferred concentration of Bailey’s flavor, but this was just right for me.

    Hope you enjoy!

    Pressure Cooker Irish Cream Flan

    Ingredients

    • 1/4 cup plus 2 tbsp white sugar, divided
    • 1 tbsp water
    • 1 cup Half and Half
    • 1/4 cup Irish Cream flavored coffee creamer
    • 1/4 cup Irish Cream
    • 2 eggs

    Directions

    In a small saucepan, heat 1/4 cup of sugar over medium heat, swirling the pan occasionally to distribute the heat.  Once the sugar has melted and turned deep amber, remove from heat and add the 1 tbsp of water (careful, it may splatter) and stir until combined.  Distribute the syrup evenly between 3 6 oz ramekins or custard cups.

    Crack the eggs into a small, heat-proof bowl and whisk, then set aside.  In a small saucepan (can be the same one if you want), heat the Half and Half, creamer, Irish Cream, and sugar until lightly simmering.  Remove from heat and gradually add this mixture, 2 tbsp at a time, to the eggs, whisking constantly.  Once about 1/3 of the hot cream mixture has been added to the eggs, slowly pour the remaining hot cream into the egg mixture, whisking the entire time.

    Add 1 cup of water to the inner liner of your electric pressure cooker and place a trivet inside.  Cover your custard cups tightly with foil, then set on the trivet inside the pressure cooker.  Seal and cook on Steam setting for 5 minutes, then allow the pressure to release naturally for an additional 5 minutes before releasing the rest of the pressure manually.  Remove custards from the pressure cooker and allow to cool, uncovered, on a wire rack.  Flans will be very jiggly when you take them out.  This is normal.  Re-cover and refrigerate at least 4 hours, but preferably overnight.

    To serve, run a small knife around the edge of the custard cup, then invert onto a plate.

    Makes 3 servings.

  • Pumpkin and Cheese Pastries (Pastelitos)

    Pumpkin and Cheese Pastries (Pastelitos)

    Skip to Recipe

    Pumpkin and cheese (cream cheese, to be specific) is one of those combinations that sounds weird if you have never tried it, but works incredibly well.  So, pumpkin and cheese pastries (or pastelitos, as we call them down my way) seemed like a win for me.  Lightly sweetened pumpkin puree and soft cream cheese wrapped in flaky puff pastry…what could be wrong with that?

    I got the idea when I had some canned pumpkin left over from making pumpkin oatmeal and didn’t really know what to do with it.  Thankfully, I also had a few boxes of puff pastry sitting in the freezer from when I stocked up during a sale, so it wasn’t difficult to come up with a plan that incorporated both.

    You will need defrosted the pastry dough.  If you are making your own puff pastry, then more power to you.  I am not on that level yet.

    Prep your filling and your egg wash.  Combine your pumpkin puree, brown sugar, cinnamon, and nutmeg together.  Then, crack an egg into a small bowl and beat, then pour half of the beaten egg into your pumpkin mixture.  Save the other half for your egg wash.

    Unfold each piece of defrosted puff pastry and cut into 9 equal pieces.  I used a pizza cutter for that part.  Then, cut small pieces of cream cheese and place some in 9 of the squares and top with a spoonful of the pumpkin mixture.  Using a pastry brush, moisten the outer edges of the filled squares with egg wash, then top with an unfilled square of dough.  Gently press down around the edges to seal the dough.  Repeat until you have 9 filled squares of pastry.  Then, place on a baking sheet and brush with remaining egg wash.  You can also sprinkle with sugar, if you want.

    Bake them at 350º until they are puffy and golden on the outside, about 30-35 minutes.  Let them cool for at least 15-20 minutes before you attempt to consume, as the filling will be HOT.

    Plated pumpkin and cheese pastries

    Using a small amount of egg as a binder ensures that you have a somewhat custard-like filling in your pumpkin and cheese pastries, instead of a mess of pumpkin oozing out.  Store any leftovers in an airtight container.  These are best served warm.  I like to heat mine up in my toaster oven the next day, but you can also eat them at room temperature if you’re not as patient as I am.

    Pumpkin and Cheese Pastries (Pastelitos)

    Ingredients

    • 1 17oz package frozen puff pastry, thawed
    • 1 cup pumpkin puree
    • 3 tbsp brown sugar
    • 1/4 tsp cinnamon
    • a pinch of nutmeg
    • 4-6 oz cream cheese, cold
    • 1 egg, beaten
    • granulated sugar (optional)

    Directions

    Preheat oven to 350º.  Line a large baking sheet with parchment paper.  Mix pumpkin, brown sugar, cinnamon, and nutmeg together in a small bowl.  Add half of the beaten egg and mix until combined.  Set aside.

    On a silicone mat or lightly floured surface, gently unfold both sheets of pastry dough and cut into 18 equal squares (9 squares per sheet).

    Cut small rectangles of cream cheese and place in the center of 9 of the dough squares.  Top with the pumpkin mixture, then use a pastry brush to brush some of the remaining egg mixture around the edges of the filled dough squares.  Top with an unfilled dough square, pressing gently to seal.  Set finished squares on prepared baking sheet and brush with leftover beaten egg.  Sprinkle with sugar, if desired.

    Bake in preheated oven for 30-35 minutes, or until tops are golden brown.  Allow to cool 15-20 minutes before eating, and cool completely on a wire rack before storing.

    Makes 9 servings.


  • Pressure Cooker Red Velvet Flan

    Pressure Cooker Red Velvet Flan

    Skip to Recipe

    My boss hates flan, but loves anything red velvet.  When I asked her what she thought of a red velvet flan, she was like “H’mm…I might try that.”Sadly, Google wasn’t very helpful in locating a recipe for red velvet flan that looked promising.  So, I devised my own.

    Making a red velvet flan posed a bit of a challenge at first.  The two primary flavors that come together to make that classic and recognizable “red velvet” flavor are cocoa powder and buttermilk.  So, I knew that I wanted to include buttermilk in the flan, but in a way that wouldn’t make it curdle or taste too sour.  I found that I could safely replace a fourth of the milk with buttermilk, and replaced the rest of the milk with half-and-half so that the additional fat content would discourage curdling.

    Since owning a pressure cooker, flan is one of the many dishes that I have discovered that a pressure cooker excels at making.  The moist heat of the pressure gives it a smooth and silky texture in about half the time of oven baking.  I highly recommend using a flanera (flan plan), which has a lid that locks in place to protect your flan.  I know some people use a pyrex dish or cake pan covered in foil, and that should also work.  You can also bake the flan in the oven if you don’t have a pressure cooker.  Just bake at 350° for about an hour in a water bath.

    Melt the sugar in a saucepan over medium to medium-high heat.  Once the sugar is melted and dark amber, remove from heat and add water.  It will bubble, steam, and sizzle furiously, so be careful.  Once you can get your hand close, stir until the water and sugar are combined, and then pour it into your flan mold.

    The rest of the ingredients can go in your blender.

    And blend until smooth.

    Pour this mixture in your prepared flan pan (or making dish) and cover in foil.  Place on a trivet in your pressure cooker filled with about 1 cup of water, then cook on manual (high pressure) for 12 minutes.  After the time is up, allow the pressure to release naturally for another 10-15 minutes, then release any remaining pressure (if any) and remove the flan from the pressure cooker.  Uncover and allow to cool completely before refrigerating.  Let is refrigerate at least overnight before you remove the red velvet flan from the pan.

    Red Velvet Flan

    The food coloring kind of bleeds into the caramel and dyes it red, which I think adds some visual impact.

    red velvet flan slice

    There are a few air bubbles here and there, but the overall texture of this red velvet flan is very smooth and creamy.  Best of all, it tastes like actual red velvet!

    Red Velvet Flan

    Ingredients

    • 1/2 cup white sugar
    • 2 tbsp water
    • 1 can sweetened condensed milk
    • 1 1/2 cups half-and-half
    • 1/2 cup buttermilk
    • 2 tbsp cocoa powder
    • 1 tbsp red food coloring
    • 1 tsp vanilla extract

    Directions

    In a saucepan over medium heat, heat the sugar until it melts and turns medium amber.  Remove from heat and add the water (careful, as it may splatter), stirring until combined.  Quickly pour the mixture into a flan pan or baking dish.  Set aside.

    Using a blender, combine the condensed milk, half-and-half, buttermilk, cocoa powder, vanilla extract, and food coloring until smooth and uniform.  Pour mixture into prepared pan and cover.  Set pan on a trivet and lower into pressure cooker filled with 1 cup of water.

    Cook on Manual (High Pressure) for 12 minutes, then allow the pressure to release naturally for 10-15 minutes.  Remove the flan from the pressure cooker, uncover, and allow to cool completely on a wire rack.  Refrigerate 8 hours or overnight before serving.

    To unmold: Run a thin bladed knife around the inside of the flan pan to loosen the flan, then invert onto a baking dish (or a deep plate).  Lift the flan pan upward off the dish, shaking gently to loosen the flan.

    Oven Directions: Same as above, except use an 8″ or 9″ round pan.  Bake uncovered in a water bath at 350° for about an hour, or until center is only slightly jiggly.

  • Pascal’s on Ponce (A Review)

    Pascal’s on Ponce (A Review)

    Pascal’s on Ponce opened in Coral Gables back in 2000, and is still going strong.  Given the general fickleness of the restaurant industry, especially in South Florida, this says a lot.  Since it opened, it has been recognized by food-writers and critics nationwide for its made-to-order contemporary French cuisine.

    Pascal’s on Ponce, like many other restaurants in South Florida, is typically above my price range.  But, sometimes life throws you a bone.  In this case, that “bone” was a discounted 3-course meal promotion and someone else footing the bill.  That’s all the excuse that I needed to show up one night after work.

    This being a French restaurant, we started off with a piece of warm, crusty bread with soft butter.  I don’t think that the bread is made in-house, but it still tasted good.

    We were surprised at our table with an amuse-bouche of salmon cake.  I typically only like salmon in sushi form, as it tends to taste too “fishy” for me once it’s cooked.  However, I enjoyed this salmon cake, and the “fishyness” was quite muted.

    Pascal's on Ponce Lobster Bisque

    I’m a sucker for a good lobster bisque, so I already knew that it was what I wanted to order when it was listed as one of our fixed menu selections.  It was a very good lobster bisque, but my favorite lobster bisque still belongs to Devon Seafood.  The bisque was less creamy than other bisques that I have tried, and was pretty heavy on whatever alcohol was used when cooking the bisque.  Sherry, perhaps?

    Pascal's on Ponce Braised Beef

    For my entree, I ordered a braised beef dish with vegetables and a side of mashed potatoes.  I recall giving my vegetables to the person sitting next to me and keeping the mashed potatoes.  The swirled design of the plated mashed potatoes was a nice touch, and they were incredibly thick and dense potatoes.  I expected the beef to be more tender.  Despite not having that melt-in-your-mouth texture, though, it had great flavor.  The sauce went very well with the potatoes, which were a little bland on their own.

    Pascal's on Ponce Opera Cake

    For dessert, I opted for the Opera Cake.  For me, the cake was a little too heavy on the coffee.   My dinner companions felt otherwise.  I guess I need to be a caffeine junkie to truly understand, because they loved it.

    Service at Pascal’s on Ponce was interesting.  Different workers took our orders or heard our requests.  It wasn’t clear to us exactly who our server was (if we even had one).  The plus side is that, aside from the time it took the kitchen to prepare our food, we never really had to wait for anything.

    For more information on Pascal’s on Ponce, visit their web site at http://www.pascalmiami.com/


  • Caramel Apple Bundt Cake

    Caramel Apple Bundt Cake

    Skip to Recipe

    Lately, I have been rethinking my aversion to cooked fruit.  Those of you that are close to me know that I am always complaining about mushy fruit in desserts, like apple or berries.  And, those of you that only know me through this blog are probably now just realizing why this blog has so few pies, tarts, etc.  I am slowly starting to realize that my issue isn’t necessarily with all types of cooked fruit, but with canned fruit or the fruit in mass-produced pastries and pies (which is probably also canned).  It’s very much a texture thing with me, so cooking fruit at home gives me greater control over the texture and any other aspects that may make the fruit unpleasant for me.

    Before my gradual acceptance of including cooked fruit in desserts, there were a few exceptions.  Apples cooked in “apple pie filling” were meh, but apples cooked in CARAMEL SAUCE were a win.  I would normally serve it over cheesecakes or ice cream, but one day I found myself wondering if I could incorporate the caramel apples into a cake.  To be more specific, I decided to make a caramel apple bundt cake.  After a few experiments, several of which were failures, I came up with a recipe that worked for me.  The caramel apples still sink to the bottom of the pan, meaning that they end up at the top of the bundt cake.  But, I decided that it doesn’t matter.   The cake is delicious anyway.

    Make Caramel Apple Filling

    The first step is to make the caramel apple filling.  Melt some butter in a pan, then add chopped apples (sprinkle them with cinnamon, if you want).  Cook until they start to soften and are coated in butter, then add the sugar and continue cooking until the sugar melts.  Use a slotted spoon or strainer to strain the apples out of the pan and set aside.  Continue cooking until it starts to turn dark amber, then remove from heat and add the cream.  If it looks thin, you can return it to the heat and keep cooking after that so that it continues to thicken.  Once it’s done, remove from heat and stir in the apples.

    It’s best to make this a day in advance and refrigerate so that it gets firm.  It will be easier to fill the bundt with a firmer filling.

    makecaramelapplecake

    Once you’re ready, you can make your batter for the caramel apple bundt cake.  Cream the butter and sugar until fluffy, then add the eggs one at a time until combined.  Add your (pre-sifted) dry ingredients alternately with your liquid, then pour all but about 1 cup of the batter into your greased bundt pan.  Using the back of a spoon or a small spatula, trace a small “moat” in the center of the bundt.  Fill it with the apple filling, taking care that it doesn’t spill over towards the edges of the pan.  Top with the remaining batter and gently spread it across.  It doesn’t have to cover all of the apples.  The cake rises during baking, and that will take care of that.

    DSCN4538

    Into the oven it goes!

    DSCN4531

    When it’s done, let the caramel apple bundt cake cool in the bundt pan for no more than 10 mins before inverting.  If any of the caramel apple filling leaked out, you don’t want it to harden and make your cake get stuck to the pan.

    Plated caramel apple bundt cake

    You can see parts of the caramel apple filling had started to poke out, but who cares?  It’s delicious!

    Sliced caramel apple bundt cake

    I could never get the apples to stay in the middle of the cake, but it tastes great regardless!

    Slice of caramel apple bundt cake

    Check out those thinly sliced apples floating around up there!  The caramel apple bundt cake can be served warm or at room temperature.  I have never had issues storing this cake at room temperature, but feel free to refrigerate if you are squeamish about that sort of thing.

    Caramel Apple Bundt Cake

    Ingredients

    For the Caramel Apple Filling

    • 1/2 cup ((1 stick) butter
    • 1 cup granulated sugar
    • 4 medium Granny Smith apples, peeled and chopped
    • 1/2 cup heavy cream
    • 1/2 tsp cinnamon (optional)

    For the cake

    • 1 cup butter, softened
    • 2 cups brown sugar
    • 4 eggs, room temperature
    • 1 cup buttermilk (or regular milk)
    • 1 teaspoon vanilla extract
    • 3 cups all-purpose flour
    • 1/2 teaspoon baking powder
    • 1/2 teaspoon baking soda
    • 1 pinch salt


    Directions

    Make the caramel apples

    Melt the butter in a large skillet over medium-high heat. Add the apples and cinnamon (if using).  Cook, stirring, until they are coated with butter, about 2 minutes. Add the sugar and stir until the sugar dissolves and the liquid starts to boil, about 3 minutes.

    Using a slotted spoon, transfer the apples to a bowl. Reduce the heat to medium and cook the remaining liquid, stirring often, until it turns a deep amber. Remove the skillet from the heat to stop the cooking and add the cream. Be careful, as the cream may splatter. Return the skillet to the heat and bring it to a boil, whisking constantly. Remove the sauce from the heat and stir in the apples. Allow to cool until lukewarm.  Store in an airtight container in the refrigerator until ready to use.

    Make the cake

    Preheat oven to 350°F.  Generously grease your bundt pan (or spray with cooking spray)

    Sift together flour, baking powder, baking soda, and salt. Set aside.

    Beat butter and brown sugar until fluffy. Add eggs, one at a time, mixing well after each addition. Mix in the vanilla.

    Gradually add flour mixture, alternating with buttermilk. Begin and end with flour mixture. Mix just until combined.  Do not overmix!

    Transfer batter to prepared bundt pan, reserving about 1 cup of matter. Trace a small trench in the center of the cake batter and fill with chilled caramel apple filling (you will have some left over).  Top with remaining cake batter and gently spreading to cover most of the filling.  Bake for 55-70 minutes, or until a toothpick inserted into center comes out clean.  Remove from oven and allow to cool in pan for no more than 10 minutes before inverting.


  • Pressure Cooker Jerk Chicken Chili

    Pressure Cooker Jerk Chicken Chili

    Skip to recipe

    For the second year in a row, my job has organized a chili cook-off.  Now, chili isn’t really my forte, and it’s not something that I make often or ever.  But, ever since I got this Instant Pot I have gotten a lot more adventurous with my cooking.  So, I figured “why not?”

    I wanted to do something that was not only unique, but that had cultural significance.  Living in South Florida, chili is not something that is really huge like it would be in a place like Texas.  Plus, I have been cutting down on the red meat for health reasons and wanted a chicken chili.  I had been working on some different variations of “Latin” inspired chilis when a lightbulb went off.  We’re practically in the Caribbean…so why not make jerk chicken chili?

    Sure enough, I wasn’t the first person to have thought of this, and I came across a great recipe to use as a starting point.  Of course, the challenge became converting it into a pressure cooker recipe, but it worked out fairly well.  I added a few adjustments of my own based on my own experiences eating Caribbean food in South Florida.  And, I wound up winning First Place!  Woohoo!

    One thing to note is that I made this chili in a 6qt pressure cooker and had a lot of issues with it coming to pressure that I suspect may have been from the pressure cooker being too full.  So, the bottom would start to scorch before the pot could actually come to pressure.  If you have an 8qt pressure cooker, I think that you will be fine, but if you’re using a 6qt or smaller than I recommend scaling the recipe down to avoid this issue.

    UPDATE 3/19/2017:  As a test, I halved the recipe and cooked it in my 6qt pressure cooker, and still had the same issue where the pot would not come to pressure before the bottom would scorch.  Once I scraped the burnt bits from the bottom of the pot, it started to simmer pretty furiously and the pot pressurized after I sealed it again.  So, the trick seems to be bring the chili to a simmer prior to sealing so that it will come to pressure.  Also, scotch bonnet peppers vary in heat by color.  I used an orange one in my first batch and a red one in my second batch, and it was SO MUCH hotter.  So, choose your peppers wisely.

    Jerk chicken chili ingredients

    I got my ingredients together, including the tiny atomic bomb known as a scotch bonnet pepper.  Scotch bonnet pepper is a key component of Jamaican jerk, so of course it needs to be included in jerk chicken chili!  I mixed all of the spices and seasonings together to form a paste to make it easier to add in later.

    DSCN4590

    First, you want to cook your beans.  While they are cooking, prep all of your veggies so that they are ready to go.

    DSCN4593

    Once the beans are done, drain and set aside.

    prepthepot

    Saute your veggies until soft, then add your seasoning paste.  Add the tomatoes, beans, and chicken.  I added the tomatoes last in this case, but I would recommend adding those before the beans and chicken.  Then, seal the pot and cook on Beans/Chili setting or on High for 30 minutes.

    DSCN4612

    Let the pressure release naturally, then open and remove the chicken.  Set the pot to Saute to reduce the chili to the desired thickness, then shred your chicken and return to the pot.  Stir in the scallions.

    Finished jerk chicken chili

    Yup…good stuff!

    Plated Jerk Chicken Chili

    I served this jerk chicken chili with mango salsa and plantain chips for dipping, but it also tastes good over rice or scooped up with naan or roti.  It’s great on its own as well.  This can be made on the stovetop or slow cooker with some adjustments if you don’t have a pressure cooker.  It will just take a bit longer.  You can also save some time by using canned beans instead of dried.

    Pressure Cooker Jerk Chicken Chili

    Ingredients

    • 3 lbs bone-in chicken legs and thighs
    • 14oz dried red chili beans
    • 1/2 cup jerk seasoning (I used Mild.  Use Hot at your own risk!)
    • 2 Tbsp vegetable oil
    • 1 medium onion, diced
    • 1 red bell pepper, diced
    • 1 green bell pepper, diced
    • 1 yellow bell pepper, diced
    • 1 Tbsp fresh ginger, grated
    • 5 garlic cloves, minced
    • 1 scotch bonnet or habanero pepper, de-seeded minced (keep the seeds if you like extra spicy)
    • 1½ tsp all-spice
    • 2 tsp smoked paprika
    • 2 tsp thyme
    • 1 Tbsp cumin
    • 1 Tbsp ground cinnamon
    • 1 Tbsp chili powder
    • ¼ cup molasses
    • 1 1/2 tsp liquid smoke
    • 2 tbsp soy sauce
    • 1 tbsp cider vinegar
    • 1 cup chopped scallion
    • 2 15oz cans fire-roasted diced tomatoes (or 1 28oz can also works)
    • 1 cup chicken or vegetable stock
    • salt and pepper to taste

    Directions

    Add the beans to the inner bowl of the pot with 4 cups of water.  Cover and set the pressure valve to Sealing.  Cook on Manual (High Pressure) for 17 minutes, then allow the pressure to release naturally.  Drain and set aside.  In a bowl or measuring cup, combine the jerk seasoning, ginger, allspice, paprika, thyme, cumin, cinnamon, chili powder, molasses, liquid smoke, soy sauce, and salt and pepper so that it forms a loose paste.

    Clean the inner bowl (or, use a new bowl) and set the cooker to Saute/Brown setting.  When hot, add the vegetable oil and saute the onions and peppers until they start to turn translucent.  Add the garlic and continue to saute until fragrant, then add the spice paste and stir until it coats the vegetables.  Add the tomtatoes, beans, chicken/vegetable stock, and chicken.  Stir to combine.

    Turn off the pressure cooker, cover and set the release valve back to Sealing, and set to Beans/Chili function (or Manual High for 30 minutes).  When the timer runs out, allow the pressure to release naturally.

    Once the pressure has been release, open the pot and remove the chicken using tongs and shred it with a form.  Set the cooker back to the Saute setting and cook until the chili until it is reduced to your liking, then return the shredded chicken to the pot.  Stir in the chopped scallions.  Serve the jerk chicken chili immediately or store in an airtight container in the refrigerator until ready to consume.

    Enjoy!

  • Taco Craft (A Review)

    Taco Craft (A Review)

    When a craving for tacos hits, no ordinary taco will do.  This was the predicament that I found myself recently.  It was a Tuesday afternoon, and the workday had been particularly long and eventful.  Well, I needed no other excuse than that to treat myself to tacos on Taco Tuesday.  So began my quest to find tacos on one fateful Tuesday.

    Unsurprisingly, it wasn’t easy to find taco-centric restaurants in Miami that were also easy to get to after work AND observed Taco Tuesday.  Taco Craft fit all of the criteria, and had the added bonus of being owned by the same company that runs my favorite burger joint.  Okay, so that probably meant that they wouldn’t be authentic Mexican taqueria fare, but I am willing to make concessions if the flavor combinations are well-executed.  It was also easy to find.  It’s one block south of Sunset Place in South Miami.

    Taco Craft is kind of a quirky little spot, with Day of the Dead inspired artwork peppering the walls and a layout that is sort of open but not.  Their Taco Tuesday special is any taco for $3, excepting their Taco of the Day which is $4.  Given the usual price of an individual taco is about $5, this is not a bad deal.  It’s the perfect opportunity to try a variety of their tacos and see which you like best, which I did in two separate trips.

    20170131_181718

    Even though we were there for the cheap tacos, we couldn’t say no to guacamole.  While we were concerned that it would take up precious real estate in our stomachs that could be used for tacos, it was most definitely the right call.  This is probably one of the better guacamoles that I have had in South Florida.  It has the right balance of cilantro, lime, and seasonings.  The chips are kind of thick and kind of hard, unlike the thinner and lightly crunchy tortilla chips that I prefer.  Still, the guacamole is worth getting.

    20170214_174947

    During my second visit, we talked ourselves out of getting guacamole again and opted to try the oxtail empanadas.  They arrived steaming hot to the table, so be extra careful if you order these.  My friend really enjoyed them once they were cool enough to eat, while I was immediately turned off the moment I realized the filling had olives and eggs in it.  No bueno.

    20170131_183205

    Since their Taco of the Day was only $1 more than the Taco Tuesday prices, I didn’t mind the “splurge” and started with one of those.  Tuesdays they have their Mojo Pork taco.  It’s topped with avocado cream, pork cracklings, and pickled onions.  It is also the best taco from Taco Craft out of all of the ones that I tasted.

    20170131_193614

    The skirt steak (left) and braised chicken (right) tacos were also good.  I was skeptical about the chicken at first because chicken tacos almost always wind up being a letdown, but the chicken was moist and flavorful.  The chicken appears to be the Taco Craft rendition of Chicken Tinga, only not called that because we apparently won’t know what that means.  The steak chunks in the steak taco were tender, and the toppings melded well together.

    20170131_185122

    The other tacos that I tried on my first trip were the brisket (left) and crispy pork (right) tacos.  I wound up sending the brisket taco back and asking for another mojo pork taco in its place.  The brisket was kind of dry and bland, and the taco had a sweet sauce that screamed too much “BBQ” and not enough “taco.”  The crispy pork taco was sort of like an interpretation of tacos al pastor, as it had a pineapple sauce.  The pork wasn’t completely crispy, but it had a good smokey flavor that made this taco my second favorite of the night.

    20170214_181149

    There were enough tacos left on the menu that I hadn’t tried to make it worth a return trip.  I decided to get out of my comfort zone and try a shrimp taco (left) and a mushroom taco (right).  I had law expectations for the shrimp taco, because the menu described the shrimp as “tempura fried” and I expected to be chewing through lots of soggy batter.  Instead, the shrimp have a very thin coating of batter, making them crunchy on the outside and tender on the inside.  I had them hold the sauce, but the mango salsa on top of the shrimp was more than enough flavor to carry this taco into my top three.  The mushroom taco, on the other hand, was kind of one-note.  I appreciate that they put forth an effort to accommodate herbivores, but I don’t think that this was a particularly successful taco.  The mushrooms are kind of bland and soft, so there’s no plays on texture or flavor to help the taco be a little more exciting.

    20170214_185254

    My greatest regret, though, was ordering the Gringo taco (left).  As the name implies, this taco is reminiscent of the “typical American taco” with ground beef, sour cream, lettuce, tomato, and cheddar cheese on a flour tortilla.  It basically tasted like it was made with a taco kit from the grocery store.  Mind you, I don’t think that taco kit tacos are necessarily BAD, but I don’t want to go to a restaurant and pay for something that I can make at home.  I expected some sort of twist or different spin on the interpretation of an American taco, but that didn’t happen.  Fortunately, I had the foresight to order myself another Mojo Pork taco to go along with it, so my disappointment with the taco was soon forgotten.

    I think that Taco Craft is worth checking out at least once, but make sure you come on a Tuesday when you can afford to make a mistake or two in making your taco choices.  Be prepared to wait, though.  Both times that I have paid them a visit, the service has been on the slow side.

    For more information on Taco Craft, please visit their web site at http://tacocraft.com/