Blog

  • Pressure Cooker Red Velvet Cheesecake

    Pressure Cooker Red Velvet Cheesecake

    This is a quickie post due to popular demand.  I made this red velvet cheesecake last week with mixed results, but Valentine’s Day is right upon us and I REALLY wanted to have this cheesecake as my go-to.  So I tried again today with a few adjustments and got it just right!  I posted a picture to an Instant Pot group on Social Media and got several requests for the recipe, so here it is!

    If you don’t know what an Instant Pot is, you’re missing out!  I won’t bore you with the details, mostly because everything there is to know is already available online and said more eloquently.  Google is your friend.  Suffice to say that making cheesecake in the Instant Pot (or any electric pressure cooker) is something that I only discovered a month or two ago, but it’s been GREAT!  If you’re new to making cheesecakes in an Instant Pot, I recommend checking out this link for reference.  It will point you in the right direction.
    [Skip to recipe]

    DSCN4432

    Start by preparing your pan.  Mix your cookie crumbs with melted butter and press onto the bottom of a well-greased cheesecake pan.  This is a 7in cheesecake pan with a removable bottom.  It fits perfectly into the Instant Pot!

    preparecheesecakebatter

    Then, make your cheesecake batter.  Use your preferred method.  I like using a blender or food processor because I am lazy, but some people do it with a stand mixer of by hand.  That is also fine.  Once you have your smooth batter, pour it into your prepared baking pan.  While you’re making your batter, prepare your Instant Pot by pouring about a cup of water into the pot and placing the trivet in there, then press the Saute button to allow the water to come to a simmer.  Fashion a sling out of foil and place it underneath your pan, then use it to lower your cheesecake into the Instant Pot.

    DSCN4446

    Once your pan is in the pot, turn the Instant Pot off, cover and seal it, and then set it to Manual for 20-25 minutes, depending on your preferred texture.  I set it to 23 minutes and then did a 15 minute Natural Release.

    DSCN4451

    Once time is up, you can open your Instant Pot and use the foil sling as handles to pull the red velvet cheesecake out.  Make sure you check for doneness.  If it’s still wobbly, you can put it back in and cook for a few more minutes.  Blot any condensation on the surface of the cheesecake with paper towels.  Afterwards, allow it to cool completely and then refrigerate until firm.

    Red velvet cheesecake

    There you have it!  Beautiful and delicious Instant Pot red velvet cheesecake!  Top with dollops of whipped cream for a dessert to impress, and it will look like you slaved all day over it!  Don’t worry, I won’t tell.

    Red velvet cheesecake

    Ingredients

    • 1 cup Oreo cookie crumbs
    • 1 tbsp butter, melted
    • 2 8oz packages cream cheese, room temperature
    • 2 eggs, room temperature
    • 1/2 cup sugar
    • 1/2 cup buttermilk, room temperature
    • 1 1/2 tbsp Dutch processed cocoa powder
    • 1/2 tsp vanilla extract
    • 1 tbsp red food coloring
    • 1/2 tsp white vinegar

    Directions

    Prepare the Instant Pot by adding 1 cup of water and a trivet or steaming rack to the inner pot.

    Combine the cookie crumbs and melted butter and press onto the bottom of a 7in springform or cheesecake pan.  If you’d like, you can pre-bake for 5 minutes at 350°, but this is not required.

    Set the Instant Pot to the Saute function.  In a food processor, combine the cream cheese, eggs, sugar, and cocoa powder.  Blend until almost combined.  Add the buttermilk, food coloring, and vanilla extract and mix until smooth.  Mix in the vinegar.

    Pour the cheesecake batter into the prepared baking pan.  When the water in the Instant Pot has started to simmer, place the cheesecake pan in the inner pot.  Press cancel.  Cover and seal the Instant Pot and set it to Manual for 20-25 minutes, then Natural Release for 15 minutes.  Open the lid carefully to avoid water dripping onto the cheesecake.  Remove cheesecake from pot and blot the cheesecake with paper towels to remove condensation.

    Allow to cool completely on a wire rack, then refrigerate the red velvet cheesecake at least 4 hours before serving.


  • Red Velvet Rolls

    Red Velvet Rolls

    Skip to recipe
    Valentine’s Day is just around the corner, and LOVE is in the air.  In my case, it’s love of delicious things.  For me, food has always been a very emotional experience.  As such, making food is one of the ways that I express myself.  Nothing makes me happier than to feed the people close to me and see them enjoy my cooking.  But, on the same note, the thought of someone that I don’t like enjoying something that I made is absolutely intolerable.  Food is love.  MY love.  You can’t have any of it.  So there.

    Valentine’s Day, of course, means all manner of red and pink treats flying around.  And, when a baker thinks of things that are red, red velvet is usually one of the first things that comes to mind.  And, since they’re red, these morsels of red-velvety goodness are PERFECT for a post on the month of a holiday that is associated with this color.  I have been meaning to post this recipe for quite some time, but anytime I made them I would forget to take pictures.  So, “Valentine’s Day post” became “Independence Day post,” which became “Okay, Christmas post for sure!”  And, well, you see how well that went.

    But, here they are!  Lovely red velvet rolls with a sweet cocoa filling that are perfect for a Valentine’s Day breakfast or brunch.  Make them for your sweetie.  Make them for your friends.  Heck, even make them for yourself!  Hint: they freeze well.

    DSCN4362

    I love my bread machine because it takes most of the work out of these types of undertakings.  Just toss all of your dough ingredients in the machine, and let the Dough cycle run its course.

    DSCN4363

    While the bread machine is working on your dough, you can start getting the ready for the next step.  Have your pan, sugar mixture, and softened butter ready to go.

    DSCN4366

    Once the bread machine has done its work, you are rewarded with vibrant red dough!

    rolloutdough

    Turn out your dough on a lightly floured surface and roll into a rectangle.  Spread your rectangle with butter about 1/2 inch away from the edges all around, and then sprinkle your sugar mixture evenly over that.

    letthemrise

    Carefully roll the dough (starting from one of the shorter sides) so that you get a cylinder shape.  Cut the roll of dough into 12 pieces.  Get them as close to the same size as possible. Lay them in your greased baking pan.

    At this point, you could let the red velvet rolls rise for about an hour and then bake.  However, my favorite strategy is to make them the night before and then let them rise in the refrigerator overnight.  Just cover your pan and put it in the fridge until the next morning.

    Baked red velvet rolls

    Using the cold rise method, I bake the red velvet rolls for half an hour.  I start with a cold oven.  That is, you do not preheat the oven before you bake them.  Just pop them in the cold oven, THEN turn it on.  Once they’re done, frost them with cream cheese icing while they’re still hot.

    Red Velvet Rolls

    Aaaaand DIG IN!

    There are a lot of steps to making any type of “roll,” but it’s easier than it looks.  Plus, the waiting is rewarded with something warm and amazing that makes people go “Mmmmmm.”  Don’t be afraid.  It’s totally worth it!  Make these red velvet cocoa rolls and I’m sure they will be added to your permanent recipe book.

    Red Velvet Rolls

    Ingredients

    For the dough:

    • 4 1/2 tsp bread machine yeast
    • 3/4 cup buttermilk, warm
    • 1/4 cup warm water
    • 1 large egg
    • 1 tbsp red food coloring
    • 3 tbsp cocoa powder
    • 1/3 cup granulated sugar
    • 4 tbsp melted butter
    • 1/2 tsp salt
    • 4 cups all-purpose flour

    For the filling:

    • 1/3 cup white sugar
    • 1/3 cup brown sugar
    • 2 tbsp cocoa powder
    • 4 tbsp butter, softened

    Additional ingredients:

    • 1-1 1/2 cups cream cheese icing

    Directions

    Add the dough ingredients to the bowl of your bread machine according to the manufacturer’s directions.  Select the Dough cycle and press Start.  While the dough is being prepared, combine the white sugar, brown sugar, and cocoa powder for the filling and set aside.  Grease a 13″ x 9 ” baking pan.

    When the Dough cycle is complete, turn the dough out onto a lightly floured surface.  Roll the dough to an approximately 12″ x 16″ rectangle.  Brush with the softened butter and then sprinkle with the sugar mixture.  Starting with the shorter side, roll the dough into a cylinder and cut into 12 equal pieces.  Arrange in your prepared baking pan, then cover and refrigerate overnight.

    Bake at 350°(do not preheat the oven first) for 25-30 minutes, or until rolls are lightly browned. Top with cream cheese icing as soon as they come out of the oven.  Serve warm.

    Makes 12 rolls

  • Ichimi Ramen (A Review)

    Ichimi Ramen (A Review)

    Before a certain ramen place opened up in Brickell, my experiences with ramen were limited to the cheap kind that comes in packets.  You probably know the kind.  That stuff has kept many college kids from starving to death.  Hell, it even got me through a rough patch post-college.  For a few months, my diet consisted almost entirely of ramen noodles and oranges (this is Florida and you can get a bulk bag of oranges for a decent price).  My family lived about an hour away at the time, and they never had trouble convincing me to come to their house to help them with computer issues or my niece’s homework if there was the promise of a free meal and the chance to do my laundry for free.  I remember being at my absolute thinnest back then.  Poverty is truly the best weight loss plan, ha!  I certainly don’t regret it.  It gives me a very profound appreciation for everything that I get to eat as a mostly financially-stable adult.  It also means that overpaying for mediocre food is a big no-no.  When you’ve experienced a life where every penny counts, you just can’t justify throwing money away like that.

    But, I digress.  We were talking about ramen, and about how Brickell opened up my mind and my taste buds to the wonderful world of ACTUAL ramen.  Rich, complex broth.  Fresh noodles and vegetables.  A comforting aroma that wafts into your nostrils and brings a smile to your face.  Ah, real ramen is a wonderful thing.  Unfortunately, through the magic of inflation and supply and demand, the bowls that started at $18 are now $30.  While they are still worth the price when I’m in the right mood and can afford the splurge, I was definitely keeping my eyes and palate open for alternatives.  Plus, Brickell isn’t exactly around the corner, and I loathe driving.  When I found out about Ichimi Ramen in Coral Gables (closer to where I live than Brickell), I thought my ramen prayers had been answered.

    There aren’t really any signs on the street, so it’s hard to see if you are simply driving by.  I happened to find it by accident while I was walking to the parking garage from an appointment.

    20161117_115402The restaurant isn’t large, but it was cozy and the staff welcomed me in with a smile.  I arrived not long after the restaurant opened for the day, so I had my pick of seating.

    20161117_121122The other plus side of visiting during the day was finding out that they have a lunch special.  You get a bowl of ramen, 3 gyoza, a salad, and homemade Japanese pickles for $14.  Not a bad deal at all, especially not for Coral Gables.

    20161117_121135Aside from the presence of bean sprouts, which I am not a fan of, the salad was my favorite part of the meal.  Their Asian dressing was very refreshing.

    20161117_121145The gyoza looked delicious and had beautiful plating.  Unfortunately, I found them to be a bit bland and unremarkable when compared to gyoza that you can get elsewhere.  Still, they were not bad.  I ate them all, although I didn’t touch the pickles, so I can’t say if those were any good.

    20161117_121155The moment of truth came when it was time for me to try the actual ramen.  I forgot to ask them to hold the egg (don’t like eggs), but it was easy for me to scoop it out and set it to one side.  It’s still a shame, since I know that someone else would have greatly appreciated it.  For the price, I would say that the ramen was good.  However, the broth lacked the richness and depth of flavor that I have enjoyed from other ramens.  For some reason, it felt a little too watery. The pork belly in the ramen was great, so no complaints there.  I just wish the broth would have had that richness that feels like it’s enveloping your mouth.  Then again, for half the price of the other ramen, there had to be a trade-off.

    Ichimi Ramen is a nice little spot to have a good and filling lunch at a decent price.  I would go back if I wanted to satisfy my ramen fix on a tight budget.

  • Heath Bar Pound Cake

    Heath Bar Pound Cake

    Skip to recipe
    When I was younger, Heath bars were one of my mother’s favorite candy bars.  I am pretty sure that I inherited my love of caramel from her, and chocolate covered crunchy toffee is right up her alley.  She has always had an obsession with crunchy things.  She likes her cookies crunchy instead of chewy, and chews ice so much that I often joked that she probably has undiagnosed Pica.  I prefer caramel over toffee, but that certainly doesn’t mean I will turn down a Heath bar if it’s presented to me.  And, it definitely won’t stop me from grabbing a bag of Heath bars to make into a pound cake.

    As with most recipes that contain candy, I came up with this recipe around Halloween as a means to use up by abundance of leftover Halloween candy.  It worked out so well that I have made it several times since, and always to rave reviews.  It’s basically just a caramel pound cake batter with Heath bar pieces mixed in for a double dose of buttery caramel goodness.  And, since it’s a pound cake, there’s no frosting to mess around with.  It doesn’t NEED any.

    heathbarcake1

    Start with your oils and your sugars.  Beat them until they are soft and creamy, and then incorporate the eggs, one at a time.  Beat after adding each egg.  While you’re doing this, you can sift your dry ingredients and crush your candy bars.  I unwrapped them and put them in a ziploc bag, then crushed them with a rolling pin.

    heathbarcake2

    Add the dry ingredients alternately with the milk, mixing to get a smooth batter.  Once all of the dry and wet ingredients are mixed in, fold in the Heath bar pieces.

    dscn4004

    Heath bar goodness!  Pour this batter into a greased Bundt pan and bake.

    dscn4005

    You want to let it cool for about 10 minutes before removing from the pan, but not more more than that.  It will be easier to take it out of the pan while the chocolate pieces are still kind of melty, so that it’s less likely that they will stick to the pan and make it difficult to unmold.

    dscn4012

    You can’t tell from the photo, but this cake smells AMAZING!  I find it best served warm, but it also tastes just fine at room temperature.  I hope you like this cake as much as I do!

    Heath Bar Pound Cake

    Ingredients

    • 1 cup butter, softened
    • 1/2 cup vegetable oil
    • 2 cups packed brown sugar
    • 1 cup white sugar
    • 5 eggs
    • 3 cups all-purpose flour
    • 1/2 tsp baking powder
    • 1 tsp vanilla extract
    • 1 cup milk (or buttermilk, if you have it)
    • 1-2 cups chopped Heath bar pieces

    Directions

    Preheat oven to 325° F. Grease and flour a large Bundt pan, or spray with nonstick cooking spray.

    Cream together the butter, oil, brown sugar, and white sugar. Add eggs one at a time, beating well after each addition. Stir in 1 teaspoon vanilla.

    Sift the flour and baking powder. Add alternately with milk to the creamed mixture. Gently fold the Heath Bar pieces into the batter. Pour into prepared pan.

    Bake in preheated oven for 60 to 90 minutes, or until a toothpick inserted into the center comes out clean. Let stand in pan 10 minutes, and then turn out onto a wire rack and cool completely.


  • Da Burger Shack (A Review)

    Da Burger Shack (A Review)

    Ah, burgers.  Like most “All-American” foods, burgers are basically a balanced meal.  You’ve got all of the primary food groups: meat, dairy, vegetables, fruit (yes, tomato is a fruit), and grain.  It’s the balanced meal that you can hold in your hand!  What more could you possibly ask for?  Okay, maybe a delicious burger that’s zero calories is a bit much, but one can dream.  A good burger is not necessarily difficult to come by in Miami, but it might require making a drive.  And, sometimes you just don’t feel like doing all of that.  So, it’s always nice to try and find new places that serve good burgers around Miami.  That way, no matter where you are, there’s a good burger somewhere nearby.

    Da Burger Shack is one of those food truck success stories where a food truck business did well enough to open an actual storefront.  They serve Chicago-inspired burgers, although I’m not exactly sure what that means.  Given the amount of praise that is heaped onto this place, I’m surprised that it took me this long to discover them.

    20161105_135826
    In case you forget where you’re eating while you’re waiting for your food.

    The restaurant is probably about the size of a fast food chain restaurant.  However, while you do order at a counter, your food is made-to-order.  The person at the counter was friendly and knowledgeable about the menu, although I already had an idea of what I wanted.

    20161105_141102I ordered the BBQ, Bacon, and Cheddar burger (otherwise known as my Burger Holy Trinity).  As the name implies, it’s a burger with BBQ sauce, bacon, and cheddar cheese.  It was also topped with sauteed onions and a fried onion ring.  The burger was cooked exactly how I asked (medium).  It was juicy, tender, and flavorful.  The bacon had the right amount of chewiness.  The fries I found to be kind of average, but they are included with the burger so I won’t complain much.  They were just fine with ketchup.

    Da Burger Shack has not replaced my favorite burger place in Miami, but it is definitely worth a return trip.

    For more information on Da Burger Shack, visit their web site at http://www.daburgershack.com/105089/home


  • Irish Cream Brownie Trifles

    Irish Cream Brownie Trifles

    Skip to recipe
    The title says it all, but I will say it again: Irish Cream Brownie Trifles.  Pieces of brownie are layered with Irish Cream pastry cream, then topped with a swirl of whipped cream and garnished with a chocolate covered espresso bean.  Itty, bitty bites of happiness in an itty, bitty dish.  Who could ask for more?

    Broke Baker veterans are probably already aware that, every year, my employer throws a bake-off during the holidays.  Any employees that can bake, or have relatives that can bake, are encouraged to enter. The result is a day full of cakes, pies, and all sorts of other treats.

    This was my third year entering.  My coworkers once advised that, in order to win, your dessert needs to contain alcohol.  I scoffed at the idea, although I still made Eggnog Mini Cheesecakes that had rum in both the cheesecake and the caramel sauce for the first year.  The 2014 winner was a Coquito Rum Cake, which I took to mean that the judges are more partial to desserts with latin-inspired flavors.  So, last year I took this knowledge at face value and made Chocolate Coquito Macarons.   While the judges found them to be good, a Coquito Flan took the title.  I heard through the grapevine that my macarons were considered good, but that they didn’t think they really qualified as “dessert.”  So, for 2016, I went into this armed with the knowledge that my entry had to both contain alcohol and represent the traditional idea of a “dessert.”

    I went with Irish cream because it’s sweet and translates easily into dessert form.  I considered cake, cheesecake, and even mousse when I was thinking of what to make.  Ultimately, I decided on making trifles because they seemed like the most unique option.  Plus, serving them in disposable mini cups from the local party supply store made for a nice presentation without a whole lot of messing around with icing or complex decorating.  The trifles are a bit time-consuming, but they are not particularly labor-intensive.  All you have to do is bake a thin layer of brownie, cut it into small circles, and then layer it in mini trifle dishes with the pastry cream.  A dollop of whipped cream finishes it off.  They just require a little bit of planning so that you have all of the components ready to go in the right order.  In the end, I got First Place in Presentation (for the third year in a row), but nothing in Taste except for a pat on the back from several judges for the deliciousness of my trifles.  And, since they DID receive a warm reception, I decided to share the recipe with you all.

    The recipe below makes enough brownie for about 2 dozen mini trifle cups filled with brownie circles, but about enough pastry cream for 36 trifles total.  What I usually do is chop up the brownie scraps and use that to layer the last dozen.  You could also always make a regular-sized trifle with it by just cutting a regular pan of brownies into cubes and layering it with the cream.


    20161216_085442

    Irish Cream Brownie Trifles

    Ingredients

    • 3/4 recipe batch of brownie batter (from a 13″ x 9″ pan recipe)
    • 1 cup sugar
    • 6 large egg yolks (I used 3 whole eggs)
    • 6 tbsp cornstarch
    • 1/2 tsp salt
    • 3 3/4 cups half-and-half
    • 3/4 cup Irish Cream
    • 1 tsp vanilla extract
    • 1 1/2 cups sweetened whipped cream (optional)

    Directions

    Make the pastry cream:

    Place the half-and-half, irish cream, and sugar in a saucepan over medium heat.

    In a separate bowl, whisk the egg yolks, salt, and cornstarch until there are no clumps and mixture is pale in color.  Set aside.

    When the saucepan mixture is about to come to a boil, remove from heat.  Slowly add the hot mixture to the egg yolk mixture, 1/4 cup at a time, whisking constantly.  Once about half of the hot mixture has been added to the yolk mixture, pour the yolk mixture into the saucepan with the rest of the hot mixture.  Return to heat and continue to cook, stirring or whisking constantly, until mixture has properly thickened.

    Remove from heat and strain the mixture into a heat-proof bowl.  Add the vanilla and stir gently to combine.  Cover with plastic wrap and refrigerate for several hours or overnight before using.

    Make the brownie:

    Preheat oven to 350°.  Line a 10″ x 15″ jelly roll pan with parchment paper.  Spread the brownie batter evenly into the jelly roll pan, then bake for10-15 minutes or until a toothpick inserted in the center comes out clean.  Allow to cool completely on a wire rack before using.

    Assemble the trifles:

    Using a cookie or biscuit cutter the same size as the opening of your trifle cups, cut the cooled brownie into circles.  Place one circle into the bottom of a trifle cup, then spoon or pipe a small amount of pastry cream on top of it.  Place another brownie circle on top of the cream and gently push it down until there are no gaps between the brownie and the cream.  Spoon or pipe additional pastry cream until it reaches the top of the cup, then gently tap the bottom of the cup against the counter to let the cream settle.  When you run out of brownie circles, you can cut up the brownie scraps and layer those in the cups.  Repeat the process until either no brownie or pastry cream remains.  Top with whipped cream, if desired.

    Makes about 3 dozen

  • Pumpkin Cinnamon Rolls

    Pumpkin Cinnamon Rolls

    Skip to recipe
    I owe all of you a sincere apology.  I really wanted to have this recipe posted before Thanksgiving, because it’s such an ideal breakfast for the holiday.  Unfortunately, things happened, and here we are.

    I originally made these to get rid of some leftover pumpkin that I had been using for another project.  They were so good that I decided that I wanted to post them to the blog as a special Thanksgiving post.  Well, Thanksgiving has come and gone, but I still think that this recipe is worth a post.  In fact, I did make these for my sister’s family as I am visiting them in Phoenix as a special After Thanksgiving breakfast treat.  Needless to say, my nieces love me.

    Special thanks to my sister and her family for allowing me to take over their kitchen.  Also, because I am the first one to use the bread machine that I bought her as an early Christmas gift.  I don’t think she minded at all, though.

    20161126_073434

    Add the ingredients in the bread machine according to the manufacturer’s directions. Then, set it to the Dough Cycle and let the machine do its thing.

    20161126_083036

    When the dough is almost done, mix together the brown sugar and the spices.

    20161126_090556

    Once the dough cycle is complete, your dough will be ready for rolling.

    20161126_090836

    Drop the dough onto a floured surface and sprinkle with more flour.

    20161126_091236

    Roll the dough out into a rectangle.  Or, as close to a rectangle as you can get.

    20161126_091708

    Then brush with softened butter…

    20161126_092000

    …and sprinkle evenly with the brown sugar and spice mixture.

    20161126_092435

    Roll the dough into a cylinder and cut into 12 equal pieces.  Unfortunately, my part-time photographer for the day was one of my nieces, who wasn’t exactly honest when she told me that she knew how to take photos.  So, we missed the pictures of me rolling and cutting the dough.

    20161126_100008

    Let them rise in a warm place until doubled in size.  This should take about an hour.

    20161126_102648

    Bake them for about 20 minutes, or until lightly browned.

    20161126_103051

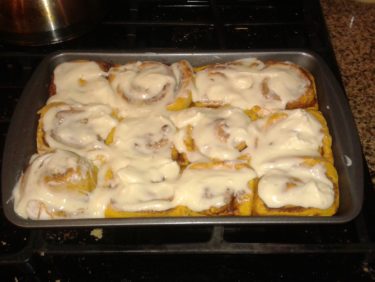
    Top the rolls with cream cheese icing while they are still hot.  I once also topped them with a caramel icing to accommodate someone that hates cream cheese. That was also good, but I think that the cream cheese icing is better.

    If you don’t have a bread machine, you can still make these by replacing the bread machine yeast with active dry yeast and kneading/rising by hand.  The process will be a little more involved, but it can be done!  I sometimes also use pre-mixed Pumpkin Pie Spice instead of the individual spices with great results.

    Pumpkin Cinnamon Rolls

    (Adapted from Taste of Home Recipe)

    Ingredients

    • 3-3 1/2 cups flour
    • 1 package (2 1/4 tsp) bread machine yeast or instant yeast
    • 3/4 cup pumpkin puree
    • 1/2 cup warm milk
    • 2 tbsp sugar
    • 2 tbsp butter, melted
    • 1/2 tsp salt
    • 1 egg, lightly beaten
    • 1 cup brown sugar
    • 4 tbsp butter, softened
    • 1 tbsp ground cinnamon
    • 1/2 tsp ground nutmeg
    • 1/4 tsp ground cloves
    • 1/4 tsp ground allspice
    • 1-1 1/2 cups cream cheese icing

    Directions

    Add the first 8 ingredients to the bowl of the bread machine according to manufacturer’s directions.  Set the machine to the Dough cycle and turn on.  Meanwhile, combine the brown sugar, cinnamon, nutmeg, cloves, and allspice.

    When the dough cycle is complete, turn the dough out onto a floured surface.  Sprinkle with additional flour and roll into a rectangle approximately 12″ x 16″.  Brush with the softened butter, then sprinkle with the brown sugar and spice mixture.

    Roll the dough into a log and cut into 12 equal pieces.  Place the pieces in a greased 13″ x 9″ baking pan.  Cover and allow to rise in a warm place until doubled in size, about 1 hour.

    Once risen, bake at 350° for 20-25 minutes, or until golden brown.  Top hot rolls with cream cheese icing.  Serve warm.

    Makes 12 servings

  • Antojitos Mexicanos (A Review)

    Antojitos Mexicanos (A Review)

    Decent Mexican food is very hard to come by in South Florida.  Sure, there are pockets here and there, as well as the occasional “hidden gems,” but stellar Mexican food is not something that South Florida is known for.  It sucks for people like me, who would eat tacos several times a week if I could get away with it.

    Sometimes, you just really need a taco.  That’s where I was one Tuesday afternoon, which is quite apt since “Taco Tuesday” is a thing even all the way over here in Miami.  Through a streak of luck, I found a place that serves Mexican food not too far away.  Antojitos Mexicanos Tenorio is located in the Olympia Heights area in Southwest Miami. It’s situated in a very nondescript shopping center on the corner of Bird Rd and 147th Ave.  I drove by it twice before I finally spotted it.

    20161018_181441

    The restaurant has that hole-in-the-wall dive kind of feel to it.  There are no actual tables in here.  Just two counters with stools.  Thankfully, I came early enough and on a slow day, so I had no trouble finding a place to sit.

    20161018_181521

    They had horchata on their menu, which is automatic bonus points for me.  Their version of this rice drink had the perfect balance of richness and spice.  No watery horchata here.  Already, this place was showing some promise.

    20161018_182136

    In addition to the daily specials, they also have specials on their menu that are available every day.  They have a 3 taco special for a discounted price, but only if all three tacos are the same kind of meat.  Since I wanted to try different meats, I ordered three tacos a la carte to try.  I got steak, carnitas (shredded pork), and al pastor.  Taking a bite out of these was like taking a bite out of a taco from a street vendor.  I mean that in the best possible way.  The corn tortillas were tender, yet held together.  A squeeze of lime on the tacos rounded it out.  Of these three, my favorite by far was the al pastor.

    20161018_184046

    In fact, it was so good that I ordered another, along with a chicken taco to try.  The shredded chicken, while flavorful, felt a bit on the dry side to me.  The al pastor tacos were the clear winners for me.

    The counter service was very polite, and the food is prepared to order but quick.  Be prepared to wave someone down if you need something, though.  Once you get your food, they kind of forget that you’re there.  Still, next time I’m in the mood for some good tacos, I know that Antojitos Mexicanos where I need to go.


  • Burgerliscious 2016

    Burgerliscious 2016

    Another year, another barrage of burger competitions.  As usual, Burgerliscious in Coral Gables is the last burger festival that I attend every year, and  the competition was fierce!  Local restaurants brought out their “A” game.  And, as usual, some fared better than others.

    I enjoy the fact that a lot of these competitors tend challenge my idea of what the “ideal” burger is, and sometimes even bring me around to trying new things on my burgers.  Of course, this means getting out of my comfort zone and trying burgers with toppings that I typically don’t like (hello there, mayo, onions, and pickles).  Sometimes, I wind up pleasantly surprised.

    So, who impressed me at Burgerliscious 2016?  Let’s see!


    Burgerliscious 2016 1-4

    Burgers 1-4

    • Burger #1: Fetes and Events – Fondue Burger
      • Beef sliders with truffle tomato jam, crispy prosciutto, and brown butter sweet potato bread.
      • What stood out the most to me about this burger was the crispy prosciutto, which was a pleasant salty crunch for me.  Unfortunately, the fondue was kind of lumpy and the burger was already cold, which ruined it for me
    • Burger #2: Swine Southern Table and Bar – Swine Burger Sliders
      • Short rib, brisket, and smoked pork blend patty with homemade dill pickle, thick-cut house-smoked bacon, lettuce, tomato, American cheese, and Swine Special Sauce
      • Swine, whenever they participate, always turn out their same signature burger.  As the saying goes, “Don’t mess with the classics.”  As always, it’s a strong contender with an incredibly juicy and flavorful patty, awesome bacon, and melty cheese.  It was one of my favorites
    • Burger #3: The Big Easy – The Big Easy Burger
      • Local natural prime beef patty, tomatoes, red wine onion jam, rocket leaves, Braai sauce
      • I had two Google the last two ingredients on their burger to even know what they actually were.  Despite the exotic ingredients, this burger was pretty ordinary.  What stood out the most was that the bread was kind of dry and hard, which wasn’t pleasant for me
    • Burger #4: Christy’s – Christy’s Slider
      • House-ground sirloin burger, portabella mushroom, aged Swiss cheese, truffle aioli, and bibb lettuce on a Hawaiian roll
      • I’m usually not a had of mushrooms on my burgers, but this burger’s bite of portabella was one of my favorites of the evening.  The flavors of the burger came together very well.

    Burgerliscious 2016 5-8

    Burgers 5-8

    • Burger #5: Doctor’s Hospital – Mediterranean-inspired Burger
      • Bruschetta topping (red onion, garlic, slivered kalamata olives, tomato, european cucumbers, Avocado, lemon zest, and fresh Herbs de Provence), Herb cheese (whipped Mascarpone cheese, whipped butter, fresh garden herbs), chopped fresh arugula, frise, and romaine, on a Hawaiian roll grilled with herb butter
      • Doctor’s Hospital always comes up with some pretty crazy burgers, which kind of makes me imagine that their chef is some culinary mad scientist and we are all his guinea pigs.  I was very fearful when I noticed that there were olives on the burger (which I probably hate even more than mayo), but I tried it anyway.  Sadly, one bite was enough for me to know that this wasn’t for me.
    • Burger #6: John Martin’s – The Pub Burger
      • Beef patty with Irish cheddar, bacon, and pickles
      • This burger was confusing.  It had a patty that was incredibly dry and tasted like it might not actually be beef, although the claims were that it was locally sourced beef.  Maybe it was just the way that it was prepared, but this burger was not a success.  The chips that came with it were great, though.
    • Burger #7: Rok:Brgr – Rok this Way Burger (People’s Choice Winner!)
      • Special “ROK” burger blend patty topped with 10-hour smoked brisket, aged cheddar cheese, Chioptle BBQ aioli, pickled red onions, and house made pickles
      • Rok:Brgr does it again!  The brisket, covered with the melted cheddar cheese, simply melted in your mouth, and the beef patty was juicy and cooked to perfection.  The tang of the red onions gave a nice contrast that rounded the flavors of the burger out.  My only complaint is that this burger is not on their restaurant menu yet.  They need to get on that.
    • Burger #8: The Cafe at Books and Books – The One Night Stand Burger
      • A 50/50 chuck and sirloin blend patty topped with J Wakefield Brewing Up Smoked Ported BBQ Sauce, caramelized onions, and Bleu cheese
      • The Cafe at Books and Books normally serves up one of the weirdest burgers of the evening every year, so it was a shock for me to find their station had such a tame burger.  The Bleu cheese and the caramelized onions paired very well together (*gasp!*…I enjoyed onions on my burger!).  I think this was one of the better burgers of the night.

    burgerliscious2016_9-12

    Burgers 9-12

    • Burger #9: Shula 347 Grill – Shula Slider
      • American Wagyu beef topped with Vermont aged cheddar, Cipollini onions, and bacon jam
      • I was very underwhelmed by this burger.
    • Burger #10: Ventanas – The Ventanas Burger
      • A beef patty with tomato jam, arugula, Bleu cheese, and spiced bacon on a brioche bun
      • This was a very good burger put out by a newcomer on the event roster.
    • Burger #11: Off the Mile – The Frita
      • A Cuban frita (burger patty made with pork and chorizo) topped with potato sticks and sweet plantain
      • I thought I knew what to expect after eating all of those fritas at the Frita Showdown not too long ago, but my first bite was like an explosion of grease in my mouth.  Not pleasant at all.
    • Burger #12: Bricktop’s Slider
      • A burger with bacon, cheddar, and pickles
      • The burger was simple enough, but unfortunately it was incredibly dry

    burgerliscious2016_13-16

    Burgers 13-16

    • Burger #13: Pincho Factory – Pincho Burger (Winner Judge’s Choice)
      • A burger with lettuce, tomato, onion, potato sticks, pink sauce, and American cheese
      • The sauce that they put on this burger is tastes so much of mayonnaise, and they put SO MUCH on it, that I couldn’t get past the first bite.  As usual, I disagree with the judges’ decision on giving them the win, but oh well.
    • Burger #14: BurgerFi – House Veggie Burger
      • House veggie patty with house secret sauce, lettuce, tomato, and white American cheese
      • I was absolutely terrified to try this burger after finding out that it was not a meat patty.  Those fears were unfounded, as the burger was actually very flavorful.  I think that it worked because the patty was not intended to taste like meat, which is where a lot of other meatless burgers fail.
    • Burger #15: American Harvest – The American Harvest Burger
      • beef patty with house dressing, caramelized shallots, creamy fontina cheese, and Dade County Pickles
      • I enjoyed the pickled vegetables served on the side of the burger more than I enjoyed the actual burger.  It wasn’t a bad burger, though.  There were just better ones available.
    • Burger #16: Copper 29 – Pork Slider
      • Pork slider with mango aioli, cabbage, and pickle
      • I’m still not entirely sure how I feel about this one.  I think the mango aioli was a little bit too overpowering, but it had a lot of potential.

    burgerliscious2016_17-20

    Burgers 17-20

    • Burger #17: Iron Tribe – Paleo Burger
      • A beef burger with paleo mayo and paleo bbq sauce wrapped in lettuce and served with plantain chips cooked in coconut oil
      • When I took my first bite, I wanted to look the chef in the eye and ask him what I ever did to deserve this.  That being said, I do appreciate that a healthy food provider made an earnest attempt to give health nuts a burger.  It didn’t work at all for me, but I’m sure that this made some Paleo person’s day.
    • Burger #18: Pisco y Nazca – La Bestia Burger
      • A burger with aji panca, spicy aioli, and potato sticks on a pretzel bun
      • This was the same burger that they made the last time that they participated, only now they’re in slider form.  The slider form kind of messed up the balance of the burger, so all of the flavors get lost in the overwhelming taste of the aji panca.  I think it would have worked better if they had scaled back on that to account for the smaller sizes.
    • Burger #19: Bulla Gastrobar – The Bulla Burger
      • Grass fed Angus beef with Piquillo peppers, tetilla, caramelized onions, and honey thyme glaze on a homemade bun
      • I was excited to try these burgers because they looked so nice and juicy, but they ended up being kind of bland.
    • Burger #20: Tarpon Bend – Sweet Bacon Cheddar Short Rib Burger
      • A burger with aged cheddar cheese, diced red onion, bacon, miso aioli, and balsamic reduction on a Challah roll
      • The patty itself was cooked perfectly, but I don’t think that the actual burger toppings worked very well together.


    dscn4324

    Final Burger

    • Burger #21 – Shake Shack – The BBQ Shackmeister
      • An all natural Angus beef cheeseburger topped with crispy beer-marinated shallots and Shack BBQ sauce
      • Shake Shack has a reputation for dishing out some decent burgers, but this burger was a salt bomb.  I needed to drink like an entire gallon of water after one bite.

    As usual, there were sweets available to counter all of the savory!

    dscn4329

    Cupcakes provided by Dee-lish Cupcakes.

    dscn4333

    And, of course, the usual dessert shots from Seasons 52!

    Since it started to rain, I didn’t linger.  But, thankfully, I got to taste all of the burgers at Burgerliscious 2016 before I had to make a dash for the safety of my car.  Until next time!


  • Bacon, Beer, and Three-Cheese Risotto

    Bacon, Beer, and Three-Cheese Risotto

    Skip to recipe
    I love my friends, but they are a bunch of enablers.  Instead of going outside or having a life, I prefer to spend my free time trying new things out in the kitchen.  They are happy to oblige, always providing me with recipes that caught their eye or that they think I would be interested in.  Of course, it serves their own interests as well, since they normally get to consume the finished product.  I’m not complaining.  I have discovered some pretty delicious things by having a friend plant the seed.

    One such friend, who is practically “vegetarian except for bacon,” sent me this recipe, which immediately caught my attention.  Bacon, beer, and three-cheese risotto!  I love carbs, bacon, and cheese.  What could possibly be bad about combining them all into one, steaming bowl of creamy risotto?  Nothing, that’s what.  I challenge anyone to refute that.  So, I agreed to give this recipe a shot.  And, of course, she was more than happy to come and “assist” and critique the finished product.  Quality control is an important job, you know!  But, thanks to the extra set of hands, I managed to catch some shots of the process to making this decadent dish.

    20160918_133740

    Now, I am normally a pretty ad-hoc cook, but risotto is a fairly time-sensitive dish that requires constant attention.  You really can’t step away to chop a shallot or grate cheese while it simmers, so mise en place (prepping everything and having it ready to go before you start cooking) is critical.  So, before you get started, make sure all of your ingredients are prepped and ready to go.  You can heat up your broth or stock while this is happening.

    20160918_134008

    While your cooking liquid is warming up, you can start cooking the bacon.  Make sure you lower the heat on the liquid as soon as it starts to simmer.  You don’t want to add boiling broth/stock to your risotto.

    cookthebacon

    Fry the bacon until it’s nice and crispy, and then strain the bacon out and set it aside.  Do not clean out your pan.  Just pour out all except for about a tablespoon of the bacon fat.

    addingliquids

    So, we’re leaving the fond-crusted pan as-is and dumping our chopped shallots in there, then the garlic once the shallots are soft.  Once the garlic is starting to get fragrant, throw in the rice and let it brown a little.  Add the beer, and cook until the rice absorbs most of it.  Then, reduce the heat and start adding the hot stock/broth, one ladle at a time.  Let the rice absorb most of the liquid before adding another ladle, continuing to stir gently.  It will take about 20-30 minutes for the rice to cook, so be patient and don’t rush it.  If you run out of liquid and the rice is still not cooked through, you can add some hot water and continue stirring until it’s the desired consistency.

    finishingtouches

    Once the rice is the desired consistency, add the cheeses and stir until they are melted.  The original recipe uses Parmesan and cheddar, but we added a bit of Gruyere to give it some additional bite.  Add the bacon after that, then season with salt and pepper to taste.

    20160918_142630

    Dinner is served!  See those dark flecks of solidified bacon drippings floating around in there? That’s concentrated flavor!

    If you’re feeling fancy, garnish with an extra sprinkle of cheese or some chopped parsley or chives.  But, I’m not fancy.  I’m hungry.

    EDIT 10/28/2017: I recently discovered that this can also be made in a pressure cooker, which saves a lot of effort.

    Bacon, Beer, and Three-Cheese Risotto

    Ingredients

    • 1 cup uncooked Arborio rice (add in extra 1/2 cup if using a pressure cooker)
    • 6 slices of bacon, cut into small pieces
    • 1/2 bottle of beer (I use lager)
    • 1 shallot, diced
    • 2 garlic cloves, minced
    • 1 quart broth or stock of your choice (I use Vegetable or Chicken Stock)
    • 1/2 cup cheddar cheese
    • 1/4 cup Parmesan cheese
    • 1/4 cup Gruyere cheese
    • salt and pepper to taste

    Directions

    Pour chicken broth in a small pot, and let it sit on a gentle heat.

    In a large sauté pan, cook bacon to render the fat. Once crispy, remove from pan and set aside.  Leaving about 1 tbsp of the bacon fat in the pan.  In the bacon fat, add the shallot. Cook until translucent, then add the garlic and cook until fragrant. Add the rice and stir to coat the grains in the fat. Cook for about 2 minutes.

    Once the grains begin to brown slightly, pour in the beer. Stir and let simmer. Once the liquid is mostly absorbed, add a large ladle of the hot broth/stock. Continue to stir until the liquid is mostly absorbed. Repeat the process until the grains are creamy and cooked through.

    Lower the heat and stir in the cheeses and cooked bacon. Remove from heat and serve.

    To make in a pressure cooker: Follow the same steps as the stovetop recipe, except use the liner of your electric pressure cooker on the Saute/Browning setting, until you get to the part where you add the beer.

    Once the rice has absorbed most of the beer, add in the entire 4 cups of broth or stock.  Cover and seal your pressure cooker, then cook on Manual (High Pressure) for 6-7 minutes.   Immediately release the pressure, uncover, and remove the liner from the pot.  Stir the rice with the liquid until it starts to thicken.  Add the cheese, a little bit at a time, until all of the cheese is melted and risotto is creamy.  Stir in the cooked bacon and serve immediately.