Tag: red velvet

  • Red Velvet Cookies

    Red Velvet Cookies

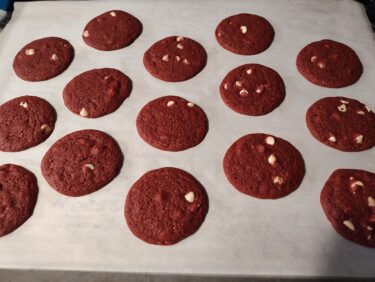
    Yes, you read that correctly. Red. Velvet. Cookies. They have the classic “hint of cocoa” as red velvet does, as well as the buttermilk tang from the addition of powdered buttermilk to the dough. To top things off, they use cream cheese chips to mimic the cream cheese icing that is commonly used with red velvet cake.

    I have found cream cheese chips for sale at my local Walmart, but you can also buy them online in a pinch.

    Red Velvet Cookies

    Adapted from Crazy For Crust

    Ingredients

    • 10 tbsp unsalted butter, melted
    • ½ cup packed brown sugar
    • ⅓ cup granulated sugar
    • 2 tablespoons natural unsweetened cocoa powder (NOT dutch process)
    • 1 tbsp buttermilk powder (sifted if it’s clumpy)
    • 1 large egg
    • 1 teaspoon vanilla extract
    • ½ teaspoon baking soda
    • ½ teaspoon salt
    • 1 ½ (cups all-purpose flour
    • 1 teaspoon white vinegar
    • 1 teaspoon liquid red food coloring
    • 1 cup cream cheese flavored baking chips

    Directions

    Line 2 cookie sheets with parchment paper. You can also use silicone baking mats, but I prefer parchment paper.

    Stir both sugars into the melted butter in the bowl of a stand mixer. Add the egg and beat until smooth. Stir in cocoa powder, buttermilk powder, vanilla, baking soda and salt. Add the flour and beat until just combined.

    Add the vinegar and red food coloring and mix one more time, then fold in the cream cheese chips by hand.

    Use a cookie scoop to scoop cookie dough balls onto the cookie sheets about 2-inches apart.

    Preheat oven to 350°F. Bake the red velvet cookies cookies for 9-12 minutes or until they just lose their glossy sheen. Cool on cookie sheets before removing to eat.

  • Pressure Cooker Red Velvet Flan

    Pressure Cooker Red Velvet Flan

    Skip to Recipe

    My boss hates flan, but loves anything red velvet.  When I asked her what she thought of a red velvet flan, she was like “H’mm…I might try that.”Sadly, Google wasn’t very helpful in locating a recipe for red velvet flan that looked promising.  So, I devised my own.

    Making a red velvet flan posed a bit of a challenge at first.  The two primary flavors that come together to make that classic and recognizable “red velvet” flavor are cocoa powder and buttermilk.  So, I knew that I wanted to include buttermilk in the flan, but in a way that wouldn’t make it curdle or taste too sour.  I found that I could safely replace a fourth of the milk with buttermilk, and replaced the rest of the milk with half-and-half so that the additional fat content would discourage curdling.

    Since owning a pressure cooker, flan is one of the many dishes that I have discovered that a pressure cooker excels at making.  The moist heat of the pressure gives it a smooth and silky texture in about half the time of oven baking.  I highly recommend using a flanera (flan plan), which has a lid that locks in place to protect your flan.  I know some people use a pyrex dish or cake pan covered in foil, and that should also work.  You can also bake the flan in the oven if you don’t have a pressure cooker.  Just bake at 350° for about an hour in a water bath.

    Melt the sugar in a saucepan over medium to medium-high heat.  Once the sugar is melted and dark amber, remove from heat and add water.  It will bubble, steam, and sizzle furiously, so be careful.  Once you can get your hand close, stir until the water and sugar are combined, and then pour it into your flan mold.

    The rest of the ingredients can go in your blender.

    And blend until smooth.

    Pour this mixture in your prepared flan pan (or making dish) and cover in foil.  Place on a trivet in your pressure cooker filled with about 1 cup of water, then cook on manual (high pressure) for 12 minutes.  After the time is up, allow the pressure to release naturally for another 10-15 minutes, then release any remaining pressure (if any) and remove the flan from the pressure cooker.  Uncover and allow to cool completely before refrigerating.  Let is refrigerate at least overnight before you remove the red velvet flan from the pan.

    Red Velvet Flan

    The food coloring kind of bleeds into the caramel and dyes it red, which I think adds some visual impact.

    red velvet flan slice

    There are a few air bubbles here and there, but the overall texture of this red velvet flan is very smooth and creamy.  Best of all, it tastes like actual red velvet!

    Red Velvet Flan

    Ingredients

    • 1/2 cup white sugar
    • 2 tbsp water
    • 1 can sweetened condensed milk
    • 1 1/2 cups half-and-half
    • 1/2 cup buttermilk
    • 2 tbsp cocoa powder
    • 1 tbsp red food coloring
    • 1 tsp vanilla extract

    Directions

    In a saucepan over medium heat, heat the sugar until it melts and turns medium amber.  Remove from heat and add the water (careful, as it may splatter), stirring until combined.  Quickly pour the mixture into a flan pan or baking dish.  Set aside.

    Using a blender, combine the condensed milk, half-and-half, buttermilk, cocoa powder, vanilla extract, and food coloring until smooth and uniform.  Pour mixture into prepared pan and cover.  Set pan on a trivet and lower into pressure cooker filled with 1 cup of water.

    Cook on Manual (High Pressure) for 12 minutes, then allow the pressure to release naturally for 10-15 minutes.  Remove the flan from the pressure cooker, uncover, and allow to cool completely on a wire rack.  Refrigerate 8 hours or overnight before serving.

    To unmold: Run a thin bladed knife around the inside of the flan pan to loosen the flan, then invert onto a baking dish (or a deep plate).  Lift the flan pan upward off the dish, shaking gently to loosen the flan.

    Oven Directions: Same as above, except use an 8″ or 9″ round pan.  Bake uncovered in a water bath at 350° for about an hour, or until center is only slightly jiggly.

  • Pressure Cooker Red Velvet Cheesecake

    Pressure Cooker Red Velvet Cheesecake

    This is a quickie post due to popular demand.  I made this red velvet cheesecake last week with mixed results, but Valentine’s Day is right upon us and I REALLY wanted to have this cheesecake as my go-to.  So I tried again today with a few adjustments and got it just right!  I posted a picture to an Instant Pot group on Social Media and got several requests for the recipe, so here it is!

    If you don’t know what an Instant Pot is, you’re missing out!  I won’t bore you with the details, mostly because everything there is to know is already available online and said more eloquently.  Google is your friend.  Suffice to say that making cheesecake in the Instant Pot (or any electric pressure cooker) is something that I only discovered a month or two ago, but it’s been GREAT!  If you’re new to making cheesecakes in an Instant Pot, I recommend checking out this link for reference.  It will point you in the right direction.
    [Skip to recipe]

    DSCN4432

    Start by preparing your pan.  Mix your cookie crumbs with melted butter and press onto the bottom of a well-greased cheesecake pan.  This is a 7in cheesecake pan with a removable bottom.  It fits perfectly into the Instant Pot!

    preparecheesecakebatter

    Then, make your cheesecake batter.  Use your preferred method.  I like using a blender or food processor because I am lazy, but some people do it with a stand mixer of by hand.  That is also fine.  Once you have your smooth batter, pour it into your prepared baking pan.  While you’re making your batter, prepare your Instant Pot by pouring about a cup of water into the pot and placing the trivet in there, then press the Saute button to allow the water to come to a simmer.  Fashion a sling out of foil and place it underneath your pan, then use it to lower your cheesecake into the Instant Pot.

    DSCN4446

    Once your pan is in the pot, turn the Instant Pot off, cover and seal it, and then set it to Manual for 20-25 minutes, depending on your preferred texture.  I set it to 23 minutes and then did a 15 minute Natural Release.

    DSCN4451

    Once time is up, you can open your Instant Pot and use the foil sling as handles to pull the red velvet cheesecake out.  Make sure you check for doneness.  If it’s still wobbly, you can put it back in and cook for a few more minutes.  Blot any condensation on the surface of the cheesecake with paper towels.  Afterwards, allow it to cool completely and then refrigerate until firm.

    Red velvet cheesecake

    There you have it!  Beautiful and delicious Instant Pot red velvet cheesecake!  Top with dollops of whipped cream for a dessert to impress, and it will look like you slaved all day over it!  Don’t worry, I won’t tell.

    Red velvet cheesecake

    Ingredients

    • 1 cup Oreo cookie crumbs
    • 1 tbsp butter, melted
    • 2 8oz packages cream cheese, room temperature
    • 2 eggs, room temperature
    • 1/2 cup sugar
    • 1/2 cup buttermilk, room temperature
    • 1 1/2 tbsp Dutch processed cocoa powder
    • 1/2 tsp vanilla extract
    • 1 tbsp red food coloring
    • 1/2 tsp white vinegar

    Directions

    Prepare the Instant Pot by adding 1 cup of water and a trivet or steaming rack to the inner pot.

    Combine the cookie crumbs and melted butter and press onto the bottom of a 7in springform or cheesecake pan.  If you’d like, you can pre-bake for 5 minutes at 350°, but this is not required.

    Set the Instant Pot to the Saute function.  In a food processor, combine the cream cheese, eggs, sugar, and cocoa powder.  Blend until almost combined.  Add the buttermilk, food coloring, and vanilla extract and mix until smooth.  Mix in the vinegar.

    Pour the cheesecake batter into the prepared baking pan.  When the water in the Instant Pot has started to simmer, place the cheesecake pan in the inner pot.  Press cancel.  Cover and seal the Instant Pot and set it to Manual for 20-25 minutes, then Natural Release for 15 minutes.  Open the lid carefully to avoid water dripping onto the cheesecake.  Remove cheesecake from pot and blot the cheesecake with paper towels to remove condensation.

    Allow to cool completely on a wire rack, then refrigerate the red velvet cheesecake at least 4 hours before serving.


  • Red Velvet Rolls

    Red Velvet Rolls

    Skip to recipe
    Valentine’s Day is just around the corner, and LOVE is in the air.  In my case, it’s love of delicious things.  For me, food has always been a very emotional experience.  As such, making food is one of the ways that I express myself.  Nothing makes me happier than to feed the people close to me and see them enjoy my cooking.  But, on the same note, the thought of someone that I don’t like enjoying something that I made is absolutely intolerable.  Food is love.  MY love.  You can’t have any of it.  So there.

    Valentine’s Day, of course, means all manner of red and pink treats flying around.  And, when a baker thinks of things that are red, red velvet is usually one of the first things that comes to mind.  And, since they’re red, these morsels of red-velvety goodness are PERFECT for a post on the month of a holiday that is associated with this color.  I have been meaning to post this recipe for quite some time, but anytime I made them I would forget to take pictures.  So, “Valentine’s Day post” became “Independence Day post,” which became “Okay, Christmas post for sure!”  And, well, you see how well that went.

    But, here they are!  Lovely red velvet rolls with a sweet cocoa filling that are perfect for a Valentine’s Day breakfast or brunch.  Make them for your sweetie.  Make them for your friends.  Heck, even make them for yourself!  Hint: they freeze well.

    DSCN4362

    I love my bread machine because it takes most of the work out of these types of undertakings.  Just toss all of your dough ingredients in the machine, and let the Dough cycle run its course.

    DSCN4363

    While the bread machine is working on your dough, you can start getting the ready for the next step.  Have your pan, sugar mixture, and softened butter ready to go.

    DSCN4366

    Once the bread machine has done its work, you are rewarded with vibrant red dough!

    rolloutdough

    Turn out your dough on a lightly floured surface and roll into a rectangle.  Spread your rectangle with butter about 1/2 inch away from the edges all around, and then sprinkle your sugar mixture evenly over that.

    letthemrise

    Carefully roll the dough (starting from one of the shorter sides) so that you get a cylinder shape.  Cut the roll of dough into 12 pieces.  Get them as close to the same size as possible. Lay them in your greased baking pan.

    At this point, you could let the red velvet rolls rise for about an hour and then bake.  However, my favorite strategy is to make them the night before and then let them rise in the refrigerator overnight.  Just cover your pan and put it in the fridge until the next morning.

    Baked red velvet rolls

    Using the cold rise method, I bake the red velvet rolls for half an hour.  I start with a cold oven.  That is, you do not preheat the oven before you bake them.  Just pop them in the cold oven, THEN turn it on.  Once they’re done, frost them with cream cheese icing while they’re still hot.

    Red Velvet Rolls

    Aaaaand DIG IN!

    There are a lot of steps to making any type of “roll,” but it’s easier than it looks.  Plus, the waiting is rewarded with something warm and amazing that makes people go “Mmmmmm.”  Don’t be afraid.  It’s totally worth it!  Make these red velvet cocoa rolls and I’m sure they will be added to your permanent recipe book.

    Red Velvet Rolls

    Ingredients

    For the dough:

    • 4 1/2 tsp bread machine yeast
    • 3/4 cup buttermilk, warm
    • 1/4 cup warm water
    • 1 large egg
    • 1 tbsp red food coloring
    • 3 tbsp cocoa powder
    • 1/3 cup granulated sugar
    • 4 tbsp melted butter
    • 1/2 tsp salt
    • 4 cups all-purpose flour

    For the filling:

    • 1/3 cup white sugar
    • 1/3 cup brown sugar
    • 2 tbsp cocoa powder
    • 4 tbsp butter, softened

    Additional ingredients:

    • 1-1 1/2 cups cream cheese icing

    Directions

    Add the dough ingredients to the bowl of your bread machine according to the manufacturer’s directions.  Select the Dough cycle and press Start.  While the dough is being prepared, combine the white sugar, brown sugar, and cocoa powder for the filling and set aside.  Grease a 13″ x 9 ” baking pan.

    When the Dough cycle is complete, turn the dough out onto a lightly floured surface.  Roll the dough to an approximately 12″ x 16″ rectangle.  Brush with the softened butter and then sprinkle with the sugar mixture.  Starting with the shorter side, roll the dough into a cylinder and cut into 12 equal pieces.  Arrange in your prepared baking pan, then cover and refrigerate overnight.

    Bake at 350°(do not preheat the oven first) for 25-30 minutes, or until rolls are lightly browned. Top with cream cheese icing as soon as they come out of the oven.  Serve warm.

    Makes 12 rolls

  • Red Velvet Ice Cream Sandwiches

    Red Velvet Ice Cream Sandwiches

    Skip to Recipe
    Okay, I lied.  I am totally posting a “red” recipe in February for Valentine’s Day.  But, I got inspired and decided that this recipe deserved a posting.  I mean, they’re HEART-SHAPED!  What other month of the year could I get away with this!?  Exactly.  Besides, it’s kind of cheating because it’s simply combining two existing recipes.

    These ice cream sandwiches are made with brownie, but you can also use blondie or cookie dough for the outside, if you prefer.  The star of the show is the red velvet ice cream sandwiched in the middle.  Out of so many things red velvet that exist in the world, this ice cream is a personal favorite.

    (more…)

  • Red Velvet Rum Cake

    Red Velvet Rum Cake

    Skip to Recipe
    Every now and then, my boss flies into town and pays her subordinates a visit.  During her most recent visit, one of my colleagues and I were dealing with an ongoing project, and she was feeling fairly overwhelmed.  As a joke, she asked our boss to approve the shipment of a cake just for her (she works out in California) to boost her morale.  Unbeknownst to her, my boss thought that this was a good idea, and asked me to make one to ship to her.

    Drinking on the job is, for obvious reasons, frowned upon.  But, there’s nothing stopping us from sending the booze in the form of a cake.  But, my boss reminds me that my colleague’s favorite cake is red velvet.  Yes, but red velvet cake needs the cream cheese icing, which would never survive a trip without professional food packaging.  A rum cake is much more likely to make it to its destination with little to no deterioration in quality, because of the alcohol content helping to keep it fresh.  My boss ponders a bit, then asks “Well, could you make a red velvet rum cake?”

    Why didn’t I think of that sooner? (more…)

  • Red Velvet Cupcakes

    Red Velvet Cupcakes

    Skip to Recipe
    I started writing this post back in late June, with the full intention of posting it as a 4th of July post.  Then, mangoes happened, and I got distracted.  Still, a good red velvet cake is something that should be shared.

    I came across this recipe while I was looking for firm cake recipes that would work well for frosting-free cake pops.  I used to use a recipe that required softened butter for the cake batter, but using oil is so much easier.  Plus, there’s no planning required.  Anyone that has worked closely with me has probably seen sticks of butter or cream cheese sitting on my desk at the office, because I need to have my ingredients at room temperature by the time I get home and am ready to bake.  Hopefully, my boss isn’t reading this…

    Both Fourth of July and Christmas are great times to make red velvet anything.  Cupcakes are always winners, and all you need is some decorative sprinkles to cater the cupcakes to a holiday theme. (more…)

  • Red Velvet Waffles

    Red Velvet Waffles

    Red velvet cake was, for a long time, something that I refused to try.  In fact, the first time I made it (at someone’s request), I didn’t even like it.  It took a while for me to decide to try a different recipe, which turned out FANTASTIC!  So, with boyfriends being a notable exception, it never hurts to give things another chance when they fail to impress you the first time. (more…)