Category: Recipes

Recipes

  • Pressure Cooker Cheeseburger Mac

    Pressure Cooker Cheeseburger Mac

    Sometimes, it’s the simple things that give us happiness.  Like cheeseburger mac.  My mom used to make it for us when we were kids.  She used boxed mac and cheese (the kind with the liquid cheese packet).  Now that I’m an adult, I figured I should elevate it a little bit.  That doesn’t mean that it doesn’t need to be easy to make, though!  Making it in my Instant Pot takes care of that part.

    This recipe is best eaten as soon as it is made, but leftovers can be reheated if needed.  Just microwave in 30-second intervals with a little bit of milk until it’s creamy again.

    Pressure Cooker Cheeseburger Mac

    Ingredients

    • 1 tbsp oil (use a high heat oil)
    • 1 1/2lbs (24oz) lean ground beef
    • 1/2 tsp salt (more or less to taste)
    • 1 tsp garlic powder
    • 1 tsp onion powder
    • 1 tsp ground black pepper
    • 1/4 tsp mustard powder
    • 1/2 tsp chili powder
    • 1lb dried macaroni noodles (I used cavatappi, but you can also use elbow noodles)
    • 4 cups low sodium beef broth or water
    • 3 tbsp butter
    • 1/2 cup half-and-half (you can also use milk or heavy cream)
    • 4oz cream cheese, cut into cubes
    • 8oz shredded colby jack cheese
    • 8oz shredded cheddar cheese (I used white cheddar)

    Directions

    Heat the oil in the liner of your pressure cooker in the Saute/Browning setting.

    When it is hot, add the ground beef.  Cook, breaking up the pieces, until no longer pink.  Stir in the seasonings, then turn off the pressure cooker.

    Place the dried noodles over the ground beef, then pour in the broth or water.  Top with butter.

    Cover, seal, and cook on Manual (High Pressure) for 4 minutes.  When the timer is up, leave the pressure cooker on Keep Warm and release the pressure manually.

    Add the cubed cream cheese and stir until melted.  Add the half-and-half, then gradually add the cheese, a little bit at a time, until completely melted and creamy.  Serve hot.

  • Mango Truffles

    Mango Truffles

    Skip to Recipe

    I recently got into the idea of making truffles again after giving up on it for many years. It took one batch of hand-rolled truffles for me to decide to go online and find a better solution. I found a really neat truffle mold on Amazon, and have made more truffles in the last few weeks than I have made in the past YEAR. And, since it is Mango Season here in South Florida, there have been a lot of mango truffles.

    Since my first batch of these truffles, I have made them 3 more times. These truffles are a bittersweet chocolate shell with a whie chocolate mango ganache filling. And, they are a hit each time. Because the white chocolate mango filling is not firm enough to hold a shape for rolling, it is good for molded truffles where you pipe the filing into each one.

    These truffle molds make beautiful, bite-sized truffles. They are smaller than a traditional hand-rolled truffle, which means that they work great for fillings that don’t exactly hold their shape for dipping and still have enough filling without creating a big mess.

    Make sure that your molds are clean and dry before you get started. I recommend working with the molds on a baking sheet lined with parchment. It will make cleaning up between steps a LOT easier.

    Your ganache needs to be cold before you get started, so make that first. Just mix your white chocolate, mango pulp, and cream, then microwave in bursts until the chocolate is melted and the mixture is smooth. Let it cool to room temperature, then cover it with plastic wrap and refrigerate. I let it sit overnight in the fridge, or 1 hour in the freezer.

    I’m using a chocolate melting pot from my local craft store. Since these truffles are best stored in the refrigerator, I didn’t see a need to temper the chocolate. If you want to temper your chocolate, feel free. Otherwise, melt the bittersweet chocolate using whatever method you like best.

    When the chocolate is melted, fill each cavity of the truffle mold with chocolate.

    If your chocolate is thin, let the filled molds sit for a few minutes before you continue. My chocolate is on the thick side, so I flip the molds upside down right away. Let the chocolate run out of the molds, then turn it back facing up and use an offset spatula to scrape off any excess. Let the chocolate sit in the mold until it starts to set. You can expedite this by popping the mold in the fridge around 10 minutes.

    You can return the leftover chocolate back to the pot. I used a large angled spatula to scrape it off of the parchment and back into the pot.

    Now, it’s time to fill your shells. Fill a piping bag with the white chocolate mango ganache. Pipe some of the ganache into each chocolate-lined cavity. Do not fill them all the way to the top. You will need to leave some room for the next step.

    Cover the top of each filled cavity with more melted bittersweet chocolate. Take an offset spatula and smooth out the top of each filled cavity, scraping off the excess chocolate.

    Let the assembled truffles set. Again, you can speed up this process by popping them in the fridge for about 15 minutes.

    You can pop your truffles out of your truffle mold with some gentle coaxing after they have set.

    So pretty!

    Store your mango truffles in the refrigerator. Since the filling is softer than a traditional ganache, these are best served cold. They should keep for up to a week.

    Mango Truffles

    (Adapted from this recipe)

    Ingredients

    • 5oz white chocolate, chopped
    • 1/4 cup mango puree
    • 1 tbsp heavy cream
    • 1lb bittersweet chocolate (more or less as needed)
    • Materials needed: Silicone truffle mold (link here)

    Directions

    In a microwave-safe bowl, melt the white chocolate with the mango puree and cream in bursts of 15-20 seconds until smooth. Cover with plastic wrap and refrigerate or freeze until ready to use.

    Melt the bittersweet chocolate using your preferred method. Fill each cavity of the truffle mold with melted chocolate. Turn the mold upside down and allow the excess chocolate to drip down. Turn mold right side up and scrape the excess chocolate off of the top of the molds.

    Allow the chocolate to set in the molds. You can speed this up by refrigerating the molds for 7-10 minutes.

    When the chocolate is set, spoon or pipe some of the ganache into each cavity, leaving space at the top to seal the truffles with chocolate.

    Spoon some of the remaining melted chocolate on top of each filled cavity. Spread it evenly until it covers the ganache and seals the sides. Scrape off any excess chocolate.

    Refrigerate for about 15 minutes or until set.

    Once they are set, gently remove the truffles by turning the mold upside down and applying pressure to the bottom of each truffle cavity.

    Makes about 4 dozen 1in truffles.

  • Pressure Cooker Mango Chutney

    Pressure Cooker Mango Chutney

    Skip to Recipe

    A friend of mine was the go-to person for mango chutney for a few years. When her annual supply of mangoes during Mango Season was not to the usual standard, I stepped in to give it a shot on my own. I used my Instant Pot, and am pretty happy with the results!

    Before you begin, gather all of your ingredients. I like to combine all of the spices in a small bowl. I used two different kinds of mango.

    Heat the oil in the pressure cooker. When the pressure cooker is hot, add the onions and cook until they start to soften. Add the garlic and ginger, and cook until fragrant. This usually takes about a minute. Once that is done, add the spices and stir for another minute. Add the mango and stir to coat in the spiced onions, then add the sugars and the cider vinegar.

    Give everything one more stir to make sure that everything is mixed together, and then seal the pressure cooker. Cook on High Pressure for 10 minutes, and then let it release manually. After the pressure is released, set the pressure cooker to Saute/Browning on the highest setting again. Simmer the chutney until it has reduced and thickened as much as you want it to.

    I mistakenly had mine set on the lowest Saute setting and it took a full 30 minutes for my chutney to thicken enough. I’m guessing that it will take about half of that time if you use the higher Saute setting.

    Once the chutney is done, you can divide it evenly into jars. I got 4 and a half 8oz jars out of this recipe.

    The chutney should last about 2 months in the fridge in a sealed container. If you are familiar with canning, this will increase the shelf life.

    Pressure Cooker Mango Chutney

    Ingredients

    • 1 tablespoon cooking oil
    • 1 cup yellow onion, diced
    • 2 tablespoons fresh ginger, finely minced
    • 2 cloves garlic, finely minced
    • 1 red chili, sliced (or substitute 1 tsp red chili flakes)
    • 1 teaspoon ground coriander
    • ½ teaspoon ground cumin
    • ¼ teaspoon ground turmeric
    • 5 whole cloves
    • ¼ teaspoon ground cinnamon
    • 1/2 teaspoon salt
    • 5 green cardamom pods
    • 1 quart of peeled and diced mango chunks (use ripe mangoes)
    • 1 cup white granulated sugar
    • 1 cup light brown sugar
    • 1 cup apple cider vinegar

    Directions

    Heat the oil in your electric pressure cooker on the Saute/Browning setting. When done preheating, add the onions and sliced chile (if using) and cook until soft, about 5 minutes. Add the ginger and garlic and cook until fragrant, about 1 more minute. Then, add the spices (coriander, cumin, turmeric, cloves, cinnamon, salt, and cardamom pods) and cook, stirring, for an additional minute.

    After the spices are ready, add the mango and stir until fully coated in the onion and spice mixture. Add the sugars and the cider vinegar. Stir to combine.

    Cover, seal, and set the pressure cooker to cook on High Pressure for 10 minutes. When the timer is up, allow the pressure to release naturally.

    When the pressure is released, uncover and set once again to Saute/Browning on the highest possible setting. Let the chutney cook until it thickens and reduces to your liking.

    Makes about 4 1/2 cups.

  • Asian Appetizer Meatballs

    Asian Appetizer Meatballs

    Skip to Recipe

    I had been looking for a good appetizer to bring to a party, and several people recommended meatballs. Asian appetizer meatballs sounded more appealing to me than Italian or any other kind, so that is what I decided to make. I couldn’t find a single recipe that sold me 100%, so I decided to make my own.

    This recipe is actually a combination of several recipes. I just took what I liked about each one and put them together. The end result turned out a lot better than I had hoped. I love the taste of these meatballs. Hopefully, you will too.

    Gather all of your ingredients before you begin. I used a microplane grater to grate my ginger, but you can mince it if you want. Chop your scallions. Mince your garlic. When, throw all of the meatball ingredients into a large bowl and combine.

    If you have kitchen gloves, this is a good time to use them. I sprayed them lightly with oil before getting started. This helped to keep the meat mixture from sticking. Mush the meat mixture together until just combined. Do not work it too much or it may affect the texture of the meatballs. When it’s nicely combined, form them into small, appetizer-sized balls. I used a cookie scooper to help them stay uniform.

    Bake the meatballs on a foil or parchment lined baking sheet for 10-15 minutes. While the meatballs are baking, you can start your sauce.

    If you have a wok or a stir-fry pan, this is a good use for it. Otherwise, a skillet works fine.

    Heat the sauce ingredients in your pan over medium-high heat. When it starts to bubble (but not boil), reduce the heat to medium and stir in a cornstarch slurry. Do this little by little, until your sauce is as thick as you want it. Add the meatballs, then stir until coated. If the coating looks a little thin, you can try to increase the heat or add more cornstarch slurry until the sauce thickens enough to coat the meatballs.

    When you’re satisfied with how coated the meatballs are, remove them from the heat. I threw in some chopped scallions at this point, but you don’t have to.

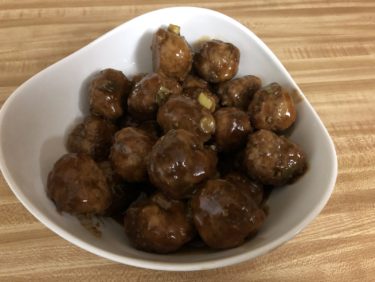
    You can serve these in a pretty bowl, or in a crock pot to keep them warm. Either way, they will be delicious!

    Asian Appetizer Meatballs

    Ingredients

    For the meatballs:

    • 1 lb ground beef
    • 1 lb ground pork
    • 1 cup panko bread crumbs
    • 1/2 tbsp fresh ginger, minced
    • 2-3 cloves garlic
    • 2 scallions, finely chopped
    • 2 eggs
    • 1 tsp salt
    • 2 tsp sesame oil

    For the sauce:

    • 3/4 cup water, divided
    • 2/3 cup low-sodium soy sauce
    • 1/4 cup rice vinegar
    • 3 tbsp brown sugar
    • 2 tsp chili paste
    • 1/2 tbsp fresh ginger, minced
    • 1/2 tbsp garlic, minced
    • 2 tbsp cornstarch
    • chopped scallions for garnish (optional)

    Directions

    Make the meatballs:

    Preheat oven to 400 degrees F. Line a large baking sheet with foil or parchment paper.

    Combine all of the meatball ingredients together in a large bowl. Be careful not to overwork the mixture. Take about 2tbsp at a time and roll into balls (I used a medium cookie scoop). Arrange on the lined baking sheet, leaving some space in between each meatball.

    Bake for 10-15 minutes, until meatballs are browned.

    Make the sauce:

    In a stir fry pan or skillet, combine 1/2 water, soy sauce, rice vinegar, brown sugar, chili paste, ginger, and garlic. In a small bowl, combine the remaining water and the cornstarch. Stir to combine, then set aside.

    Heat the soy sauce mixture in the pan over medium to medium-high heat until the mixture is about to come to a boil. Reduce the heat and stir in the cornstarch mixture, a little bit at a time, until the sauce is the desired thickness.

    Add the meatballs and stir to coat. Continue to cook until the sauce thickens and thickly coats the meatballs. Remove from heat. Serve hot and garnish with chopped scallions, if desired.

    Makes about 4 dozen bite-sized meatballs

  • Vietnamese Yogurt

    Vietnamese Yogurt

    Skip to Recipe

    Making yogurt is something that would have never considered trying before I owned an electric pressure cooker with a Yogurt setting. Now, yogurt is a regular occurrence at my house. When I’m not dieting, Vietnamese yogurt is my go-to.

    Vietnamese yogurt (da ua or sua chua) is different from making regular yogurt in two ways. First, you do not need to boil your milk before you make the yogurt. This saves a lot of time. Second, the yogurt is made with condensed milk. This makes it sweeter and richer than plain yogurt. I got all of my friends hooked on it, so I figured it was time that I pass the recipe along so that they can make their own.

    You don’t need very many ingredients for this yogurt. Including the boiling water, it takes 4 ingredients total.

    Make sure that your yogurt contains active cultures.

    Empty the can of condensed milk into a large bowl. Set the empty can aside for now. Bring some water to a boil, and then add 1 can’s worth of boiling water into the condensed milk. Whisk gently until well-blended, then add half of your milk and whisk until blended again. Add the yogurt and whisk until no visible clumps of yogurt remain.

    Whisk in the remaining milk. Divide the mixture evenly among 4 16oz jars. Cover the jars with the a lid, but leave the ring off.

    Pour 1 cup of water in the liner of your electric pressure cooker. Place your covered jars on a trivet in the liner. Cover and incubate on the Yogurt setting for 6-8 hours.

    **If you do not have an electric pressure cooker, you can put your jars in a pot and fill with hot (not boiling) water until the water reaches almost to the top of the jars. Cover the pot with a towel and then with a lid.

    When the time is up, remove your jars. Wipe off any condensation that has collected, and then seal and refrigerate for a few hours to finish setting.

    When the yogurt is set, it will look kind of like what you see here. At this time, you can add flavorings if you want. Personally, I think the yogurt tastes fine as-is.

    It goes great with fresh berries. Also try it with fruit curd.

    If you do not want to make the Vietnamese yogurt in individual jars, you can also make it directly in the liner of your pressure cooker. Just skip the part about the trivet and adding water.

    Vietnamese Yogurt

    (Adapted from this recipe)

    Ingredients

    • 4 cups milk
    • 1 14oz can sweetened condensed milk
    • 14oz boiling water (use the empty condensed milk can to measure)
    • 6oz plain yogurt (about 3/4 cup)
    • Materials needed: 4 16oz (pint) mason jars with lids

    Directions

    Bring water to a boil. Pour the condensed milk in a large bowl. Set aside the empty can. Place a trivet in the liner of your electric pressure cooker and add 1 cup of water to it.

    When the water begins to boil, pour the water into the empty condensed milk can (this will dissolve any of the condensed milk left in the can). Pour the water from the can into the bowl with the condensed milk. Whisk to combine.

    Add half of the milk and whisk until combined, then add the yogurt. Whisk until few clumps remain, then add the remaining milk.

    Divide the mixture evenly among the jars. Cover, but do not seal. Place on the trivet in the electric pressure cooker.

    Cover, then set to the Yogurt setting for 6-8 hours. When the cycle is complete, remove the jars, seal, and refrigerate for at least 4 hours to set.

    Makes 4 pints

  • Passion Fruit Sticky Buns

    Passion Fruit Sticky Buns

    Skip to Recipe

    Yes, you read that title correctly.  Passion Fruit STICKY BUNS.

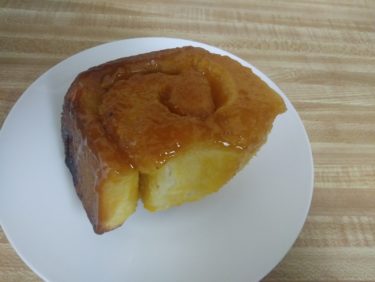
    These buns are as unique as they are delicious.  They’re like a traditional sticky bun, but instead of a cinnamon-sugar filling they are filled with a tart passion fruit curd. Each bite is like a tropical paradise and a down-home comfort food met, fell in love, and had the most delicious baby.  The sweetness of the passion fruit glaze balances the tartness of the passion fruit curd, which also has a hint of passion fruit flavor.

    I used my bread machine to make the dough for the passion fruit sticky buns.  You can do it by hand if you feel more comfortable, or if you have no bread machine.  Doughs are not my forte, so I take shortcuts where I can.

    The first thing that you want to do is make the passion fruit curd filling. Combine all of the filling ingredients (except the butter) in a small saucepan. Use an immersion blender to blender until fully combined. If you do not have an immersion blender, you can use a regular blender and then pour the blended mixture into your saucepan.

    Cook the mixture on medium-low heat. Whisk it frequently. It will start to thicken. When it reaches a pudding-like consistency, remove it from the heat.

    Whisk the cubed butter into the passion fruit mixture. When all of the butter has been incorporated, pass the mixture through a fine-mesh strainer to remove any solid bits. Set it aside to cool. You can cover it with plastic wrap to keep it from forming a skin.

    Because we are using a bread machine to make the dough, you can make the caramel while the bread machine is running. If you are making the dough by hand, you will want to make the caramel beforehand.

    Combine all of the caramel ingredients in a heavy bottomed saucepan. Heat over medium to medium-high heat until the mixture is combined and comes to a boil. Boil for 5-10 minutes, then remove from the heat and pour directly into a 13″ x 9″ rectangular pan.

    To make the dough, add the dough ingredients to your bread machine according to the manufacturer’s directions. Set it to the Dough cycle and let it run.

    When the dough cycle completes, turn the dough out onto a lightly floured surface. Roll into a 22″ by 16″ rectangle. Spread the passion fruit curd over the top of the dough rectangle, then gently roll the dough up into a cylinder. Resist the urge to roll it tightly, or your filling will get pushed out.

    Cut the dough cylinder into 12 even pieces and arrange in your prepared pan. Cover with a clean dish towel and let them rise in a warm place until they double in size. This took 45 minutes to an hour for me.

    Once they are risen, bake them in a preheated oven at 350 degrees for 25-30 minutes, or until the tops have browned. When they are done, let them cool on a wire rack for about 5 minutes, then invert the pan onto a serving dish or tray. I use a foil-lined baking sheet for easy cleanup.

    These sticky buns are fantastic while still hot from the oven, but they also reheat well. Because of the curd filling, it’s safer to refrigerate any leftover buns. You can reheat them by microwaving them for 20 to 30 seconds and they still taste great!

    Passion Fruit Sticky Buns

    For the passion fruit filling:

    • 1 large egg
    • 2 egg yolks
    • 1/2 cup granulated sugar
    • 1/2 cup passion fruit puree, strained of seeds
    • a pinch of salt
    • 1-2 tbsp cornstarch
    • 1/4 cup (1/2 stick) butter, cut into cubes

    For the dough:

    • 1 cup warm milk (around 110 degrees F)
    • 2 eggs, room temp
    • 1/3 cup melted butter
    • 1/2 cup sugar
    • 1 tsp salt
    • 4 1/2 cups bread flour
    • 2 1/2 tsp bread machine yeast

    For the glaze:

    • 1/2 cup (1 stick) butter
    • 1 cup brown sugar
    • 1/4 cup heavy cream
    • 1/4 cup passion fruit juice
    • 2 tbsp corn syrup

    Directions

    Make the passion fruit curd:

    Combine all of the curd ingredients (except the butter) in a blender.  Blend until smooth.  Transfer mixture to a small saucepan and cook over medium to medium-low heat, whisking constantly, until the mixture thickens to a pudding like consistency.

    Remove from heat and whisk in the butter, one cube at a time, until fully incorporated.  Cover with plastic wrap and set aside to cool.  You can strain through a fine mesh strainer to remove any lumps, if you wish.

    (Curd can be made in advance.  Store in refrigerator until ready to use, then bring to room temperature.)

    Make the dough:

    Combine the dough ingredients in your bread machine according to the manufacturer’s specifications.  Set the bread machine to the Dough cycle and allow the cycle to complete.

    Make the glaze (make while dough is in progress):

    In a medium saucepan, combine all of the ingredients.  Cook over medium-high heat until butter has melted and mixture comes to a boil.  Boil for approximately 5 minutes, then pour the mixture evenly into a 13 x 9 inch baking pan.  Set aside to cool until ready to use.

    Assembly:

    Turn completed dough out onto a lightly floured surface. Roll into a 22″ by 16″ rectangle.

    Spread the passion fruit curd over the dough, then gently roll into a cylinder. Cut the cylinder into 12 equal pieces and arrange in your prepared baking pan. Cover and allow to rise in a warm place until doubled in size, about 45-minutes to an hour.

    Bake in a preheated oven at 350 degrees until tops are golden, 25-30 minutes. Cool on a wire rack for 5 minutes before inverting onto a heat-proof serving tray or dish. Serve warm.

  • Pressure Cooker Berry Citrus Liqueur

    Pressure Cooker Berry Citrus Liqueur

    Skip to Recipe

    A friend of mine has a cousin with a mulberry tree, and was nice enough to share some of their surplus with me. When I got the berries, they were frozen. Once fruit has been frozen, your choices for what to do with it become more limited. That is basically what gave me the idea to make this berry citrus liqueur.

    Making “moonshine” has become all the rage in the pressure cooking community. But, what most don’t realize is that what they are calling “moonshine” is actually liqueur. Moonshine is a high-proof distilled spirit, whereas liqueur is a sweet alcoholic liquor that is infused with things like herbs, fruits, spices, flowers, nuts, and creams. The “moonshine” that is made in the pressure cooking community gets its name from the fact that it usually uses grain alcohol (151 proof) in the beverage. Because I wanted a citrus flavor, I used citrus rum, but I added a little bit of 151 proof rum to offset the reduced alcohol content of flavored rums.

    Combine water, sugar, berries, and citrus rum in the liner of your pressure cooker. Cover, seal, and cook on High Pressure for 30 minutes. Once the time is up, allow the pressure to release naturally.

    At this point, you can move directly to the next step, or let the mixture cool for another hour or so. I let mine cool for an hour, and then strained mixture into a large bowl using a fine mesh strainer. Gently press the berries in the strainer so that they release more liquid, then discard. Add lemon juice and 151 proof rum to the mixture.

    My large mason jar was in use, so I poured the mixture into 16oz mason jars. One batch filled 5 jars

    Seal your jars (or chosen storage vessel) and then store in the refrigerator. You should let it sit for at least 2 weeks for best flavor, but no one will judge you if you can’t wait that long.

    Pressure Cooker Citrus Berry Liqueur

    Ingredients

    • 4 cups water
    • 1 1/2 cups sugar
    • 1 lb fresh or frozen berries (I used mulberries)
    • 2 cups citrus rum (I used Bacardi Limon)
    • 1 cup fresh squeezed lemon juice
    • 1/2 cup 151 proof rum

    Directions

    Combine the water, sugar, berries, and citrus rum in the liner of your electric pressure cooker. Cover, seal, and cook on High Pressure for 30 minutes. When the time is up, allow the pressure to release naturally. If desired, allow the mixture to cool for an additional hour after pressure has released.

    Strain the mixture through a fine mesh strainer to remove the berries. Gently press them down to release the additional juices. Stir in the lemon juice and 151 proof rum. Pour into your desired storage vessel.

    Refrigerate the berry citrus liqueur for 2-4 weeks before serving.

  • Pressure Cooker Tonkotsu Ramen Broth

    Pressure Cooker Tonkotsu Ramen Broth

    Skip to Recipe

    My favorite ramen place is a 45 minute drive from my house. On top of that, their bowls of tonkotsu ramen about about $30.00 nowadays. When I found out that someone had figured out how to make it in their pressure cooker, I was skeptical at first. But, I decided to give it a try, and it worked out great!

    Tonkotsu ramen broth in an electric pressure cooker is not significantly less labor-intensive. You still need to boil and clean your bones before you start the broth. This helps to remove the marrow and impurities that will alter the color of your finished broth. It does cut down on the total cook time significantly, though. Plus, no babysitting a boiling pot for an entire day.

    Traditional tonkotsu ramen broth is cooked for up to 18 hours, which is what gives the broth its signature “creaminess.” The fat and collagen in the bones breaks down and emulsifies in the broth. The pressure cooker doesn’t produce the rolling boil required to emulsify the broth. So, for using a pressure cooker, you need to add your own emulsifier after the broth is finished. I have also read that you can move the broth to the stove after pressure cooking and boil for about an hour to emulsify, but I have never tried this.

    If you REALLY want to go all-out with your tonkotsu ramen, you can also make chashu pork (braised pork belly) to top it with. You can add some of the leftover braising liquid to your ramen broth for flavoring.

    Once your broth is cooked, you can season it and pour over your cooked ramen noodles and serve with your choice of toppings. In addition to the base broth recipe, there are also recommendations for seasoning your broth and for toppings to serve the ramen with. Just play around with the ingredients and quantities until it tastes to your liking.

    You can refrigerate tonkotsu broth for up to a week, or freeze for a few months. The broth will separate when chilled, so be sure to bring it back to a boil when you reheat it to emulsify it again.

    Pressure Cooker Tonkotsu Ramen Broth

    Adapted from Pressure Eats Recipe

    **NOTE: I used an 8qt Instant Pot to make this quantity of broth, and it was a very tight squeeze. If you will be using a smaller pressure cooker, I recommend cutting the recipe in half.

    Ingredients

    For the broth

    • 3lbs pork hocks, cut into discs
    • 2bs chicken backs
    • 2 whole leeks, washed and roughly chopped
    • 1 3in piece of ginger, peeled and sliced
    • 12 cloves of garlic
    • 1 large onion
    • 6 dried shitake mushrooms (you can also use fresh)
    • 1 tsp salt
    • 1 slab pork fatback
    • 1/2 egg yolk or 2 tsp soy lecithin (I used a whole egg yolk with no issues)
    • Additional recommended equipment: an immersion blender

    For seasoning the broth (per 3 cups of broth)

    • 1 tbsp tahini
    • 2 cloves grated garlic
    • Salt and pepper to taste
    • 1 tbsp mirin
    • 1 tbsp chashu braising liquid
    • 1 tbsp toasted sesame seeds
    • a dash of fish sauce

    To serve

    • Cooked ramen noodles
    • Chopped scallions
    • Sliced chashu pork (I used this recipe)
    • Sliced mushrooms
    • Seaweed
    • Hard boiled or soya egg

    Directions

    Add the pork hocks and chicken backs to a large pot. Fill pot with water until the bones are fully submerged. Cover and refrigerate for at least 1 hour, but preferably overnight.

    Drain the water from the pot and add fresh water. Place the pot, uncovered, on a stove and bring to a boil. Boil for 3 minutes, then remove from heat and drain. Allow bones to cool for about 15 minutes, then rinse and clean with cold water.

    Optional step: Char the onions and garlic by placing them on a sheet pan and broiling them until some black spots appear (this took about 5 or 10 minutes for me)

    Add the cleaned bones to the liner of your pressure cooker. Add the leeks, onions, ginger, garlic, mushrooms, and salt. Add enough water to reach about 3/4 of the way up the pot. Cover, seal, and cook on High Pressure for 3 hours.

    When the time is up, release the pressure manually. Uncover, add the slab of fatback, then cover and seal again. Cook on High Pressure for 1 hour. At this point, you can release the pressure manually or naturally. I have done it both ways and both have been fine.

    Drain the broth to remove the solids. Add the soy lecithin or egg yolk (temper the yolk first with broth if using), using the immersion blender to blend completely. Broth should become translucent.

    Season broth to taste with seasonings of choice, then pour over cooked ramen noodles. Serve with your choice of toppings.

  • Caramel (or Mango) Bars

    Caramel (or Mango) Bars

    Skip to Recipe

    Bars aren’t exactly an elegant or overly sophisticated dessert, but they can sure please a crowd. I made these caramel bars for a work event, and was shocked at how delicious they are. I got several requests for the recipe, which is adapted from a recipe that I found online.

    Combine the dry ingredients to make the crumb crust, then add melted butter. Stir until the mixture is moistened throughout, but it should still be kind of crumbly. Take half of the mixture and press it onto the bottom of a baking pan and bake it for 8 minutes

    While the bottom crust is in progress, melt the caramels and the cream until smooth and fluid. This has to be done over medium-low heat to avoid burning the caramel, which means it will take some time. Start melting your caramel while you’re gathering the ingredients for the crust to make the most of the time.

    Sprinkle your pecans and chocolate chips over the baked crust, then pour the caramel over them. Crumble the other half of the crumb mixture over the bars, then lightly press down. Bake the bars for another 12 to 15 minutes, or until the edges are browned.

    You can see where the caramel has started bubbling out in some places. This is how you want them to look when they’re ready.

    It’s best to cut them while they are still slightly warm.

    These bars are extra rich, so a small portion goes a long way. Try warming one up in the microwave for a few seconds before eating.

    **UPDATE 7/15/2019: You can also use this recipe to make Mango bars! I am updating the recipe with separate recipe list and directions for caramel filling vs mango filling.

    Caramel Bars

    Ingredients

    For the crust:

    • 2 cups all purpose flour
    • 2 cups rolled oats
    • 1 1/2 cups brown sugar
    • 1 cup (2 sticks) butter, melted
    • 1 tsp baking soda
    • 1 tsp salt

    For caramel filling:

    • 1 14oz bag caramels, unwrapped
    • 5 tbsp heavy cream
    • 1/2 cup semisweet chocolate chips
    • 1/2 cup chopped pecans

    For mango filling:

    • 4 cups fresh mango, cut into 1/2 inch cubes
    • 3/4 cup brown sugar
    • 2 tbsp cornstarch
    • 1 tsp lemon juice

    Directions

    Preheat the oven to 350 degrees F.

    In a large bowl, combine the dry ingredients (except chocolate chips and pecans). Stir in the melted butter, then press half of the mixture onto the bottom of a 13″ x 9″ baking pan (I recommend lining with foil or parchment). Bake for 15 minutes.

    If using caramel filling: (Do this while the crust is baking) In a small saucepan, melt caramels with heavy cream over medium-low heat.

    Remove from oven and sprinkle with chocolate chips and walnuts. Pour the warm caramel evenly over the top, then crumble the remaining crust mixture over the top. Press it down lightly.

    Return pan to the oven and bake for an additional 12-15 minutes, or until the top is lightly browned. Let cool, then cut into bars.

    If using mango filling: While the crust is baking, combine the mangoes, brown sugar, cornstarch, and lemon juice in a medium saucepan. Cook over medium to medium-high heat, stirring frequently to prevent sticking, until mixture thickens.

    Pour mixture over the pre-baked crust, spreading it evenly to cover the whole crust. Crumble the remaining half of the crust mixture evenly over the top. Press it down lightly.

    Return pan to the oven and bake for an additional 20-25 minutes. Let it cool on a wire rack before cutting into bars.

    Makes 2 dozen bars

  • Lemon Rolls

    Lemon Rolls

    Skip to Recipe

    Not long ago, I came across a great sale on lemons at my local grocery store.  I grabbed a whole bunch, fully intending to make a lemon bars with them.  That never happened, and the lemons were nearing the end of their life when I decided to try to make lemon rolls.

    I wasn’t sure what to expect when I decided to try these lemon rolls, but I had just binge watched The Great British Baking Show and was feeling gutsy.  Thankfully, they turned out great.  They are essentially a cinnamon roll with the cinnamon sugar filling replaced with lemon curd.  I added a little bit of lemon juice to the cream cheese icing to put on top for some extra zing.

    I have used stovetop and pressure cooker lemon curds to make these rolls.  I am including the stovetop lemon filling recipe, but feel free to use whatever lemon curd recipe is your favorite to make these.

    Here, you can see the baked rolls pre-icing.  Check out all of that lemony goodness!

    The icing really rounds them out.  It provides just enough richness to offset the sweet-tart taste of the lemon filling.

    You can also “cold rise” these rolls overnight by preparing and rolling the dough the night before, then placing the pan with the filled rolls in the pan in the refrigerator overnight.  In the morning, bake in a non-preheated oven at 350 degrees and add a few minutes to the baking time.

    You don’t need a bread machine to make these rolls, but it makes life a lot easier.  This article shows how to convert bread machine recipes into hand-kneaded recipes.

    Lemon Rolls

    Adapted from this recipe

    Ingredients

    For the dough

    • 1 cup warm milk
    • 2 eggs, room temperature
    • 1/3 cup butter, melted
    • 1 tsp salt
    • 1/2 cup granulated sugar
    • 4 1/2 cups bread flour
    • 2 1/2 tsp bread machine yeast or instant yeast

    For the filling (you can replace this with about 1 1/2 cups of your favorite store-bought or homemade lemon curd)

    • 1/2 cup fresh squeezed lemon juice
    • 1/2 cup sugar
    • 3 eggs
    • 1 tbsp cornstarch
    • a pinch of salt
    • 1 tsp lemon zest (optional)
    • 1/4 cup (1/2 stick) butter

    For the icing:

    • 4oz cream cheese, softened
    • 4tbsp (1/2 stick) butter, softened
    • 1 cup confectioner’s sugar
    • 1/2 tsp vanilla extract
    • 1 tbsp lemon juice

    Directions

    Place ingredients in the pan of the bread machine in the order recommended by the manufacturer, then use the Dough cycle to prepare the dough.

    When the dough cycle is complete, turn it out onto a lightly floured surface.  Roll into a 16″ x 21″ rectangle

    Spread the lemon curd evenly over the surface of the dough, then gently roll into a log.  Cut the log into 12 even pieces and place in a grease 13″ x 9″ baking pan.  Cover and let rise in a warm place until doubled in size (about 45 minutes).  Meanwhile, preheat oven to 350 degrees F.

    Bake the risen rolls for 30 minutes or until golden brown.  Remove from oven and top with icing while still hot.

    To make the icing:

    Cream together the butter and cream cheese until smooth.  Add the confectioner’s sugar and beat until combined.  Add the vanilla and lemon juice.

    Note: If your icing is too thick, you can thin it out with a bit of milk until you have the desired consistency.