Blog

  • Pressure Cooker Turkey Stock

    Pressure Cooker Turkey Stock

    Once upon a time, before the magic of pressure cookers, my turkey carcasses went in the trash after the turkey was carved.  Seeing the craze with making “bone broth” and stocks at home, though, I decided to give it a go.  After my first batch of turkey stock, I vowed never to let a turkey carcass go to waste again.  The canned and boxed stuff just doesn’t compare.

    If you plan on using it within a few days, you can store your turkey stock in the refrigerator.  Otherwise, you can freeze it in any freezer-safe container.  I have kept containers of turkey stock in my deep freezer for around 3 months and it’s still good.

    Pressure Cooker Turkey Stock

    Ingredients

    • 1 cooked turkey carcass (from a 12lb turkey or larger)
    • 1 large onion, quartered
    • 3 carrots, peeled and cut into large chunks
    • 3 celery stalks, cut into large chunks
    • 4 cloves of garlic
    • 1 in piece of ginger, sliced into rounds
    • 3 bay leaves
    • salt and pepper to taste
    • 8 cups of water

    Directions

    Combine all of the ingredients in the liner of your electric pressure cooker (you may have to cut up the carcass to make it fit).  Cover, seal, and cook on Manual (High Pressure) for 30 minutes.  When the timer is done, allow the pressure to release naturally.  Strain the turkey stock to remove the solids before using.

    Store unused turkey stock in the refrigerator, or freeze for up to 3 months.


  • Red, White, and Blue Jello Shots

    Red, White, and Blue Jello Shots

    Skip to Recipe
    Back in July, I brought a batch of red, white, and blue jello shots to an Independence Day party.  They went over very well, and the hostesses requested the recipe.  Sure, I said, I will put the recipe on the blog as soon as I can.  I just need an excuse to make them again so that I can take pictures of the process, I told them.

    So, now we’re in November.  I don’t know how that happened, but it did.  Meanwhile, the recipe never made it to the blog.  That is, until Veteran’s Day gave me the perfect excuse to channel my inner patriot.  And, the red, white, and blue jello shots finally made their triumphant return.

    The jello shots are a bit time-consuming, because you have to wait until each layer is set before you can do the next one.  So, patience is required to make them.  They don’t require a lot of actual effort to make, though.  I use 2oz mini pedestal cups that I get from my local party supply store, but you can use any other 2oz shot cups. The pedestal cups are nice because their sides only taper slightly, so each of the layers are mostly the same size.

    I start with the red layer.  Bloom your unflavored gelatin in your water, then add the cherry Jello and heat on medium to medium-low just everything has dissolved into the liquid.  Do not let the mixture boil or you will ruin the gelatin.

    Once it’s dissolved, remove it from the heat and stir in your booze, then divide it evenly among your shot cups.  Refrigerate until almost set.  It took about 20 minutes in my fridge.

    When the red layer is almost set, you can start making the white layer.  Bloom your gelatin again, and the heat on medium to medium-low until the gelatin dissolves.  Once the gelatin has dissolved, add the condensed milk and the half-and-half.  Remove the mixture from the heat and stir in the white chocolate liqueur.

    This is where it gets tricky.  Your red layer needs to be set enough to where your white layer doesn’t sink or mix when you pour it on top.  Additionally, if your white layer is too warm, it will melt part of your red layer and cause it to bleed into your white.  You can avoid this by letting the white mixture sit at room temperature to cool down for 10 minutes or so if you notice that your red layer is starting to bleed.  You can see where it was bleeding in some of my cups, and I SHOULD have stopped and let it cool down some more.  But, I was in a hurry.  My guests enjoyed them anyway.

    After you’ve finished the white layer, refrigerate until almost set.  These took a little bit longer, likely because the mixture was warmer.  I had to leave them for about half an hour.

    Lastly, do the blue layer the same way that you did the red layer (using blue Jello, of course).  And, again let the mixture cool a bit before you attempt to layer.

    After this, they should be set and ready for consumption in about an hour.  Since they are small, they don’t take very long to firm up.  However, I would still recommend refrigerating for at least 4 hours so that they are nice and firm.

    If you’re not in the mood for red, white, and blue jello shots, don’t fret.  You can substitute the cherry and berry blue Jello for any other flavor of Jello that you like and create all sorts of other flavor combinations.  Just make sure to match your liqueurs so that the flavors don’t clash.

    These jello shots can be made a day ahead of time.  However, I wouldn’t recommend making them any sooner than that, as gelatin tends to dry out the longer it sits.

    Red, White, and Blue Jello Shots

    Ingredients

    Red layer

    • 1 3oz package cherry jello
    • 1 cup water
    • 2 slightly heaping tsp unflavored gelatin
    • 1/2 cup triple sec
    • 1/2 cup vodka

    White Layer

    • 3/4 cup half-and-half
    • 1/2 cup water
    • 1/2 cup condensed milk
    • 3/4 cup white chocolate liqueur
    • 5 tsp unflavored gelatin

    Blue Layer

    • 1 3oz package berry blue jello
    • 1 cup water
    • 2 slightly heaping tsp unflavored gelatin
    • 1/2 cup Blue Curacao
    • 1/2 cup vodka

    Required equipment: 2oz plastic shot cups

    Directions

    Make the red layer

    Place the water in a small saucepan.  Sprinkle gelatin over the water and allow to soften for about 5 minutes.  Add the Jello and heat on medium to medium-low until mixture is hot and gelatin has dissolved.  Do not boil.

    Remove from heat and add the Triple Sec and vodka.  Divide mixture evenly among the shot cups.  Refrigerate for 20 minutes or until almost set before you begin making the white layer.

    Make the White Layer

    Place the water in a small saucepan.  Sprinkle gelatin over the water and allow to soften for about 5 minutes.  Heat over medium to medium-low heat until gelatin has completely dissolved.  Stir in the condensed milk and half-and-half.  Stir until the mixture is slightly warm.  Remove from heat and stir in white chocolate liqueur.  Pour over the set red layer of gelatin, dividing evenly among the shot cups.  Refrigerate for 30 minutes or until almost set.

    Make the Blue Layer

    Place the water in a small saucepan.  Sprinkle gelatin over the water and allow to soften for about 5 minutes.  Add the Jello and heat on medium to medium-low until mixture is hot and gelatin has dissolved.  Do not boil.

    Remove from heat and add the Blue Curacao and vodka.  Divide mixture evenly among the shot cups.  Refrigerate for at least 2 hours (preferably 4) before serving.

    Makes about 3 dozen

  • Burgerliscious 2018

    Burgerliscious 2018

    Burgerliscious 2018 is the eighth year of this Coral Gables Burger Festival.  After missing it last year (I was on a cruise; shame on me!), I went this year determined to make up for lost time.  Once again, my event timing interfered, as my trip to the Epcot Food and Wine Festival this past weekend left my stomach and palate feeling overloaded.  Still, I was determined to go and taste every single burger available.  And, what is exactly what I did.

    My review of each burger is purely subjective and based on my own personal preferences.  As I hate mayo, pickles, and pairing sweet with savory, burgers that had any of these probably didn’t rate very highly with me.  This is not a reflection of the restaurant or the quality of their food, and should not discourage anyone from checking them out.  That being said, here are my thoughts on all of the offerings this year…

    Burgers 1-4

    • Burger 1: The Spartan by Clutch Burger
      • Lamb and wagyu blended patty with merguez sausage, Tzatziki sauce, roasted pepper Harissa sauce, feta cheese, and cucumber
      • Mediterranean/Greek flavors are not really my thing, but this burger was actually pretty good.  The meat was moist and the patty didn’t taste gamey, despite the lamb.
    • Burger 2: Sweet Thai Sliders by The Mighty Spark
      • Thai seasoned chicken patty with peanut sauce and broccoli slaw on brioche
      • This is, quite possibly, the first time that a non-beef burger has caught my attention at one of these events.  It really did pay homage to Thai flavors in a way that brought out the sweet undertones of the cuisine without ruining the savory aspects of a burger.  Plus, they shared the recipe!
    • Burger 3: The Frita by Off the Mile
      • A chorizo burger with potato sticks, Sriracha mayo, and sweet plantain
      • I appreciated the effort, but this burger kind of missed the mark for me.  The patty was a little bit dry, and the plantain kind of overtook the rest of the burger, so the flavors never really came together.
    • Burger 4: The Tarpon Bend Burger from Tarpon Bend
      • A burger with white cheddar cheese and bacon onion jam on a Challah bun
      • This was a solid burger, and likely a burger that I would order when it shows up on a menu.  Though, for a competition, I feel like they played it a little bit safe.

    Burgers 5-8

    • Burger 5: Untitled Burger by Morton’s Steakhouse
      • A burger with bacon jam and blue cheese butter on a brioche bun
      • I’ll be honest, I was not excited at all about this burger when I saw them assembling them.  It just sounded so plain.  Then, I took a bite, and as the juicy patty gave way in my mouth, the flavors just exploded everywhere.  Not many ingredients, but each executed with such perfection and precision that I just couldn’t stop eating.  Not only did they get my vote, but I call for blue cheese butter to become a pantry staple.
    • Burger 6: The Maple Bacon Cheddar Cheese Burger from Books and Books
      • A burger with caramelized onions, maple bacon, and cheddar cheese
      • This burger was a huge departure from my previous festival experiences with Books and Books.  Normally, their burgers are “out of the box” creations like turkey in pita, vegan burgers, and so on.  This was actually a great, simple burger that was enjoyable to eat.
    • Burger 7: The Bacon Jam Burger by House Kitchen and Bar
      • A burger with bacon jam, white cheddar cheese, red pepper aioli, lettuce, and pickles
      • The patty on this burger was juicy and flavorful, but unfortunately as a mouthful all I tasted was pickles and mayo (two of the burger toppings that I dislike the most).
    • Burger 8: La Bestia by Pizco y Nazca
      • A blended beef burger with potato sticks, spring mix, rocoto pepper aioli, and tomato jam on a pretzel bun
      • As with the previous time that they entered their signature burger, Pizco y Nazca stands out with a successful interpretation of Peruvian-inspired flavors on a bun.  The “mayo” flavor of the aioli did stand out more than I remember, which is mostly just nitpicking.

    Burgers 9-12

    • Burger 9: The Ranchero Burger by Miller’s Ale House
      • A burger patty stuffed with bacon, cheddar, and jalapeño and topped with pico de gallo and garlic aioli
      • I think that there was some thought put into each component of the burger, but not into how to tie all of them together.  What we ended up with was a burger where the individual components were at war with each other to stand out, but they never quite came together as a cohesive burger.
    • Burger 10: Untitled Burger from Shula’s 347
      • A burger with Manchego cheese, maple bacon jam, and guava sauce
      • I think that this was the first time that I actually enjoyed guava on a burger.  The sauce was tangy sweet, but not so sweet that you wondered by there is dessert on your burger.
    • Burger 11: Untitled Burger from Doctor’s Hospital
      • A burger with honey cured bacon, potato gallette,Monterey Jack cheese, and secret sauce.
      • If you’re curious, a potato galette is sort of like a savory pancake made of potato.  Also, it is quite delicious on a burger.
    • Burger 12: McFoie Sliders from Bulla Gastrobar (Burgerliscious 2018 Best in Bun Winner)
      • A burger with Mahon cheese foam and served on a handmade steamed bun
      • This burger was absolutely surreal, but not in a bad way.  The steamed bun really made this burger stand out.  Biting it was like biting into bread-flavored air.  The name of the burger seemed to suggest that the burger might have Foie Gras on it, but if it did then I couldn’t taste it (which is a good thing).

    Burgers 13-16

    • Burger 13: Untitled Burger from Dune at The Ritz Carlton Key Biscayne
      • A bison and Foie Gras burger with bacon demi glace and truffle aioli
      • The pairing of bison and Foie Gras is actually a smart move.  Bison is a very lean meat, so adding the fatty richness of the Foie Gras would help to prevent a dry patty.  Despite this, the burger just didn’t work for me.  I think that the foie gras just made it taste too “earthy.”
    • Burger 14: The Knaus Berry Burger by 109 Burger Joint
      • An Angus beef burger with caramelized apple, Swiss cheese, and bacon on a Knaus Berry Farms sticky bun.
      • If you are a fan of sweet/savory pairings, then this burger is for you.  As I am not, I was unable to wrap my head around it.  But hey, there must be a reason why McGriddles are still on the McDonald’s breakfast menu.  This is just taking the gourmet approach to them.
    • Burger 15: Burger and the Beast by Jr’s Gourmet Burgers (Burgerliscious 2018 People’s Choice Winner)
      • A burger with grilled onions, signature homemade pink sauce, and American cheese on a slider bun
      • As usual, I am apparently the only human being in all of South Florida who hates mayo, and therefore hates all variations of “pink sauce” that appear on burgers around here.  This burger didn’t do it for me, but the public felt otherwise.
    • Burger 16: The Fritanga Especial by Pincho Factory
      • An all natural Angus beef patty with fried cheese, tangy cilantro slaw, guacamole and aji amarillo sauce on toasted brioche
      • This burger was a bit misleading.  The name implies Nicaraguan-inspired ingredients, but they sneak the Peruvian aji amarillo in there as if we won’t notice that you’ll never see that in any fritanga.  It threw the burger a little off balance.

    Burger 17 and desserts

    • Burger 17: The Pub Burger from Carolina Ale House
      • A burger with cheddar cheese, secret sauce, onion strings, and bacon
      • Poor Carolina Ale House.  I almost left without tasting them because they arrived late and then had issues getting their grill going.  The burger was good, but didn’t stand out in any way.  Still, for all of the issues that they ran into during the event, they should be very proud of what they put out.
    • Cookies from Night Owl Cookies: Night Owl Cookies seems to be a foodie fest regular, as I think I have seen them at almost any local festival.  Their cookies are a bit too sweet and dense for my tastes, but they seem to be quite popular.
    • Pumpkin Pie Ice Cream Sundae from Frice Cream: This was Seminole Squash ice cream with bourbon caramel sauce, vanilla whipped cream, and a brown sugar waffle cone.  For starters, I would like to say that I have made pumpkin ice cream at home.  It has NEVER turned out as creamy and luscious as this ice cream was.  However, the waffle bowl that they served it in was hopelessly brittle.  Using the tiny wooden paddle that we were given in lieu of a spoon, each attempt at scooping the ice cream resulted in breaking the waffle cone bowl until I was basically holding the ice cream itself in the palm of my hand.  I ate it right out of my hands without a second thought, because it was THAT good, but in the future they might want to think about putting them in a small plate or bowl for more stability.  And, maybe giving actual spoons.
    • Mini Dessert Bar from Seasons 52: The Seasons 52 dessert bar also makes a comeback, and adds some different flavors.  Last night we had pecan pie, pumpkin pie, key lime pie, and S’mores brownie.

    Congratulations to the winners of Burgerliscious 2018, and I am looking forward to next year!

  • Pressure Cooker White Chocolate Raspberry Cheesecake

    Pressure Cooker White Chocolate Raspberry Cheesecake

    Skip to Recipe
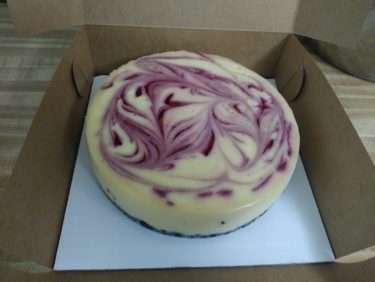
    After last week’s Halloween shenanigans, I had some leftover raspberry sauce.  Now, I hate letting stuff go to waste, even if it’s just a tiny bit of raspberry sauce.  I considered pouring it over ice cream, but I had all of that white chocolate left over from my failed attempts at white chocolate panna cotta that was firm enough to hold a shape.  It seemed like making white chocolate raspberry cheesecake was the inevitable conclusion.

    This was actually my first time making white chocolate raspberry cheesecake in my Instant Pot, but I have made enough cheesecakes in the past that I was pretty sure that I could figure out the recipe adaptation.  As it turns out, I was right!  And, since I got so many requests for the recipe, here it is!

    Start by preparing your cheesecake pan.  Combine the Oreo crumbs with the melted butter and press onto the bottom of your greased cheesecake pan.  Pop it in the freezer while you make the cheesecake batter.  Melt the white chocolate with the half and half (I used the microwave, but you can also use a double boiler if you’re more comfortable with that method), then set it aside.  Combine the cream cheese, eggs, sugar, and vanilla extract in a blender.  Blend until smooth, then add the white chocolate mixture and blend until just combined.
    Don’t overmix your cheesecake batter.  You’ll introduce too many air bubbles, which can lead to cracked cheesecakes.

    When your cheesecake batter is done, pour half of it into your prepared cheesecake pan.  Drizzle some raspberry sauce over it, then pour in the rest of the cheesecake batter and drizzle more raspberry sauce.  Use a thin spatula or dull knife to gently marble the sauce into the cheesecake.  Place the cheesecake on a trivet and place over simmering water in your pressure cooker.  Cook on Manual (High Pressure) for 26 minutes, then Natural Release.  Take your cheesecake out and blot any moisture that collected on the surface of the cheesecake.  Let it cool on the trivet completely, then cover it with foil and refrigerate for at least 4 hours before serving.

    I strongly recommend letting your cheesecake sit at least overnight.  Like custards, cheesecakes benefit from giving them some time to “mature” to get the best flavor.  I normally make mine a day or two in advance.

    There you have it!  You should now have a cheesecake that is delicious and beautiful enough to impress at any dinner party or potluck.  Or, just make it for yourself.  I won’t judge.

    The recipe for the raspberry sauce makes more sauce than you will actually need for one cheesecake.  It’s great on ice cream and panna cotta.  I bet it would also be good on a slice of pound cake.  Or, if your cheesecake disappears too quickly and you need to make another one.

    Pressure Cooker White Chocolate Raspberry Cheesecake

    Ingredients

    For the Cheesecake

    • 1 cup Oreo crumbs
    • 1 tbsp butter, melted
    • 16oz cream cheese, softened
    • 2 large eggs, room temperature
    • 1/4 cup sugar
    • 8 oz white chocolate, chopped (See note at the end of this post)
    • 1/4 cup half and half
    • 1/2 tsp vanilla extract
    • 3-4 tbsp raspberry sauce
    • Required equipment: a 7-inch cheesecake pan (the one I am using is this one)

    For the raspberry sauce

    • 5oz frozen raspberries
    • 1/4 cup water
    • 1 tbsp granulated sugar
    • 1 tsp cornstarch

    Directions

    Make the raspberry sauce

    In a small saucepan, combine your raspberries, water, corn starch, and sugar.  Bring to a boil.

    Continue to boil for about 5 minutes or until thickened, stirring constantly.  Remove from heat and strain sauce through a mesh strainer to remove the seeds.

    Make the cheesecake

    Grease a 7in round cheesecake pan. Mix the Oreo crumbs and melted butter until the crumbs are moistened all the way through. Press the mixture onto the bottom of your prepared cheesecake pan, then freeze until ready to use.

    Place the white chocolate and half-and-half in a small, heat-proof bowl.  Melt the chocolate in the microwave by microwaving in 15 second bursts, stirring after each burst, until the chocolate is melted and smooth.  Set aside to cool slightly. (NOTE: You can also melt the chocolate over a double boiler, if you prefer)

    Place the cream cheese, eggs, sugar, and vanilla extract in a blender or food processor.  Blend until smooth, but do not overmix.  Add the white chocolate mixture and continue to blend until just combined.

    Pour half of the cheesecake batter into your prepared cheesecake pan.  Drizzle with 1 1/2 to 2tbsp of raspberry sauce, then pour the remaining cheesecake batter over it and drizzle the remaining raspberry sauce.  Using a small spatula or dull knife, gently swirl the raspberry sauce through the cheesecake batter.

    Pour 1 cup of water in the liner of your electric pressure cooker and set it to the Saute/Browning setting.  When the water starts to simmer, place the cheesecake on a trivet and lower it into the pressure cooker.  Turn it off, cover and seal, then cook the cheesecake on Manual (High Pressure) for 26 minutes.  When the time is up, allow the pressure to release naturally for an additional 15 minutes.  Remove cheesecake and blot the surface with paper towel to remove moisture buildup.  Allow to cool completely, then cover and refrigerate for at least 4 hours before removing from pan and serving.

    Makes about 8 servings

    NOTE: Make sure that you use actual white chocolate for this recipe.  Most of the commercial brand chips are no longer made out of actual white chocolate, and will affect the taste of your cheesecake.  The package should say “White chocolate” on it, or it is not real chocolate.

  • Halloween Desserts 2018

    Halloween Desserts 2018

    Halloween is finally here!  And, for the first time in a while, I REALLY got into the Halloween spirit.  My job organizes a Halloween bake-off every year.  For the first time, I decided to enter.  I’m usually not the creative/artsy type when it comes to sweets, but I decided to challenge myself.  Pictured below is what I came up with, titled “The Mad Doctor’s Lab.”

    I was super happy with the way that my display turned out.  And, as it turns out, so were my coworkers.  I wound up getting awarded First Place for Originality for my Mad Scientist themed dessert display.  In addition to the actual desserts, I topped my display with a flask filled with water and a few drops of food coloring.  I did the same with two silicone cauldrons on either side of the display, then added a waterproof tea light to give them a “glow”.

    The kicker, though, was a few chunks of dry ice plunked into my vessels.  The smoke/fog effect produced by the dry ice really took the display over the top. The rest of my display was made up of two different desserts.

    My “Beaker Creatures” were key lime pie parfaits garnished with gumpaste tentacles and a Spiked Jelly Eyeball.  I used this tutorial to make the tentacles.  You can make the key lime filling by mixing 16oz of room temperature cream cheese, 2 cans of sweetened condensed milk, and 5/8 cup (that’s 1/2 cup plus two tablespoons) of key lime juice.  Add a few drops of green food coloring.  Then, alternate layers of this filling with graham cracker crumbs in small beakers (mine are 100mL).

    The “Bloody Brains” are vanilla bean panna cotta with raspberry sauce. I garnished the panna cotta brains with a royal icing meat cleaver and served them on a petrie dish just for an extra festive touch.

    Making these panna cotta brains is easy, but you do need to have a silicone mini brain mold to pull it off.  It took me about 4 or 5 tries to get the panna cotta to where it would hold the brain shape AND still be creamy.  But, I finally got the right formula, so I am passing it along so that you don’t have to go through the same trial and error as I did.  You’re welcome.

    Panna Cotta Brains

    Ingredients

    • 3/4 cup heavy cream
    • 2 tbsp sugar
    • 2 tbsp water
    • 1/2 tbsp unflavored gelatin
    • 1/4 tsp vanilla extract
    • 1/2 vanilla bean, split and seeds scraped
    • Red or pink food coloring
    • Required equipment: Silicone brain mold (I used this one)

    Directions

    Lightly grease each cavity of your brain mold and set aside.

    In a small saucepan, combine the heavy cream, sugar, and vanilla bean with seeds.  Cook on medium until the mixture starts to simmer, then remove form heat.  Allow vanilla bean to steep in the hot cream for about 10 minutes.

    Sprinkle gelatin over water and allow to soften for about 5 minutes.  Microwave for 15-20 seconds, or until all of the gelatin is dissolved (do not let the mixture boil, or you can ruin the gelatin).

    Remove the vanilla bean from the cream mixture.  Stir in the gelatin, vanilla extract, and enough food coloring to achieve the desired shade of pink.  Refrigerate for 4 hours or until set.  Remove panna cotta brains from mold and serve with raspberry sauce.

    Makes 4 Servings

  • Spiked Jelly Eyeballs

    Spiked Jelly Eyeballs

    With Halloween just a few days away, I have been looking for fun treats to make.  I had been looking for candy eyeballs to use as a garnish for a dessert that I had in mind, but I couldn’t find any that looked promising.  A few online searches brought me to some jello shots decorated like eyeballs, and it gave me the idea to make these jelly eyeballs.

    You will need a sphere ice cube tray to make these.  The one that I have makes 24 1″ spheres.  Once they were set, I used a cotton swab to paint the iris and the pupils with a bit of food coloring diluted in vodka (so that it will evaporate and leave just the color).

    I used coconut milk and pineapple rum to give it kind of a piña colada vibe, but you can come up with your own combinations.  I have also used mango rum, and maybe I will try half-and-half with vanilla vodka.  You just have to make sure that your base is a creamy white liquid to represent the whites of the eyes.

    Spiked Jelly Eyeballs

    Ingredients

    • 1 cup coconut milk
    • 1/4 cup condensed milk
    • 1/4 cup pineapple rum (or flavor of your choice)
    • 2 tsp unflavored gelatin
    • food coloring (black for the pupils and whatever color you want for the iris)
    • 1-2 tsp vodka
    • Required equipment: sphere ice cube tray (the kind that makes 1″ spheres; I used this one), cotton swabs

    Directions

    In a microwave-safe measuring cup, sprinkle gelatin over coconut milk.  Allow to soften for a few minutes, then microwave for 30 seconds.  Stir to ensure that the gelatin has dissolved.

    Stir in the condensed milk and rum, then pour into mold according to manufacturer’s directions.  Refrigerate until set, about 4 hours.

    When the spheres are set, use a cotton swap to paint an iris using food coloring diluted in vodka.  Return to refrigerator to dry, then repeat the process with black food coloring to paint the pupils.  Allow to dry.  Refrigerate until ready to serve.

    Makes about 24 1-inch sphere jello shots.

    Note: To make these non-alcoholic, swap out the rum for an extra 2 tbsp of coconut milk and an extra 2 tbsp of condensed milk.

  • Ethiopian-Spiced Lentil and Chicken Soup

    Ethiopian-Spiced Lentil and Chicken Soup

    Skip to Recipe
    I have had heard from many friends and acquaintances about the magic that is Ethiopian food.  It has always been on my list of cuisines to try, but it actually had never really happened yet.  When I got my Instant Pot about 2 years ago, one of the first things that I made in it was this Ethiopian-Style Spinach and Lentil Stew that I came across online.  It quickly became a favorite of mine.  Still, I didn’t really awaken to the wonders of Ethiopian food until a recent visit to the Epcot Food and Wine Festival.  There, I had an Ethiopian-style beef dish and a lentil stew that blew me away.

    I knew that I wanted to recreate those flavors at home.  After some digging around, I found what seemed like the two main components that I would need.  The first thing is niter kibbeh.  Niter kibbeh is basically clarified butter that has been infused with herbs and spices.  The flavor of this aromatic butter lays the foundation for the flavors to build on in most Ethiopian cuisine.  The second component is berbere.  Berbere is a spicy all-purpose seasoning blend that is used in several Ethiopian dishes.  Think of berbere as the Goya Adobo or the Lawry’s Season-All of Ethiopian cooking.  Most commercial Berbere blends are incredibly spicy, but the heat can be adjusted if you make your own.

    I took a stab at adjusting the lentil soup recipe to include the newfound niter kibbeh and berbere, and am very happy with the results.  I also added chicken, because extra protein never hurt anyone.

    You can easily leave out the chicken and make this a vegetarian dish if you prefer.

    If you are using store-bought berbere seasoning, I suggest starting with a smaller quantity and adjusting the seasoning to your liking.  My berbere is fairly mild and I used 2 tbsp, but that might be too much for hotter ones.

    I strongly suggest that you use niter kibbeh for this dish, but if you don’t want to go through the trouble then you can use ghee or olive oil in place of it.  It will still taste good!

    Pressure Cooker Ethiopian-Spiced Lentil and Chicken Soup

    (Adapted from this recipe)

    Ingredients

    • 2 tbsp niter kibbeh (you can make your own using this recipe)
    • 1 medium yellow onion, diced
    • 1/2 tbsp minced ginger
    • 3 cloves garlic, minced
    • 1-2 tbsp berbere seasoning
    • 2 cups dry brown lentils
    • 2 lbs skinless chicken thighs (leave them out if you want to make this vegetarian)
    • 8 cups chicken stock (or vegetable stock if you prefer)
    • 6 oz baby spinach
    • Salt and pepper to taste
    • Lemon wedges for serving

    Directions

    Set the pressure cooker to the Saute/Browning setting

    When the cooker reads Hot, add the niter kibbeh and the onions.  Cook until the onions start to soften, about 3-5 minutes.  Add the ginger and garlic and continue to cook until fragrant (about 1-2 mins).  Add the berbere seasoning and stir to coat. Add the chicken or vegetable stock.  Taste and adjust seasonings as needed.

    Add the lentils and chicken.  Turn off the pressure cooker.  Cover, seal, and cook on Manual (High Pressure) for 20 minutes.  Allow the pressure to release naturally for another 10-15 minutes until releasing the remaining pressure.

    Uncover, then taste and adjust seasonings again if you need to.  Stir in the spinach until wilted, then serve with lemon wedges.

  • Pressure Cooker Kahlua Dulce de Leche Cheesecake

    Pressure Cooker Kahlua Dulce de Leche Cheesecake

    Skip to Recipe
    When I learned how to make dulce de leche in my Instant Pot, the floodgates were wide open for a time.  Any time that I caught a sale on condensed milk, some of it wound up becoming dulce de leche.  This, of course, meant that I needed to find a use for all of it.  I have never been the kind that can just eat it with a spoon.  I experimented all sorts of ways with it.  I even made some with coffee.  The coffee and dulce de leche combo is actually pretty delicious.  So, I combined them in cheesecake form and came up with this Kahlua and dulce de leche cheesecake.

    Prepare your cheesecake crust by combining Oreo crumbs and melted butter.  Press that into a prepared cheesecake pan, then stick it in the freezer.  Add 1 1/2 cups of water to the liner of your pressure cooker and set to the Saute/Browning setting.

    Combine cream cheese, sugar, vanilla extract, and eggs in a blender or food processor.  Blend them until they are smooth, but do not overmix them.  Set aside 1/2 cup of the cheesecake mixture and fold in 1/2 cup of dulce de leche into it.  Add the Kahlua to the rest of the batch of cheesecake batter, then pour it into the cheesecake pan.  Plop the dulce de leche mixture in spoonfuls over the batter, then use a dull knife to gently swirl it through the batter.  Place the pan on a trivet (you can also add a foil sling) and lower it into the pressure cooker.  The water in the pressure cooker should be simmering by now, so turn off the pressure cooker.  Cover, seal, and set to cook on Manual (High Pressure) for 23 minutes.

    Once the time is up, allow the pressure to release naturally for 12 minutes before you release the remaining pressure.  Remove the cheesecake and let it cool completely, then cover and refrigerate it for at least 4 hours before serving.


    You can swap out the Kahlua with another liqueuer, if you like.  Or, with plain espresso if you don’t want the alcohol.  This cheesecake will still be delicious!

    Pressure Cooker Kahlua Dulce de Leche Cheesecake

    Ingredients

    • 1 cup crushed Oreo crumbs
    • 1 tbsp butter, melted
    • 16oz cream cheese, softened
    • 1/2 cup granulated sugar
    • 2 eggs, room temperature
    • 1/2 tsp vanilla extract
    • 1/4 cup Kahlua coffee liqueur
    • 1/2 cup dulce de leche (can be homemade or store-bought)

    Directions

    Grease a 7in round cheesecake pan. Mix the Oreo crumbs and melted butter until the crumbs are moistened all the way through. Press the mixture onto the bottom of your prepared cheesecake pan, then freeze until ready to use.

    In a blender or food processor, combine the cream cheese, sugar, eggs, and vanilla extract until smooth.  Do not overmix.

    Remove 1/2 cup of the cheesecake batter and mix it with the dulce de leche.  Add the Kahlua to the remaining mixture, then pour that into the prepared cheesecake pan.  Gently drop spoonfuls of the dulce de leche mixture over the mixture in the pan, then swirl gently with a knife or thin spatula.

    Add 1 1/2 cups of water to the liner of your electric pressure cooker, then set to the Saute/Browning setting. When the water comes to a simmer, set your cheesecake on a trivet and lower it into the pressure cooker. Cover, seal, and change the setting to cook on Manual (High Pressure) for 23 minutes. When the time is up, allow the pressure to release naturally for 12 minutes, then release any remaining pressure. Remove the cheesecake from the pressure cooker and allow to cool completely, then refrigerate for at least 4 hours

  • Seven Layer Ice Cream Cake

    Seven Layer Ice Cream Cake

    Skip to Recipe
    I think that ice cream cake might be one of my favorite kinds of cake EVER.  In fact, a Carvel ice cream cake remains the ONLY store bought cake that is acceptable for my birthday.  For a long time, trying to recreate the magic of my favorite ice cream cake was on my to-do list.  When I finally worked up the nerve to give it a shot, I decided that recreating it was not enough.  No, I didn’t want to just reproduce that combination.  I wanted to up the ante.  Let’s add some additional texture with some crushed candy in there.  Oh, and let’s add a brownie base for more flavors and some stability.  And, let’s drizzle it with caramel because caramel makes everything better.  By the time I was done, I had a seven layer ice cream cake on my hands.

    Yes, I said seven layers.  One layer of chewy brownie base.  Then, a layer of crushed candy bars.  Then, ice cream.  Then, cookie crunchies.  And then, MORE ice cream and MORE crushed candy bars.  And finally, whipped cream and caramel drizzle to finish it off.  An explosion of flavors and textures.

    The great thing about this seven layer ice cream cake recipe is that you can customize it to your tastes.  You can pick whatever flavors of ice cream you want, and whatever candy you like.  My version uses homemade caramel ice cream and crushed Heath bar pieces.  You can use store bought ice cream if you’re nervous about making your own ice cream.  Just make sure to soften it before you start assembling your cake.

    The first thing that you need to do is make your brownie base.  One fourth of the recipe for a 13 x 9 inch pan of brownies made in a 9in round pan makes the perfect thickness for the base.  Be sure to use a springform or removable bottom pan to make the brownie so that you have an easier time getting it all out in one piece.

    Freeze the brownie for at least an hour before you start to assemble.  It will help to keep the ice cream from melting too much while you’re trying to assemble the cake.  While the brownie is chilling, pulse the chocolate wafers in a food processor.  When they are broken up into large crumbs, add the chocolate shell topping and pulse until the crumbs moistened all the way through.

    Once the brownie is cool, the assembly process can begin.  I used a ring mold.  If you don’t have a ring mold, use a 9inch springform pan lined with parchment.  Place the brownie at the bottom of the mold.  Add half of the candy pieces, then 1 1/2 quarts of ice cream.  Spread the cookie crumb layer on top of that, then add the remaining ice cream.  Top with the rest of the crushed candy, then freeze for at least 4 hours (overnight is preferable) before you continue.

    When you’re ready, remove the ice cream cake from the mold and pipe dollops of whipped cream along the edges.

    Heat the butter, sugar, salt, and corn syrup in a small saucepan over medium heat.  Bring to a boil and continue to cook until the mixture turns an amber color.  Remove it from the heat and stir in the heavy cream.  Do this carefully, because it might splatter.  If the mixture looks thick enough at this point, add the vanilla extract.  Otherwise, put it back on the heat until it reaches the desired thickness, then remove it again and add the vanilla.  Keep in mind that the sauce will thicken more as it cools.  The sauce can be made in advance and stored in the fridge.  Just warm it up a tad in the microwave to get it back to pouring consistency.

    Right before you’re ready to serve the cake, drizzle it with the caramel sauce.

    To make your ice cream cake easier to cut, run your knife through hot water for a few seconds before eat cut.  It will make things a lot easier.

    This is a great make-ahead cake, so it’s perfect for events where you won’t have time for cake-making the day of.  I have made a seven layer ice cream cake a few days in advance and it is still fantastic.

    Seven Layer Ice Cream Cake

    Ingredients

    For the cake

    • 1/4 recipe for a 13 x 9 inch brownie (this recipe recommended)
    • 3 quarts of your ice cream of choice (can be homemade or store bought), softened
    • 2-3 cups of crushed candy pieces, divided
    • 1 9oz package of chocolate wafer cookies
    • 1 7-8oz bottle of chocolate shell ice cream topping
    • 1 1/2 cups sweetened whipped cream (or store bought whipped topping)

    For the caramel sauce

    • 1/4 cup (1/2 stick) butter
    • 1 tbsp light corn syrup
    • 1/2 cup white sugar
    • 1/2 tsp vanilla extract
    • 1/4 cup heavy cream
    • a pinch of salt

    Directions

    Preheat oven to 350 degrees.  Grease a 9in round springform or push-bottom pan.

    Prepare brownie batter according to the recipe directions.  Pour into prepared pan and bake for 12-15 minutes, or until a toothpick inserted in the center comes out with only frudgy crumbs.  Remove from oven and allow to cool completely on a wire rack.

    Place a 9in ring mold (or 9in springform pan lined with parchment) on a plate or cake board.  Remove the brownie from the pan and place at the bottom of the mold.  Freeze for at least one hour.

    In a food processor, pulse the chocolate wafer cookies into large crumbs.  Add the chocolate shell topping, then continue to pulse until the crumbs are moistened all the way through.

    Remove the mold with the brownie from the freezer.  Add half of the crushed candy over the brownie, spreading it evenly.  Add half of the ice cream over this, then the moistened cookie crumbs.  Add the other half of the ice cream, and then the remaining crushed candies.  Return to the freezer and freeze for at least 4 hours, or until firm.  Once firm, remove from mold and decorate with whipped cream.  Drizzle with caramel sauce right before serving.

    To make the caramel sauce:  Melt the butter, sugar, salt, and corn syrup over medium heat.  Bring to a boil, then cook until the mixture thickens and turns light brown.  Remove from heat and stir in the cream and vanilla extract.  Allow to cool to lukewarm before serving.

  • Pressure Cooker Mango Chicken Curry

    Pressure Cooker Mango Chicken Curry

    Skip to Recipe
    Every now and then, an Instant Pot owner gets asked, “Why convert a tried and true oven/stovetop recipe to the IP?”  Sometimes, the answer is to save time.  Other times, the answer is to wash fewer dishes.  And, a lot of times, the answer is something a little unexpected: “Because I can.”  That is how I wound up with this mango chicken curry.

    I stumbled across a recipe for mango chicken curry a year or two ago during Mango Madness.  I think that it was one of my very first ventures into using mangoes in savory dishes.  It was an instant hit with my friends, and gets requested a lot.  The original recipe called for stovetop preparation.  I wanted to try to convert it to an IP recipe.  The challenge with that, of course, is that pressure cooking often leaves things a bit watery.  I got around that by using coconut cream instead of coconut milk, then reducing the sauce a bit at the end.

    Prep your ingredients first.  This will make things much easier when you get started.

    Heat the oil in your electric pressure cooker set to the Saute/Browning setting.  When the cooker reads Hot, add your dry spices and stir to coat them in oil.  Do this quickly or your spices can burn.  Add the chopped onions and peppers next, stirring to coat them in the spice and oil mixture.  Saute for 2-3 minutes, then add the garlic and ginger and keep sauteeing for another 2 minutes.  Add the mango, then stir to combine.  Stir in the vinegar and the water, then season with salt and pepper.

    As a little side interlude, having two instant pots is GREAT for situations like this.  Your curry can cook in one pot while your rice cooks in the other.

    Place your chicken thighs over your mixture.  Cover and seal your pressure cooker, then cook on Manual (High Pressure) for 15 minutes.  You can also use the Poultry setting to get the same result.  When the time is up, release the pressure manually.  Uncover and remove the chicken from the pot.  Chop or shred the chicken and set it aside.  Stir the coconut cream into the liquid remaining in the pot.  Using an immersion blender, puree the cooked vegetables and fruit.  Set the pressure cooker back to the Saute setting and let the sauce come to a simmer.  Simmer the sauce for 5-10 minutes, or until it thickens.  Add the chicken back to the sauce and give it another stir.  Check your seasonings and add more salt and pepper if needed.

    In my house, we like our curry served with a side of white rice.  I bet it would also be great with some warm, buttery naan bread.  Is your mouth watering yet?

    If you don’t have an immersion blender, you can also puree your sauce in a conventional blender.  Just return it to the pot to reduce after you’re finished blending it.

    Pressure Cooker Mango Chicken Curry

    Ingredients

    • 3lbs boneless skinless chicken thighs
    • 3-4 cups fresh mango slices
    • 2 tbsp oil
    • 2 medium onions, roughly chopped
    • 1 red bell pepper, roughly chopped
    • 4 tbsp minced ginger
    • 4 garlic cloves, minced
    • 4 tbsp yellow curry powder
    • 1 tsp ground cumin
    • 1/2 tbsp garam masala
    • 1/4 cup cider vinegar
    • 1/4 cup water
    • 1 13.5oz can of coconut cream
    • Salt and pepper to taste

    Directions

    Heat the oil in the liner of your pressure cooker using the Saute/Browning setting.

    When the cooker reads Hot, add the spices and stir to coat with oil.  Add the chopped onions and peppers and cook for 2-3 minutes until just beginning to soften.  Add the garlic and ginger and cook until fragrant, about 1-2 minutes.  Stir in the mango slices, and then the water and the vinegar.  Season with salt and pepper.

    Lay the chicken on top of the vegetable/mango mixture.  Cover, seal, then cook on Manual (High Pressure) for 15 minutes.  When the timer runs out, release the remaining pressure manually.  Remove the chicken from the pot.  Chop or shred it and set it aside.

    Stir the coconut cream into the liquid remaining in the pot.  Puree the vegetables and fruit using an immersion blender.  Turn the cooker back to the Saute/Browning setting and allow the sauce to come to a simmer.  Cook the sauce until it thickens, about 5-10 minutes.  Serve hot.