Category: Desserts

  • Pressure Cooker Chocolate and Irish Cream Flan

    Pressure Cooker Chocolate and Irish Cream Flan

    Skip to Recipe

    One of my older sisters doesn’t make it a secret that she really doesn’t know how to cook.  It’s not that she is proud of it, but she is just very matter-of-fact about it.  Since getting married, though, she has decided to make more of an effort in learning her way around the kitchen.  So, for last Christmas, she asked for an Instant Pot as a gift, for which the family happily obliged.  She was ecstatic when she received it, and then proceeded to stuff it in her closet, too afraid to use it.

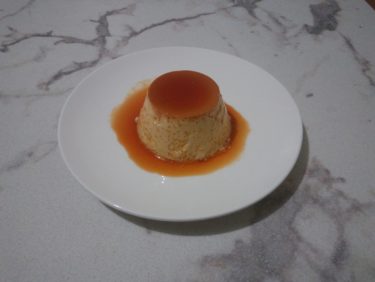
    Fast forward to present-day, and I decided to take advantage of my plans to visit her in Houston to give her a crash course on the Art of the Instant Pot.  Of the many recipes that I think that someone should have up their sleeves, an easy dessert that’s potluck-friendly is one of them.  I told her we were going to make flan, and she didn’t seem all that excited.  So, I decided to sweeten the pot and appeal to her past life as a bartender.  I proposed that we make a chocolate and Irish Cream flan, and that definitely got her attention.  When she sat down and tasted the fruit of our labors, she said that it was the best flan that she has ever had in her life.

    At home, I have a flan pan (flanera) that I use to make flans.  However, my sis doesn’t have one, so we used a glass baking dish.  The flan was a little bit too soft in the middle, so I would add another 2 minutes or so of pressure keeping time if you’re going to use glass to make your flan.  And remember, oven-safe glass only!

    You can omit the cocoa powder to make just an Irish Cream flan, and you can also replace the Irish Cream with additional half-and-half to make this just a chocolate flan.

    Pressure Cooker Chocolate and Irish Cream Flan

    Ingredients

    • 1/2 cup sugar
    • 2 tbsp water
    • 1 can sweetened condensed milk
    • 1 1/2 cups half and half
    • 1/2 cup Irish Cream
    • 3 eggs
    • 1/4 cup unsweetened cocoa powder (preferably Dutch-processed if you have it)

    Directions

    In a small saucepan, melt the sugar over medium heat, stirring frequently.  When the sugar has melted and turned amber, remove from heat and add the 2 tbsp of water (careful, it will steam and splatter).  Carefully stir until the sugar and water are combined, then pour into the bottom of a flan pan or round baking dish.  Set aside to cool.

    In a blender, add the remaining ingredients, then blend at medium speed until combined.  Pour over the cooled caramelized sugar in the flan pan or baking dish.

    Pour 1 cup of water into the liner of your pressure cooker.  Cover your flan pan or baking dish, place on a trivet, then lower into the liner of your pressure cooker.  Seal and cook on Manual (High Pressure) for 12 minutes (add another 2 minutes or so if using a glass baking dish), then allow the pressure to release naturally for another 12 minutes before removing the the flan from the pressure cooker.  Allow to cool completely, then refrigerate for at least 4 hours, but preferably overnight.

    To serve, run a thin knife along the edge of the flan, then flip the pan over onto a plate, gently shaking the flan loose.

    Makes about 8 servings

  • Pressure Cooker Peanut Butter Cheesecake

    Pressure Cooker Peanut Butter Cheesecake

    Skip to Recipe
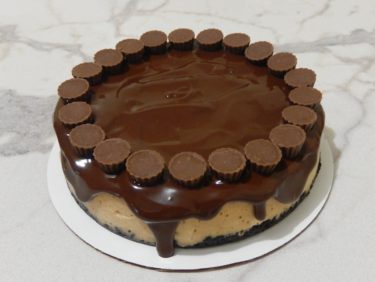
    I hosted my first “Instant Pot Party” recently for a few friends that wanted some pointers on how to make the most out of their appliance.  One of my friends wanted to make a peanut butter cheesecake, and already had a recipe in mind.  Having made that same recipe before with some changes, I told her the changes that I recommended on the recipe.  Surprisingly, she trusted me enough to go along with them.  Not only was she pleased with the results, but she asked me to document the adjusted recipe so that she could have it handy.

    You can add chocolate chips to the peanut butter cheesecake if you want and it doesn’t affect the cook time.  I prefer smooth cheesecakes, so I typically leave them out unless I am bringing the cheesecake to a group event.  Cheesecakes always taste best after they sit in the fridge for at least a day, so be sure you plan on making this at least a day in advance.

    Prepare your crust, press it into your prepared cheesecake pan, and then pop it into the freezer while you prepare your cheesecake batter.  Start with the cream cheese and sugar.  Cream it with your electric mixer until fluffy, then mix in the eggs.  Next, add the peanut butter and vanilla extract, then mix until just combined.  Pour the batter into your cheesecake pan, place the pan on a trivet, then lower it into your pressure cooker filled with about 1 1/2 cups of simmering water.  Cook on Manual for 23 minutes, then natural release for 12 more minutes before releasing the rest of the pressure and removing the peanut butter cheesecake from the pressure cooker.

    When the cheesecake is completely cool, you’ll want to refrigerate it for several hours before removing it from the pan.  At this point, you can make the ganache.  I make it by heating my cream and chocolate in the microwave in 20-second bursts until the chocolate is almost completely melted, then let it melt the rest of the way while I stir.  If you prefer to make ganache the traditional way, just bring your cream to a boil on the stove, pour the boiling cream over your chopped chocolate in a heatproof bowl, then stir until all of the chocolate is melted and the mixture is creamy.  Let the ganache sit until it’s fairly thick, but still pourable.  This is what will get you those attractive drips when you pour it over the cheesecake.

    As a finishing touch, you can garnish with mini peanut butter cups.  You can also chop them up and sprinkle them on top of your peanut butter cheesecake.

    You can also double the cheesecake ingredients and oven-bake this in a 9in round springform pan if you’re feeding a crowd.  Bake in a hot water bath at 350 degrees for about an hour, or until the center is only slightly jiggly.

    Pressure Cooker Peanut Butter Cheesecake

    (Adapted from this recipe from Pressure Cooking Today)

    Ingredients

    • 1 cup crushed Oreo crumbs
    • 1 tbsp butter, melted
    • 16oz cream cheese, softened
    • 1/2 cup white sugar
    • 2 eggs, room temperature
    • 1/2 cup creamy peanut butter
    • 1/2 tsp vanilla extract
    • 3/4 cup semisweet chocolate chips (optional)
    • 3/4 cup bittersweet chocolate pieces
    • 1/2 cup heavy cream
    • peanut butter cups for garnish (optional)

    Directions

    Grease a 7in round cheesecake pan.  Mix the Oreo crumbs and melted butter until the crumbs are moistened all the way through.  Press the mixture onto the bottom of your prepared cheesecake pan, then freeze until ready to use.

    Cream the sugar and cream cheese using an electric mixer.  Add the eggs, one at a time, beating well with each addition.  Add the peanut butter and vanilla extract and continue mixing until just combined.  Do not overmix.  Fold in the semisweet chocolate chips, if using.  Pour mixture into your prepared baking pan.

    Add 1 1/2 cups of water to the liner of your electric pressure cooker, then set to the Saute/Browning setting.  When the water comes to a simmer, set your cheesecake on a trivet and lower it into the pressure cooker.  Cover, seal, and change the setting to cook on Manual (High Pressure) for 23 minutes.  When the time is up, allow the pressure to release naturally for 12 minutes, then release any remaining pressure.  Remove the cheesecake from the pressure cooker and allow to cool completely, then refrigerator at least 4 hours.

    Place heavy cream and bittersweet chocolate in a microwave-safe dish or measuring cup.  Microwave for 20-second intervals, stirring gently between intervals, until the chocolate is almost completely melted, then continue stirring until the chocolate melts completely.  Allow mixture to cool until thick before pouring onto your peanut butter cheesecake, then garnish with peanut butter cups if desired.

    Makes about 8 servings.

  • Dulce de Leche Ice Cream

    Dulce de Leche Ice Cream

    Skip to Recipe
    When it comes to frozen treats, I always lean more towards frozen custard instead of ice cream, because I prefer the creamier consistency.  And, since learning how to make ice cream at home, I have always sought out recipes that incorporate egg yolks into the ice cream base, because I know that this will net me a creamy texture that I adore.

    The problem with using egg yolks, of course, means you end up with egg whites that you then have to find a use for.  Sometimes, I just don’t want to deal with that.  And, over time, I have found a few instances where making the ice cream egg-free still yields a creamy and luscious end product.  This dulce de leche ice cream is one of those.

    I make this dulce de leche ice cream often, because it comes together fairly easily and contains ingredients that I almost always have on-hand.  If I have milk or cream that is rapidly approaching its expiration date, ice cream is one of my go-to solutions to this predicament.

    The first thing you need to do is heat your dulce de leche on the stove with the milk.  You want to dissolve the dulce de leche so that it fully incorporates into the ice cream mixture.

    Once all of the dulce de leche has melted, you’re left with a thick, caramel colored mixture.

    Pour this mixture, along with your heavy cream, into a heat-proof bowl.  Add the vanilla extract, and stir to combine.  Cover and refrigerate until the mixture is cold.  You can speed this up by setting your bowl into a larger bowl full of ice, but I usually just let the mixture refrigerate overnight.

    When the mixture is ready, you can freeze it according to the manufacturer’s directions for your ice cream maker, then store it in the freezer until ready to serve.

    A few hours of patience while you wait for it to set will reward you with some smooth, creamy ice cream that is just bursting with dulce de leche flavor in every bite.

    You can buy premade canned dulce de leche, or make your own out of a can of condensed milk.  I haven’t yet tried this with dulce de leche that is made from scratch, but I imagine that it would also work.

    Dulce de Leche Ice Cream

    Ingredients

    • 1 14oz can dulce de leche (about 1 1/3 cups)
    • 1 1/2 cups milk
    • 1 1/2 cups heavy cream
    • 1/4 tsp vanilla extract

    Directions

    In a small saucepan, combine the dulce de leche and the milk.  Cook over medium to medium-low heat, stirring frequently, until the dulce de leche has melted and mixture is uniform and free of clumps.

    Pour mixture into a heat-proof bowl, and gently stir in the cream and vanilla extract.  Cover and refrigerate until very cold, then freeze in your ice cream maker according to manufacturer’s directions.  Transfer ice cream to a freezer-safe container, then freeze until set.

    Makes about 1.5 quarts


  • Mango Madness in July – Part 4 (2017 Chapter)

    Mango Madness in July – Part 4 (2017 Chapter)

    My first year at my current job, I was amazed at the massive influx of mangoes during mango season.  It was like homeowners couldn’t get rid of them fast enough.  That’s how Mango Madness was born, and Mango Season every year since then has been dedicated to mango-fying anything that I can think of.  Mango Madness 2017 will be no different.

    Sadly, my most reliable and prolific mango supplier was relocated.  I expected this to make getting my hands on mangoes a little harder than usual.  Instead, I had quite a steady stream of mangoes headed my way.  I guess word has gotten around about my Mango Mad Scientist antics, so everyone knows that any surplus of mangoes will get put to good use in my house.  Ha!

    So, what new things did I make for Mango Madness 2017?  Here we go!

    Mango salsa goes great on a lot of savory dishes, including jerk chicken chili!  Just combine diced mango with lime juice, salt, pepper, cumin powder, and cilantro.  The sweetness of the mango really offsets the heat of the chili, and completes the chili’s Caribbean flair.

    Mango Suspiro Limeno is a deliciously innovative way to eat the classic Peruvian dessert.  It’s normally too sweet for me, but the mango seems to cut some of that sweetness out.

    If you’re looking for something to cool you down in hot weather, try mango creamsicles.  They are cool, creamy, refreshing, and oh so delicious.  And, if you don’t own any popsicle molds, disposable cups work just as well.

    If you’re feeling fancy, try filling some puff pastry shells with mango pastry cream.  All it takes is some fresh berries and a dollop of whipped cream to make an impressive presentation.  Pro-tip: Heat the baking pan before you bake the puff pastry shells.  It makes them puff up so much higher.

    Believe it or not, mango is a great addition to BBQ sauce if you’re into sweet sauces.  Try mango BBQ sauce on ribs or brisket.  A friend of mine even put it on pasta and liked it.

    Mango upside down cake is best made with mango that doesn’t have a lot of fiber because it is easier to slice.  But, if you only have fibrous mangoes, don’t let that deter you.  The buttery, brown sugary top of the cake really elevates the mango.

    Mango compote makes a great topping for pound cakes and ice cream.  Or, stir it into your yogurt!

    If compotes aren’t your thing, you can try caramelized mango.  They’re spiked with a little bit of rum and flecked with vanilla bean seeds.  You can make it in chunks or in slices.  Either way, it’s a treat!  It would probably go great on some waffles or pancakes.

    Mango brownies are a bit out-of-the-box, but the mango actually complements the chocolate better than you might think.  The mango puree in the brownie batter makes them extra moist and fudgy.  You don’t taste the mango very much, so most people that don’t know that there’s mango in them will probably just know that there’s “something different” in them that they can’t quite put their finger on.

    You could color me shocked when I found out how well mango works in curry.  This mango chicken curry used mangoes they are slightly under-ripe so that they don’t make the curry too sweet.  Though, if your mangoes are too sweet, you can just add more acid to the curry sauce.  I bet you could also use shrimp instead of chicken!

    Mango Madness 2017 was another prolific time, and I continue to surprise myself with how many new things can be made with mango.  And, having different suppliers helped me to discover the best ways to use different types of mangoes.  Stringy and fibrous mango?  Puree, strain, and and make something with mango puree.  Smooth and firm mango?  Slice or dice and use the pieces in sauces or cakes.  Every year is a learning experience, and I can’t wait until 2018!

  • Mango Upside Down Cake

    Mango Upside Down Cake

    Skip to Recipe

    Mango season is in full swing, and the creative juices are flowing!  Trying to figure out what to make with mango every year is often a challenge.  Often, however, an idea just pops into my head that makes me say “Why the heck didn’t I think of that before!?”  That was the case with this mango upside down cake.  While I was brainstorming with a coworker on what new things I could try making with mango this year, it just popped into my head.  I knew that I HAD to make it, and my brain wouldn’t let me stop thinking about it until I did.  My brain knows what it’s doing, because the cake turned out to be AWESOME.

    The mango upside down cake recipe makes a 13 x 9 inch pan, but I split it into two 9 inch round pans so that I could share with 2 separate groups of people.  Just be sure to split the topping ingredients between the two pans and adjust the baking time accordingly if you will be doing this.

    Stir some brown sugar into your pans of melted butter.  Spread it around as evenly as you can, and then lay your mango slices on top.  If your mangoes are too ripe, you might have some trouble getting clean mango slices like I did.  But, do the best that you can.  It will still taste great!

    Make the batter by creaming butter and brown sugar, then adding the egg.  Stir in the vanilla, and add your sifted dry ingredients alternately with mango pulp and milk.  Gently spread the batter into your prepared pans, and then bake.  Wait about 5 minutes, and then remove the cake from the pan.

    Don’t wait too long to unmold your cakes, or you run the risk if the brown sugar hardening.  Good luck getting your cakes out of the pan in one piece if that happens.

    I was initially kind of disappointed at the lack of height with the cake, until I realized that this meant that the mango topping to cake ratio made it so that the taste of the mango topping really stood out.  The buttery, sweet, caramelized mango topping is really what makes this cake stand out, so you don’t want to skimp on that.  I prefer mine warm, but it tastes good cold also.

    Mango Upside Down Cake

    Ingredients

    For the topping

    • 1/3 cup butter
    • 3/4 cup brown sugar
    • 5 cups mango slices (may be more of less depending on the size of the slices)

    For the cake

    • 2 cups all-purpose flour
    • 1 tbsp baking powder
    • 1/4 tsp salt
    • 1 cup packed brown sugar
    • 2/3 cup butter
    • 3 eggs
    • 2 tsp vanilla extract
    • 1/2 cup mango puree
    • 1/4 cup milk

    Directions

    Preheat oven to 350° F.

    While the oven is preheating, place an ungreased 13″ x 9″ baking pan with 1/3 cup of butter, allowing the butter to melt in the pan in the oven.  Remove the pan from the oven and stir in 3/4 cup brown sugar, then spread the mixture as evenly as possible around the pan.  Arrange the sliced mango on top of the brown sugar/butter mixture and set aside.  Sift together the dry cake ingredients.

    In the bowl of a stand mixer, cream the butter and brown sugar.  Add the eggs, one at a time, beating well with each addition.  Stir in the vanilla extract.  Add the dry ingredients alternately with the mango puree and milk, beating well with each addition.  Gently spread the batter over the mango slices in the pan.

    Bake in preheated oven for 35-40 minutes (25-30 minutes if using 9″ round pans), or until a toothpick inserted in the center comes out clean.  Let cake rest on a wire rack for about 5 minutes, then loosen the cake from the pan and invert the cake onto a serving platter.  Allow to cool at least 20 minutes before serving.

    Makes 1 13″ x 9″ rectangle cake or 2 9″ round cakes.

  • Red Velvet Lava Cake

    Red Velvet Lava Cake

    Another Fourth of July, approaches.  In addition to another year to celebrate our nation’s independence, it’s yet another reason to eat things that are red, white, blue, or a combination of all three.  Normally, this means flag cakes or tri-color jello molds, but I am thinking out of the box this year.  I’m thinking red velvet lava cake. This definitely isn’t the type of dessert that you’d plan to bring to a neighborhood barbecue or cookout, but it will impress nonetheless.  Besides, who ever really wants to eat a boxed cake mix sheet cake topped with Cool Whip, anyway?

    You can make red velvet lava cake in your oven or in your Instant Pot (pressure cooker).  I personally prefer the texture of an oven-baked lava cake, but I know that others prefer the moist, custard-like consistency of an Instant Pot lava cake.  Make sure that you play around with the cook times until you get the center as runny as you like it.

    If you REALLY want to stick to the red velvet theme, this treat is best enjoyed with a scoop of cream cheese ice cream.  Yes, it does exist.  Otherwise, vanilla ice cream also works.

    I was tempted to add a few blueberries to the plate to tie it in with the red, white, and blue, but I just didn’t think that the flavors would come together for this one.

    Red Velvet Lava Cake

    (adapted from Gretchen’s Bakery)

    Ingredients

    • 4 tbsp (1/2 stick) butter
    • 3 tbsp buttermilk
    • 2 eggs
    • 3 egg yolks
    • 1 1/4 cups bittersweet chocolate,chopped
    • 1/2 cup flour
    • 1/2 cup powdered sugar
    • a pinch of salt
    • red gel food coloring as needed

    Directions

    Preheat oven to 375°.  Generously grease 5 4oz ramekins.

    Melt the chocolate and the butter in the microwave or over a double boiler.  Stir in the buttermilk.  Sift the flour, salt, and sugar together and set aside.

    In a separate bowl, whisk the eggs and yolks.  Gradually add in the chocolate mixture to the egg yolks, a little bit at a time to keep from scrambling the eggs.  Add in the food coloring until the mixture is the desired color.  Stir in the flour mixture and whisk until smooth.

    Divide batter evenly between the greased ramekins.  Bake in the preheated oven for 14-18 minutes.  Serve immediately by inverting onto a plate to remove from the ramekin.

    To make in the Instant Pot, fill the pot with 1 cup of water, place the ramekins on a trivet, and cook on Manual (High Pressure) for 5-7 minutes.

    Makes 5 servings

  • Pressure Cooker Coffee Dulce de Leche

    Pressure Cooker Coffee Dulce de Leche

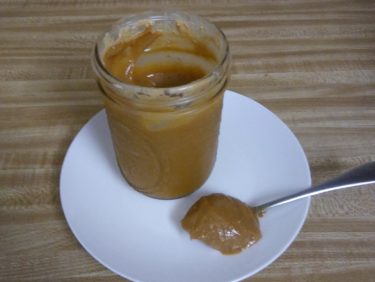
    Dulce de leche is basically the product of sweetened milk that is cooked until it darkens and thickens.  Dulce de leche, or arequipe  as it’s known in Colombia, is getting more and more popular in the US.  And, with more households investing in a pressure cooker or Instant Pot, making it at home has never been easier.  However, during my most recent visit to Colombia, I came across something that I NEVER seen in the US: arequipe con cafe (coffee dulce de leche).  I mean, I guess it’s a no-brainer that Colombians would figure out how to add coffee flavor to this confection, but my head pretty much exploded when I saw it.  I brought some home for my friends, and their reaction was pretty much the same.

    For a good week, I mulled over how I could try to recreate something similar at home.  In the end, I decided to try combining condensed milk with brewed espresso.  My fellow Colombians would have a fit, of course.  Only lazy people make arequipe with condensed milk, and only if they don’t care how it tastes.  But, here in the US, I think that dulce de leche made out of condensed milk tastes just fine, and there’s no need to babysit a pot for hours on end!  I mean, there’s a time to spend hours making something the long and painful way, and there are times to empty a can into a jar, set it in a pressure cooker, and go watch TV.

    Empty one can of condensed milk into a canning jar, then add brewed espresso.  Stir until combined, then seal your jar and place it on a trivet in your pressure cooker.  Fill with water until the jar is about halfway submerged, then seal your pressure cooker.  Cook on High Pressure for 45 minutes, then allow the pressure to release naturally for about 10-15 minutes, then release any remaining pressure.

    Once it’s done, all you have to do is give it a quick whisk to break up any clumps, let it cool, and you’re good to go.  You can make ice cream with it, stir it into yogurt, use as a filling…the possibilities are endless!

    This should keep in the refrigerator for about 2 weeks, if it lasts that long.

    Coffee Dulce de Leche (Arequipe con Cafe)

    Ingredients

    • 1 can sweetened condensed milk
    • 1/4 cup brewed espresso

    Directions

    Pour sweetened condensed milk into a canning jar.  Stir in the espresso until smooth.  Seal the jar.

    Place the sealed jar on a trivet in the pressure cooker, then fill with water until the water reaches about halfway up the jar.

    Seal the pressure cooker, then cook on Manual (High Pressure) for 45 minutes.  Turn off the pressure cooker and allow the pressure to release naturally for 10-15 minutes, then release the remaining pressure.  Remove the jar from the pressure cooker using tongs or mitts, then carefully open the jar and whisk the dulce de leche to smooth out any clumps.  Allow to cool completely before refrigerating.

    Makes about 1 pint.

  • Pressure Cooker Snickers Cheesecake

    Pressure Cooker Snickers Cheesecake

    Skip to Recipe

    Oh, if there were any two words sweeter than “Snickers Cheesecake,” I can’t think of them right now.  All I can say that, after making this only once, it became a favorite.  How can you really go wrong with cheesecake with a chocolate crust and chunks of Snickers floating in there!?

    I have been having a lot of fun playing with my Instant Pot brand pressure cooker, in case you couldn’t tell.  And, I have to admit that it does make certain things way better and easier than the traditional way.  Converting a “conventional” recipe into a pressure cooker recipe isn’t always intuitive, but cheesecake is an exception.  Practically any cheesecake recipe can be turned into a pressure cooker cheesecake with the proper adjustments to scale and cook time.  True, making cheesecake in a pressure cooker means you have to make a smaller cheesecake, but it’s not a big deal for someone that lives by themselves or hosts small dinner parties.  And, when you have something as decadent as a SNICKERS cheesecake, it’s much safer not to keep large quantities of it lying around the house.

    Get your ingredients together.  It’s always best to start by having everything you need ready and available.

    Mix the Oreos and butter together and press into your greased cheesecake pan.  I like to pre-bake my crust for 6-7 minutes at 350° in the oven, but this is not necessary.

    To make the batter, cream the cream cheese and brown sugar until combined.  Add the eggs, one at a time, and then the sour cream and vanilla.  Once your batter comes together, fold in your chopped Snickers pieces and pour into your prepared cheesecake pan.

    The water in your pressure cooker should be simmering before you put the cheesecake in.  Then, cook for 20-25 minutes and then natural release for 10-15 minutes.  Let the cheesecake cool in the pan completely, then refrigerate at least several hours before you remove from your pan.

    So, it has a small crack, but we’ll fix that.

    Note that I made enough crust to go all the way up the side of the cheesecake.  This was a bad idea, as the condensation from the pot made the outer rim of the crust soggy.  The recipe is adjusted to account for crust on the bottom only.

    Melt some caramels on the stove with a little bit of milk or half and half, then pour over the cake.  Sprinkle with some salted peanuts.  Both of these are optional, but when has extra caramel EVER been a bad idea?

    Snickers Cheesecake

    I learned the hard way that caramel covered cheesecakes don’t travel well.  So, if you’re not eating it at home, use less liquid when melting your caramels, or don’t pour the sauce over the cheesecake until you are ready to serve.Check out all of that delicious Snickers goodness!  Cheesecake alone is great, but Snickers Cheesecake is like a glimpse of heaven in every bite.  Note that you can also make this in the oven by doubling the ingredients and baking in a 9in springform pan.  Set your pan in a water bath and bake at 350° for about an hour to an hour and a half.

    If you have a family member with a peanut allergy, try making this with Almond Snickers!

    Pressure Cooker Snickers Cheesecake

    (adapted from this recipe)

    Ingredients

    • 1 cup crushed Oreos
    • 1 1/2 tbsp butter, melted
    • 2 8oz packages cream cheese, softened
    • 1/2 cup brown sugar
    • 2 eggs, room temperature
    • 1/4 cup sour cream
    • 1/2 tsp vanilla extract
    • 1 cup chopped Snickers Baking Bites (about 1/2 of a 10oz bag)
    • 1/2 bag (7oz) caramels, unwrapped (optional)
    • 1-2 tbsp milk or half-and-half (optional)
    • Salted peanuts (optional)

    Directions

    In a bowl, combine melted butter and Oreo crumbs until moistened through.  Press Oreo crumbs firmly on the bottom of a greased 7in cheesecake pan.  If you’d like, bake at 350° for 6-7 minutes before preparing the batter.  Add 1 cup of water to the liner of your electric pressure cooker and set to Saute/Brown setting.

    In the bowl of a stand mixer, beat the cream cheese and brown sugar until smooth.  Add the eggs, one at a time, beating well with each addition.  Add the sour cream and vanilla extract, and beat until just combined.  Fold in the Snickers pieces.

    Pour batter into prepared cheesecake pan, then set the pan in your pressure cooker on a trivet over the simmering water (add a little bit more water if too much has evaporated).  Hit cancel, then seal the pressure cooker and cook on Manual (High pressure) for 20-25 minutes.  Allow the pressure to release naturally, which should take 10-15 minutes.  Remove the cheesecake from the pressure cooker and allow to cool completely on a wire rack.   Refrigerate at least 4 hours, but preferably overnight, before removing from the pan.

    To make the optional topping, melt the caramels with the milk in a small saucepan over low to medium-low heat, stirring frequently.  When the caramel is completely melted, pour over the cheesecake, then sprinkly with salted peanuts.

    Makes 1 7in cheesecake

  • Pressure Cooker Irish Cream Flan

    Pressure Cooker Irish Cream Flan

    This is a haphazard post.  I hadn’t really been planning on posting this recipe to the blog, but I have had a lot of requests for Irish Cream Flan recipe that I just couldn’t refuse.  The public asks, and I deliver.  🙂

    For some reason, I have been on a Bailey’s kick lately, so I’ve been trying to come up with ways to incorporate Irish Cream into desserts.  I made Irish Cream ice cream with mixed success, as the alcohol in the Bailey’s made the ice cream too soft and melted quickly.  So, what else is creamy and whose texture will not suffer from the addition of alcohol?  Flan!  And, an Irish Cream Flan sounded like too good of an idea to pass up.  Best of all, it worked on the first try!

    The outside of the flan had me a little worried that I had overcooked it, but the inside was as smooth and creamy as I like my flans to be.  I was afraid that using too much Irish Cream would make the flan taste too heavily of booze, so I replaced some of the liqueur with Irish Cream flavored coffee creamer.  Feel free to play around with the ratios of booze and creamer to get your preferred concentration of Bailey’s flavor, but this was just right for me.

    Hope you enjoy!

    Pressure Cooker Irish Cream Flan

    Ingredients

    • 1/4 cup plus 2 tbsp white sugar, divided
    • 1 tbsp water
    • 1 cup Half and Half
    • 1/4 cup Irish Cream flavored coffee creamer
    • 1/4 cup Irish Cream
    • 2 eggs

    Directions

    In a small saucepan, heat 1/4 cup of sugar over medium heat, swirling the pan occasionally to distribute the heat.  Once the sugar has melted and turned deep amber, remove from heat and add the 1 tbsp of water (careful, it may splatter) and stir until combined.  Distribute the syrup evenly between 3 6 oz ramekins or custard cups.

    Crack the eggs into a small, heat-proof bowl and whisk, then set aside.  In a small saucepan (can be the same one if you want), heat the Half and Half, creamer, Irish Cream, and sugar until lightly simmering.  Remove from heat and gradually add this mixture, 2 tbsp at a time, to the eggs, whisking constantly.  Once about 1/3 of the hot cream mixture has been added to the eggs, slowly pour the remaining hot cream into the egg mixture, whisking the entire time.

    Add 1 cup of water to the inner liner of your electric pressure cooker and place a trivet inside.  Cover your custard cups tightly with foil, then set on the trivet inside the pressure cooker.  Seal and cook on Steam setting for 5 minutes, then allow the pressure to release naturally for an additional 5 minutes before releasing the rest of the pressure manually.  Remove custards from the pressure cooker and allow to cool, uncovered, on a wire rack.  Flans will be very jiggly when you take them out.  This is normal.  Re-cover and refrigerate at least 4 hours, but preferably overnight.

    To serve, run a small knife around the edge of the custard cup, then invert onto a plate.

    Makes 3 servings.

  • Pumpkin and Cheese Pastries (Pastelitos)

    Pumpkin and Cheese Pastries (Pastelitos)

    Skip to Recipe

    Pumpkin and cheese (cream cheese, to be specific) is one of those combinations that sounds weird if you have never tried it, but works incredibly well.  So, pumpkin and cheese pastries (or pastelitos, as we call them down my way) seemed like a win for me.  Lightly sweetened pumpkin puree and soft cream cheese wrapped in flaky puff pastry…what could be wrong with that?

    I got the idea when I had some canned pumpkin left over from making pumpkin oatmeal and didn’t really know what to do with it.  Thankfully, I also had a few boxes of puff pastry sitting in the freezer from when I stocked up during a sale, so it wasn’t difficult to come up with a plan that incorporated both.

    You will need defrosted the pastry dough.  If you are making your own puff pastry, then more power to you.  I am not on that level yet.

    Prep your filling and your egg wash.  Combine your pumpkin puree, brown sugar, cinnamon, and nutmeg together.  Then, crack an egg into a small bowl and beat, then pour half of the beaten egg into your pumpkin mixture.  Save the other half for your egg wash.

    Unfold each piece of defrosted puff pastry and cut into 9 equal pieces.  I used a pizza cutter for that part.  Then, cut small pieces of cream cheese and place some in 9 of the squares and top with a spoonful of the pumpkin mixture.  Using a pastry brush, moisten the outer edges of the filled squares with egg wash, then top with an unfilled square of dough.  Gently press down around the edges to seal the dough.  Repeat until you have 9 filled squares of pastry.  Then, place on a baking sheet and brush with remaining egg wash.  You can also sprinkle with sugar, if you want.

    Bake them at 350º until they are puffy and golden on the outside, about 30-35 minutes.  Let them cool for at least 15-20 minutes before you attempt to consume, as the filling will be HOT.

    Plated pumpkin and cheese pastries

    Using a small amount of egg as a binder ensures that you have a somewhat custard-like filling in your pumpkin and cheese pastries, instead of a mess of pumpkin oozing out.  Store any leftovers in an airtight container.  These are best served warm.  I like to heat mine up in my toaster oven the next day, but you can also eat them at room temperature if you’re not as patient as I am.

    Pumpkin and Cheese Pastries (Pastelitos)

    Ingredients

    • 1 17oz package frozen puff pastry, thawed
    • 1 cup pumpkin puree
    • 3 tbsp brown sugar
    • 1/4 tsp cinnamon
    • a pinch of nutmeg
    • 4-6 oz cream cheese, cold
    • 1 egg, beaten
    • granulated sugar (optional)

    Directions

    Preheat oven to 350º.  Line a large baking sheet with parchment paper.  Mix pumpkin, brown sugar, cinnamon, and nutmeg together in a small bowl.  Add half of the beaten egg and mix until combined.  Set aside.

    On a silicone mat or lightly floured surface, gently unfold both sheets of pastry dough and cut into 18 equal squares (9 squares per sheet).

    Cut small rectangles of cream cheese and place in the center of 9 of the dough squares.  Top with the pumpkin mixture, then use a pastry brush to brush some of the remaining egg mixture around the edges of the filled dough squares.  Top with an unfilled dough square, pressing gently to seal.  Set finished squares on prepared baking sheet and brush with leftover beaten egg.  Sprinkle with sugar, if desired.

    Bake in preheated oven for 30-35 minutes, or until tops are golden brown.  Allow to cool 15-20 minutes before eating, and cool completely on a wire rack before storing.

    Makes 9 servings.