Category: Desserts

  • Caramel (or Mango) Bars

    Caramel (or Mango) Bars

    Skip to Recipe

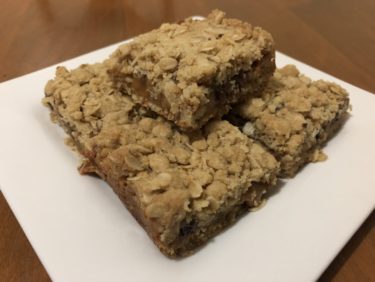
    Bars aren’t exactly an elegant or overly sophisticated dessert, but they can sure please a crowd. I made these caramel bars for a work event, and was shocked at how delicious they are. I got several requests for the recipe, which is adapted from a recipe that I found online.

    Combine the dry ingredients to make the crumb crust, then add melted butter. Stir until the mixture is moistened throughout, but it should still be kind of crumbly. Take half of the mixture and press it onto the bottom of a baking pan and bake it for 8 minutes

    While the bottom crust is in progress, melt the caramels and the cream until smooth and fluid. This has to be done over medium-low heat to avoid burning the caramel, which means it will take some time. Start melting your caramel while you’re gathering the ingredients for the crust to make the most of the time.

    Sprinkle your pecans and chocolate chips over the baked crust, then pour the caramel over them. Crumble the other half of the crumb mixture over the bars, then lightly press down. Bake the bars for another 12 to 15 minutes, or until the edges are browned.

    You can see where the caramel has started bubbling out in some places. This is how you want them to look when they’re ready.

    It’s best to cut them while they are still slightly warm.

    These bars are extra rich, so a small portion goes a long way. Try warming one up in the microwave for a few seconds before eating.

    **UPDATE 7/15/2019: You can also use this recipe to make Mango bars! I am updating the recipe with separate recipe list and directions for caramel filling vs mango filling.

    Caramel Bars

    Ingredients

    For the crust:

    • 2 cups all purpose flour
    • 2 cups rolled oats
    • 1 1/2 cups brown sugar
    • 1 cup (2 sticks) butter, melted
    • 1 tsp baking soda
    • 1 tsp salt

    For caramel filling:

    • 1 14oz bag caramels, unwrapped
    • 5 tbsp heavy cream
    • 1/2 cup semisweet chocolate chips
    • 1/2 cup chopped pecans

    For mango filling:

    • 4 cups fresh mango, cut into 1/2 inch cubes
    • 3/4 cup brown sugar
    • 2 tbsp cornstarch
    • 1 tsp lemon juice

    Directions

    Preheat the oven to 350 degrees F.

    In a large bowl, combine the dry ingredients (except chocolate chips and pecans). Stir in the melted butter, then press half of the mixture onto the bottom of a 13″ x 9″ baking pan (I recommend lining with foil or parchment). Bake for 15 minutes.

    If using caramel filling: (Do this while the crust is baking) In a small saucepan, melt caramels with heavy cream over medium-low heat.

    Remove from oven and sprinkle with chocolate chips and walnuts. Pour the warm caramel evenly over the top, then crumble the remaining crust mixture over the top. Press it down lightly.

    Return pan to the oven and bake for an additional 12-15 minutes, or until the top is lightly browned. Let cool, then cut into bars.

    If using mango filling: While the crust is baking, combine the mangoes, brown sugar, cornstarch, and lemon juice in a medium saucepan. Cook over medium to medium-high heat, stirring frequently to prevent sticking, until mixture thickens.

    Pour mixture over the pre-baked crust, spreading it evenly to cover the whole crust. Crumble the remaining half of the crust mixture evenly over the top. Press it down lightly.

    Return pan to the oven and bake for an additional 20-25 minutes. Let it cool on a wire rack before cutting into bars.

    Makes 2 dozen bars

  • Pressure Cooker Chocolate Stout Molten Pudding

    Pressure Cooker Chocolate Stout Molten Pudding

    Skip to Recipe

    I had experimented with making molten puddings (AKA lava cakes) in the Instant Pot for a while.  This chocolate stout molten pudding is the result of such experiments.

    I was not on board with making lava cakes in my electric pressure cooker (Instant Pot) when I first heard that this was a thing.  Truth be told, I tried it.  In fact, I invited a few friends over to my house and we made a batch of lava cakes in the oven and nother batch in the Instant Pot to see which ones we liked better.  The decision was split fairly evenly, but I was firmly on Team Oven.  What finally changed my mind was a trip to the Epcot Food and Wine Festival last year, where the Ireland station was serving up “chocolate pudding” that was basically a lava cake.  But, that was when it hit me that what was REALLY bothering me was that I associate a certain texture to “cake.”

    When I stopped thinking about Instant Pot lava cakes as “cakes” and instead thought of them as “molten puddings,” I quickly warmed up to them.  It’s important to make the distinction, because molten puddings/lava cakes made in the Instant Pot do have a very different texture than their oven counterparts.  The exterior is more smooth and custard-like.  The oven gives you a drier, brownie-like crust.  You can also bake these in the oven if that is the texture that you prefer.

    Start by melting your chocolate and your butter, then set it aside.  Whisk the eggs with the sugar until foamy, then whisk in the flour until there are no clumps.  Slowly which the chocolate mixture into the egg mixture.  I did it in 4 rounds so that the heat from the chocolate mixture didn’t curdle the eggs.

    Once the chocolate mixture is thoroughly combined, gradually add the stout.  Doing it little by little ensures that it won’t make your batter separate.  After that is done, pour it into greased ramekins, then cook uncovered on High Pressure for 7 minutes.  When the timer is up, use Quick Release to release the pressure and remove the ramekins.

    Invert each pudding on a plate to serve.  You could eat it as is if you want.

    Since I was sticking to the St. Patrick’s Day theme, I served them with an Irish Cream Creme Anglaise.  The rich sweetness of the cream sauce paired perfectly with the bitterness of the chocolate and the stout.  Of course, this would also go great with ice cream.

    Because these stout molten puddings use both bittersweet chocolate and beer, the pudding itself does have some bitter notes.  You can use semi-sweet chocolate for a less bitter taste, or add more sugar to suit your taste.

    Pressure Cooker Chocolate Stout Molten Pudding

    Ingredients

    For the puddings:

    • 8 oz bittersweet chocolate, chopped (or semi-sweet chocolate)
    • 1/2 cup (1 stick) butter
    • 4 whole eggs
    • 1/2 cup Stout beer (I used Guinness)
    • 1/4 cup sugar
    • 5/8 cups flour

    For the Irish Cream Creme Anglaise:

    • 1 cup milk
    • 2 egg yolks
    • 1 tbsp cornstarch
    • 1/4 cup sugar, divided
    • 1/2 cup Irish Cream liqueur (I use Kerrygold)

    Directions

    Make the Creme Anglaise:

    In a small saucepan, heat the milk and half of the sugar over medium heat  Whisk the egg yolks, cornstarch, and remaining sugar and set aside.

    When the milk starts to simmer, remove from heat.  Slowly whisk the hot milk mixture into the egg mixture, a little bit at a time.  Return the mixture to the saucepan and cook over medium heat until the mixture thickens (about 2-3 minutes).

    Remove from heat and strain mixture through a fine mesh strainer, then stir in the Irish Cream.  Allow to cool completely, then refrigerate until ready to use.

    Can be made a day in advance.

    Make the molten puddings:

    Grease 6 4oz ramekins and set side.  Pour 1 cup of water into the liner of your pressure cooker.

    Melt the chocolate and the butter in a microwave-safe bowl in 20-30 second bursts until all of the chocolate is melted and the mixture is smooth.  Set aside.

    Whisk the eggs and the sugar together until combined, then add the flour and whisk until few clumps remain.  Gradually whisk in the chocolate mixture, then the stout.

    Divide the batter evenly among the 6 ramekins.  Arrange them in 2 layers on a trivet in the liner of your pressure cooker, then cook on Manual (High Pressure) for 7 minutes.  When the timer is up, manually release the remaining pressure.

    Remove ramekins from the pressure cooker and serve by inverting the puddings onto a plate.  Serve with Creme Anglaise.

    Makes 6 servings.

  • Passion Fruit Ice Cream (Egg Free)

    Passion Fruit Ice Cream (Egg Free)

    Skip to Recipe
    I snagged a ridiculously good sale on passion fruits recently.  So good, in fact, that I drove to four different participating store locations to grab up whatever passion fruits I could.  Worth every penny, and it gave me room to start making things with passion fruit that I have wanted to make for a while, but haven’t because they are so expensive.  Passion fruit ice cream was one of them.

    Passion fruit is quite an acidic fruit.  I noticed that my ice cream mixture thickened up considerably before I even put it on the stove to make the custard the first time I made it.  So, for my second batch, I decided to skip the stove step.  Using condensed milk also helps with giving the passion fruit ice cream the creamy, custard-like consistency without the need to add eggs.

    The end result is a creamy ice cream that is the perfect balance of sweet and tart.  While freezing your passion fruit ice cream in the ice cream maker, start checking it after about 15 minutes of churning.  Because the mixture is so thick, it sometimes freezes faster than normal ice cream, and you don’t want to overchurn.

    Passion Fruit Ice Cream

    Ingredients

    • 2 cups heavy cream
    • 1 14oz can sweetened condensed milk
    • 1 1/4 cups passion fruit pulp (with seeds)
    • 1/2 tsp vanilla extract

    Directions

    Combine all of the ingredients in a medium bowl.  Let sit for 10-15 minutes, then strain to remove seeds.  Cover and refrigerate until very cold.

    Freeze in your ice cream maker according to the manufacturer’s directions.  Transfer to an airtight container and freeze for at least 4 hours or until firm.

  • Rose Entremets

    Rose Entremets

    Skip to Recipe
    For this month’s meeting of the South Florida Baking Club, I decided on “Flowers and Chocolate” as the theme.  Basically, your creation should incorporate flowers or chocolate.  Since I’m a little nuts, I decided to do BOTH.  And, before realizing how I had shot myself in the foot with that idea, these Rose Entremets were born.

    The rose entremets are made up of four components: A genoise sponge as the base, bavarian cream, a truffle center, and colored mirror glaze.  As the name implies, the entremets incorporate the flavor of rose in two of the four components.  The bavarian cream is flavored with rose syrup, and the truffle center has rosewater added to it.

    I wasn’t really expecting to post this so soon, so I don’t have pictures of the entire preparation process.  I will try to come back and update when I make these again!

    Once all of your components are prepared, the rose entremets are assembled in half-sphere molds, then frozen until solid so that they can be glazed.

    I highly recommend living the pan under your glazing tray with parchment paper.  It makes for much easier cleanup!

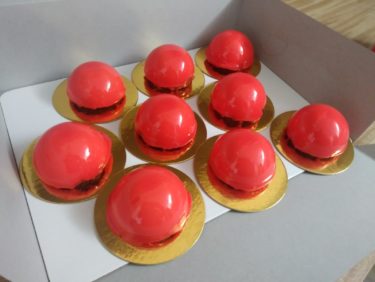
    My mirror glaze turned out a bit less opaque than I would have liked.  I think that I would add some white gel food coloring next time to make it less translucent.

    From start to finish, they took me three weekday evenings to make.  But oh, were people IMPRESSED!  I finally found a use for my gold mini cake circles that have been sitting in my pantry for AGES.

    You could definitely taste the rose, but it wasn’t overpowering.  Rather than tasting like you got smacked in the face with a bouquet, it was more of a subtle floral tone that came in at the end.  I would call these a resounding success!  The subtle rose tone in the creamy bavarian cream balanced out the indulgent and rosy truffle center.

    These are best eaten within a day after assembling, as mirror glaze doesn’t keep well.

    Rose Entremets

    Ingredients

    For the rose truffle:

    • 1/2 cup heavy cream
    • 4oz bittersweet chocolate, chopped
    • 1/4 tsp rose water

    For the chocolate genoise sponge:

    • 3/8 cup all-purpose flour
    • 2 tbsp cocoa powder
    • 3 eggs, at room temperature
    • 1/2 cup sugar
    • 1/2 tsp vanilla extract
    • 2 tbsp butter, melted and cooled slightly

    For the vanilla rose bavarois:

    • 5 egg yolks
    • 1 1/4 cups heavy cream
    • 3/4 cups heavy cream
    • 3 tbsp rose syrup
    • 2 tbsp sugar
    • 1 tbsp gelatin powder
    • 1 tsp vanilla extract

    Additional ingredients/materials

    • 1 batch of mirror glaze (I used this recipe)
    • 1 set of 2 1/2in silicone sphere molds (I used these)
    • 1 set of 1 1/2in silicone sphere mold (I used this one)
    • A 2 1/2 inch diameter cookie or biscuit cutter

    Directions

    Make the rose truffles

    Please the chopped chocolate in a heat-proof bowl.

    Heat the heavy cream in a small saucepan until it’s almost to a boil.  Pour over the chopped chocolate, then stir gently until all of the chocolate has melted and mixture is smooth.  Add the rose extract and stir to combine.

    Divide evenly among the cavities of your smaller sphere mold.  Cover and refrigerate until set.

    Make the Chocolate Genoise

    Preheat oven to 375 degrees.  Line a 13 x 9 inch baking pan with parchment paper.  Sift the flour and cocoa together and set aside.

    Using an electric mixer, beat the eggs, sugar, and vanilla until the mixture quadruples in size and turns pale yellow.  This will take about 5-10 minutes. Gently fold in the melted butter.

    Sift the flour mixture into the egg mixture and gently fold it in until no streaks remain.

    Pour into prepared baking pan and bake for about 15 minutes or until toothpick inserted in the center comes out clean.  Allow to cool completely on a wire rack.

    Make the Vanilla Rose Bavarois

    In a small bowl, bloom the gelatin in the rose syrup.  Set aside.

    In another bowl, whisk the sugar and the egg yolks together and set aside.  Heat the 1 1/4 cups of cream in a small saucepan over medium heat until it starts to simmer.  Remove from heat and very slowly whisk the hot cream mixture into the egg mixture.  Do this a little at a time, or you will scramble the eggs.  Pour the mixture back into the saucepan and return to the heat.  Reduce heat to medium-low and continue to cook, whisking constantly, until the mixture thickly coats the back of a spoon.  Remove from heat.

    Melt the gelatin mixture in the microwave by microwaving in 10-second intervals until all of the gelatin is dissolved.  Pour gelatin mixture into the cream mixture, then stir in vanilla.  Strain into a bowl using a fine mesh strainer, then let mixture cool to room temperature (place it over an ice bath to speed up the process).

    Whip the 3/4 cup of cream until it reaches stiff peaks.  Fold the whipped cream into the custard mixture.

    Assemble the entremets

    Fill each cavity of the large half-sphere molds about halfway with bavarois.  Place one truffle dome, flat side up, in the center of each.  Cut 12 rounds of chocolate genoise sponge and place one disk in each cavity.  Press it down gently to get it as flush with the tops of the cavities as possible.  Cover and freeze until solid.

    *Note: You will likely have Bavarois and truffle left over I poured the extra into small glasses and served as Bavarian Cream desserts.

    Glaze the entremets

    Place your frozen entremets on a wire rack with a parchment-lined baking sheet underneath.  Pour the prepared mirror glaze over each entremet, slowly and evenly so that it produces an even coat.  Cover and refrigerate until ready to serve.

    Makes 12 entremets

  • Pressure Cooker White Chocolate Raspberry Cheesecake

    Pressure Cooker White Chocolate Raspberry Cheesecake

    Skip to Recipe
    After last week’s Halloween shenanigans, I had some leftover raspberry sauce.  Now, I hate letting stuff go to waste, even if it’s just a tiny bit of raspberry sauce.  I considered pouring it over ice cream, but I had all of that white chocolate left over from my failed attempts at white chocolate panna cotta that was firm enough to hold a shape.  It seemed like making white chocolate raspberry cheesecake was the inevitable conclusion.

    This was actually my first time making white chocolate raspberry cheesecake in my Instant Pot, but I have made enough cheesecakes in the past that I was pretty sure that I could figure out the recipe adaptation.  As it turns out, I was right!  And, since I got so many requests for the recipe, here it is!

    Start by preparing your cheesecake pan.  Combine the Oreo crumbs with the melted butter and press onto the bottom of your greased cheesecake pan.  Pop it in the freezer while you make the cheesecake batter.  Melt the white chocolate with the half and half (I used the microwave, but you can also use a double boiler if you’re more comfortable with that method), then set it aside.  Combine the cream cheese, eggs, sugar, and vanilla extract in a blender.  Blend until smooth, then add the white chocolate mixture and blend until just combined.
    Don’t overmix your cheesecake batter.  You’ll introduce too many air bubbles, which can lead to cracked cheesecakes.

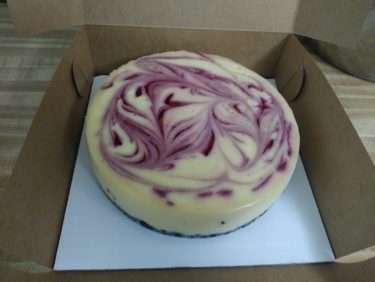
    When your cheesecake batter is done, pour half of it into your prepared cheesecake pan.  Drizzle some raspberry sauce over it, then pour in the rest of the cheesecake batter and drizzle more raspberry sauce.  Use a thin spatula or dull knife to gently marble the sauce into the cheesecake.  Place the cheesecake on a trivet and place over simmering water in your pressure cooker.  Cook on Manual (High Pressure) for 26 minutes, then Natural Release.  Take your cheesecake out and blot any moisture that collected on the surface of the cheesecake.  Let it cool on the trivet completely, then cover it with foil and refrigerate for at least 4 hours before serving.

    I strongly recommend letting your cheesecake sit at least overnight.  Like custards, cheesecakes benefit from giving them some time to “mature” to get the best flavor.  I normally make mine a day or two in advance.

    There you have it!  You should now have a cheesecake that is delicious and beautiful enough to impress at any dinner party or potluck.  Or, just make it for yourself.  I won’t judge.

    The recipe for the raspberry sauce makes more sauce than you will actually need for one cheesecake.  It’s great on ice cream and panna cotta.  I bet it would also be good on a slice of pound cake.  Or, if your cheesecake disappears too quickly and you need to make another one.

    Pressure Cooker White Chocolate Raspberry Cheesecake

    Ingredients

    For the Cheesecake

    • 1 cup Oreo crumbs
    • 1 tbsp butter, melted
    • 16oz cream cheese, softened
    • 2 large eggs, room temperature
    • 1/4 cup sugar
    • 8 oz white chocolate, chopped (See note at the end of this post)
    • 1/4 cup half and half
    • 1/2 tsp vanilla extract
    • 3-4 tbsp raspberry sauce
    • Required equipment: a 7-inch cheesecake pan (the one I am using is this one)

    For the raspberry sauce

    • 5oz frozen raspberries
    • 1/4 cup water
    • 1 tbsp granulated sugar
    • 1 tsp cornstarch

    Directions

    Make the raspberry sauce

    In a small saucepan, combine your raspberries, water, corn starch, and sugar.  Bring to a boil.

    Continue to boil for about 5 minutes or until thickened, stirring constantly.  Remove from heat and strain sauce through a mesh strainer to remove the seeds.

    Make the cheesecake

    Grease a 7in round cheesecake pan. Mix the Oreo crumbs and melted butter until the crumbs are moistened all the way through. Press the mixture onto the bottom of your prepared cheesecake pan, then freeze until ready to use.

    Place the white chocolate and half-and-half in a small, heat-proof bowl.  Melt the chocolate in the microwave by microwaving in 15 second bursts, stirring after each burst, until the chocolate is melted and smooth.  Set aside to cool slightly. (NOTE: You can also melt the chocolate over a double boiler, if you prefer)

    Place the cream cheese, eggs, sugar, and vanilla extract in a blender or food processor.  Blend until smooth, but do not overmix.  Add the white chocolate mixture and continue to blend until just combined.

    Pour half of the cheesecake batter into your prepared cheesecake pan.  Drizzle with 1 1/2 to 2tbsp of raspberry sauce, then pour the remaining cheesecake batter over it and drizzle the remaining raspberry sauce.  Using a small spatula or dull knife, gently swirl the raspberry sauce through the cheesecake batter.

    Pour 1 cup of water in the liner of your electric pressure cooker and set it to the Saute/Browning setting.  When the water starts to simmer, place the cheesecake on a trivet and lower it into the pressure cooker.  Turn it off, cover and seal, then cook the cheesecake on Manual (High Pressure) for 26 minutes.  When the time is up, allow the pressure to release naturally for an additional 15 minutes.  Remove cheesecake and blot the surface with paper towel to remove moisture buildup.  Allow to cool completely, then cover and refrigerate for at least 4 hours before removing from pan and serving.

    Makes about 8 servings

    NOTE: Make sure that you use actual white chocolate for this recipe.  Most of the commercial brand chips are no longer made out of actual white chocolate, and will affect the taste of your cheesecake.  The package should say “White chocolate” on it, or it is not real chocolate.

  • Halloween Desserts 2018

    Halloween Desserts 2018

    Halloween is finally here!  And, for the first time in a while, I REALLY got into the Halloween spirit.  My job organizes a Halloween bake-off every year.  For the first time, I decided to enter.  I’m usually not the creative/artsy type when it comes to sweets, but I decided to challenge myself.  Pictured below is what I came up with, titled “The Mad Doctor’s Lab.”

    I was super happy with the way that my display turned out.  And, as it turns out, so were my coworkers.  I wound up getting awarded First Place for Originality for my Mad Scientist themed dessert display.  In addition to the actual desserts, I topped my display with a flask filled with water and a few drops of food coloring.  I did the same with two silicone cauldrons on either side of the display, then added a waterproof tea light to give them a “glow”.

    The kicker, though, was a few chunks of dry ice plunked into my vessels.  The smoke/fog effect produced by the dry ice really took the display over the top. The rest of my display was made up of two different desserts.

    My “Beaker Creatures” were key lime pie parfaits garnished with gumpaste tentacles and a Spiked Jelly Eyeball.  I used this tutorial to make the tentacles.  You can make the key lime filling by mixing 16oz of room temperature cream cheese, 2 cans of sweetened condensed milk, and 5/8 cup (that’s 1/2 cup plus two tablespoons) of key lime juice.  Add a few drops of green food coloring.  Then, alternate layers of this filling with graham cracker crumbs in small beakers (mine are 100mL).

    The “Bloody Brains” are vanilla bean panna cotta with raspberry sauce. I garnished the panna cotta brains with a royal icing meat cleaver and served them on a petrie dish just for an extra festive touch.

    Making these panna cotta brains is easy, but you do need to have a silicone mini brain mold to pull it off.  It took me about 4 or 5 tries to get the panna cotta to where it would hold the brain shape AND still be creamy.  But, I finally got the right formula, so I am passing it along so that you don’t have to go through the same trial and error as I did.  You’re welcome.

    Panna Cotta Brains

    Ingredients

    • 3/4 cup heavy cream
    • 2 tbsp sugar
    • 2 tbsp water
    • 1/2 tbsp unflavored gelatin
    • 1/4 tsp vanilla extract
    • 1/2 vanilla bean, split and seeds scraped
    • Red or pink food coloring
    • Required equipment: Silicone brain mold (I used this one)

    Directions

    Lightly grease each cavity of your brain mold and set aside.

    In a small saucepan, combine the heavy cream, sugar, and vanilla bean with seeds.  Cook on medium until the mixture starts to simmer, then remove form heat.  Allow vanilla bean to steep in the hot cream for about 10 minutes.

    Sprinkle gelatin over water and allow to soften for about 5 minutes.  Microwave for 15-20 seconds, or until all of the gelatin is dissolved (do not let the mixture boil, or you can ruin the gelatin).

    Remove the vanilla bean from the cream mixture.  Stir in the gelatin, vanilla extract, and enough food coloring to achieve the desired shade of pink.  Refrigerate for 4 hours or until set.  Remove panna cotta brains from mold and serve with raspberry sauce.

    Makes 4 Servings

  • Pressure Cooker Kahlua Dulce de Leche Cheesecake

    Pressure Cooker Kahlua Dulce de Leche Cheesecake

    Skip to Recipe
    When I learned how to make dulce de leche in my Instant Pot, the floodgates were wide open for a time.  Any time that I caught a sale on condensed milk, some of it wound up becoming dulce de leche.  This, of course, meant that I needed to find a use for all of it.  I have never been the kind that can just eat it with a spoon.  I experimented all sorts of ways with it.  I even made some with coffee.  The coffee and dulce de leche combo is actually pretty delicious.  So, I combined them in cheesecake form and came up with this Kahlua and dulce de leche cheesecake.

    Prepare your cheesecake crust by combining Oreo crumbs and melted butter.  Press that into a prepared cheesecake pan, then stick it in the freezer.  Add 1 1/2 cups of water to the liner of your pressure cooker and set to the Saute/Browning setting.

    Combine cream cheese, sugar, vanilla extract, and eggs in a blender or food processor.  Blend them until they are smooth, but do not overmix them.  Set aside 1/2 cup of the cheesecake mixture and fold in 1/2 cup of dulce de leche into it.  Add the Kahlua to the rest of the batch of cheesecake batter, then pour it into the cheesecake pan.  Plop the dulce de leche mixture in spoonfuls over the batter, then use a dull knife to gently swirl it through the batter.  Place the pan on a trivet (you can also add a foil sling) and lower it into the pressure cooker.  The water in the pressure cooker should be simmering by now, so turn off the pressure cooker.  Cover, seal, and set to cook on Manual (High Pressure) for 23 minutes.

    Once the time is up, allow the pressure to release naturally for 12 minutes before you release the remaining pressure.  Remove the cheesecake and let it cool completely, then cover and refrigerate it for at least 4 hours before serving.


    You can swap out the Kahlua with another liqueuer, if you like.  Or, with plain espresso if you don’t want the alcohol.  This cheesecake will still be delicious!

    Pressure Cooker Kahlua Dulce de Leche Cheesecake

    Ingredients

    • 1 cup crushed Oreo crumbs
    • 1 tbsp butter, melted
    • 16oz cream cheese, softened
    • 1/2 cup granulated sugar
    • 2 eggs, room temperature
    • 1/2 tsp vanilla extract
    • 1/4 cup Kahlua coffee liqueur
    • 1/2 cup dulce de leche (can be homemade or store-bought)

    Directions

    Grease a 7in round cheesecake pan. Mix the Oreo crumbs and melted butter until the crumbs are moistened all the way through. Press the mixture onto the bottom of your prepared cheesecake pan, then freeze until ready to use.

    In a blender or food processor, combine the cream cheese, sugar, eggs, and vanilla extract until smooth.  Do not overmix.

    Remove 1/2 cup of the cheesecake batter and mix it with the dulce de leche.  Add the Kahlua to the remaining mixture, then pour that into the prepared cheesecake pan.  Gently drop spoonfuls of the dulce de leche mixture over the mixture in the pan, then swirl gently with a knife or thin spatula.

    Add 1 1/2 cups of water to the liner of your electric pressure cooker, then set to the Saute/Browning setting. When the water comes to a simmer, set your cheesecake on a trivet and lower it into the pressure cooker. Cover, seal, and change the setting to cook on Manual (High Pressure) for 23 minutes. When the time is up, allow the pressure to release naturally for 12 minutes, then release any remaining pressure. Remove the cheesecake from the pressure cooker and allow to cool completely, then refrigerate for at least 4 hours

  • Seven Layer Ice Cream Cake

    Seven Layer Ice Cream Cake

    Skip to Recipe
    I think that ice cream cake might be one of my favorite kinds of cake EVER.  In fact, a Carvel ice cream cake remains the ONLY store bought cake that is acceptable for my birthday.  For a long time, trying to recreate the magic of my favorite ice cream cake was on my to-do list.  When I finally worked up the nerve to give it a shot, I decided that recreating it was not enough.  No, I didn’t want to just reproduce that combination.  I wanted to up the ante.  Let’s add some additional texture with some crushed candy in there.  Oh, and let’s add a brownie base for more flavors and some stability.  And, let’s drizzle it with caramel because caramel makes everything better.  By the time I was done, I had a seven layer ice cream cake on my hands.

    Yes, I said seven layers.  One layer of chewy brownie base.  Then, a layer of crushed candy bars.  Then, ice cream.  Then, cookie crunchies.  And then, MORE ice cream and MORE crushed candy bars.  And finally, whipped cream and caramel drizzle to finish it off.  An explosion of flavors and textures.

    The great thing about this seven layer ice cream cake recipe is that you can customize it to your tastes.  You can pick whatever flavors of ice cream you want, and whatever candy you like.  My version uses homemade caramel ice cream and crushed Heath bar pieces.  You can use store bought ice cream if you’re nervous about making your own ice cream.  Just make sure to soften it before you start assembling your cake.

    The first thing that you need to do is make your brownie base.  One fourth of the recipe for a 13 x 9 inch pan of brownies made in a 9in round pan makes the perfect thickness for the base.  Be sure to use a springform or removable bottom pan to make the brownie so that you have an easier time getting it all out in one piece.

    Freeze the brownie for at least an hour before you start to assemble.  It will help to keep the ice cream from melting too much while you’re trying to assemble the cake.  While the brownie is chilling, pulse the chocolate wafers in a food processor.  When they are broken up into large crumbs, add the chocolate shell topping and pulse until the crumbs moistened all the way through.

    Once the brownie is cool, the assembly process can begin.  I used a ring mold.  If you don’t have a ring mold, use a 9inch springform pan lined with parchment.  Place the brownie at the bottom of the mold.  Add half of the candy pieces, then 1 1/2 quarts of ice cream.  Spread the cookie crumb layer on top of that, then add the remaining ice cream.  Top with the rest of the crushed candy, then freeze for at least 4 hours (overnight is preferable) before you continue.

    When you’re ready, remove the ice cream cake from the mold and pipe dollops of whipped cream along the edges.

    Heat the butter, sugar, salt, and corn syrup in a small saucepan over medium heat.  Bring to a boil and continue to cook until the mixture turns an amber color.  Remove it from the heat and stir in the heavy cream.  Do this carefully, because it might splatter.  If the mixture looks thick enough at this point, add the vanilla extract.  Otherwise, put it back on the heat until it reaches the desired thickness, then remove it again and add the vanilla.  Keep in mind that the sauce will thicken more as it cools.  The sauce can be made in advance and stored in the fridge.  Just warm it up a tad in the microwave to get it back to pouring consistency.

    Right before you’re ready to serve the cake, drizzle it with the caramel sauce.

    To make your ice cream cake easier to cut, run your knife through hot water for a few seconds before eat cut.  It will make things a lot easier.

    This is a great make-ahead cake, so it’s perfect for events where you won’t have time for cake-making the day of.  I have made a seven layer ice cream cake a few days in advance and it is still fantastic.

    Seven Layer Ice Cream Cake

    Ingredients

    For the cake

    • 1/4 recipe for a 13 x 9 inch brownie (this recipe recommended)
    • 3 quarts of your ice cream of choice (can be homemade or store bought), softened
    • 2-3 cups of crushed candy pieces, divided
    • 1 9oz package of chocolate wafer cookies
    • 1 7-8oz bottle of chocolate shell ice cream topping
    • 1 1/2 cups sweetened whipped cream (or store bought whipped topping)

    For the caramel sauce

    • 1/4 cup (1/2 stick) butter
    • 1 tbsp light corn syrup
    • 1/2 cup white sugar
    • 1/2 tsp vanilla extract
    • 1/4 cup heavy cream
    • a pinch of salt

    Directions

    Preheat oven to 350 degrees.  Grease a 9in round springform or push-bottom pan.

    Prepare brownie batter according to the recipe directions.  Pour into prepared pan and bake for 12-15 minutes, or until a toothpick inserted in the center comes out with only frudgy crumbs.  Remove from oven and allow to cool completely on a wire rack.

    Place a 9in ring mold (or 9in springform pan lined with parchment) on a plate or cake board.  Remove the brownie from the pan and place at the bottom of the mold.  Freeze for at least one hour.

    In a food processor, pulse the chocolate wafer cookies into large crumbs.  Add the chocolate shell topping, then continue to pulse until the crumbs are moistened all the way through.

    Remove the mold with the brownie from the freezer.  Add half of the crushed candy over the brownie, spreading it evenly.  Add half of the ice cream over this, then the moistened cookie crumbs.  Add the other half of the ice cream, and then the remaining crushed candies.  Return to the freezer and freeze for at least 4 hours, or until firm.  Once firm, remove from mold and decorate with whipped cream.  Drizzle with caramel sauce right before serving.

    To make the caramel sauce:  Melt the butter, sugar, salt, and corn syrup over medium heat.  Bring to a boil, then cook until the mixture thickens and turns light brown.  Remove from heat and stir in the cream and vanilla extract.  Allow to cool to lukewarm before serving.

  • Mango Creme Brulee Donuts

    Mango Creme Brulee Donuts

    Skip to Recipe
    I know that I am usually done with the mango recipe posts by now, but these mango creme brulee donuts just couldn’t wait until next year!

    Mango-filled donuts had been on my list of things to try during Mango Madness since last year.  I simply ran out of time (and mangoes) when I finally felt like I was ready to give it a shot.  Fast forward to this year, and the mangoes were coming so quickly that I really had no excuse NOT to try making donuts.  I’m a lazy baker, so of course I made my donuts dough in the bread machine.  Still, the combination of a fluffy fried dough, creamy mango filling, and crunchy burnt sugar crust made the mango creme brulee donuts an instant hit among my friends.

    I was so proud of how these mango creme brulee donuts turned out that I entered them in the mango dessert competition at the South Beach Mango Festival.  Sadly, I didn’t win the contest, but I did get props and handshakes from some of the event organizers and guest chefs.  I’d still call that a win!  And, because I have such a warm reception wherever I bring these donuts, I think that this recipe is worth passing along.

    The first part is pretty straightforward.  I made the dough in the bread machine, rolled it out on a floured surface when it was ready, then cut out my donut circles using a biscuit cutter.  Let them rise in a warm place until they double in size.  That will take about 45 minutes.

    Preheat the oil in your deep fryer (or your preferred stovetop frying vessel) until it reaches 375 degrees.  Fry 3 or 4 donuts at a time for 35-40 seconds per side.  They should be puffy and golden.  Drain them on a wire rack (I also blot them with paper towels afterwards).  After that, allow them to cool completely.

    After they have cooled, use a pastry bag fitted with a pastry filling tip to fill your donuts with the mango pastry cream.  Then, spoon a layer of sugar over each donut and use a kitchen torch to heat the sugar until it liquefies and melts.  I usually do about 3 layers of sugar so that the donuts have a thick layer of sugar crunch.

    Homemade donuts are best eaten the same day that they are made.  I have been told, however, that these donuts are still tasty and fluffy after a day in the refrigerator.  They rarely last that long, though.

    Mango Creme Brulee Donuts

    Ingredients

    • 1 1/4 cups warm milk
    • 2 1/4 tsp (1 package) bread machine yeast
    • 2 eggs
    • 1/2 cup butter, melted and cooled slightly
    • 1/4 cup granulated sugar, plus more for torching
    • 1 tsp salt
    • 4 1/4 cups bread flour
    • 1 recipe batch of Mango Pastry Cream
    • Oil for frying

    Directions

    Add all of the ingredients except for the pastry cream and the frying oil to the pan of your bread machine according to the manufacturer’s directions.  Set the machine to the Dough cycle and allow to run.

    When the Dough cycle is complete, turn the dough out onto a lightly floured surface.  Roll the dough out to about 1/2 inch thickness.  Cut circles out of the dough using a 2 2/4 inch biscuit cutter.  Transfer circles to a baking sheet, leaving space for the dough to rise.  Cover and allow to rise in a warm place until they are doubled in size, about 45 minutes.

    Just before the donuts have completed their second rise, preheat your frying oil in a deep fryer (or the stove-top frying vessel of your choice) to 375 degrees F.  Fry the donuts, 3 or 4 at a time (depending on the size of your frying vessel).  Allow to cool on a wire rack, then blot on paper towels to remove excess oil.

    Using a pastry bag fitted with a filling tip, fill the donuts with mango pastry cream.  Set the filled donuts on a wire rack over a baking sheet.  Top the donuts with sugar, then use a kitchen torch to melt the sugar until the donut is coated in an amber glaze.  Repeat 2 or 3 more times until the sugar coating is the desired thickness.  Allow the donuts to rest for at least 10 minutes before serving.

  • Mango Pastry Cream

    Mango Pastry Cream

    Skip to Recipe
    I’ve been experimenting with recipes for mango pastry cream for a while.  My previous go-to recipe was good, but it really didn’t have a whole lot of mango flavor.  I’m pretty happy with the results of this current iteration of mango pastry cream.  My friends and family must agree, because I got so many requests for the recipe that I had no choice but to share!

    Place your egg yolks in a measuring cup or small mixing bowl and whisk them, then add sugar and whisk until the sugar dissolves.  Once that is done, add your flour and whisk until the flour is combined, there are no clumps, and the mixture is pale yellow.  Set them aside.

    Combine the mango puree and the half-and-half in a small saucepan over medium heat, stirring to combine.  Heat the mixture until it starts to simmer, then remove it from the heat.  Add the hot mango mixture gradually into the yolk mixture, a little bit at a time, whisking constantly.  When about 1/3 of the mango mixture has been added, add the yolk mixture to the remaining mango mixture in the pot.

    Return the mixture to the heat and cook until the mixture thickens (it took about 5-10 minutes for me), whisking frequently to keep clumps from forming.  When it is thick enough, remove it from the heat and stir in your butter and vanilla bean paste.  When the butter has melted and the mixture is smooth, strain it into a heat-proof bowl with a fine mesh strainer.

    Cover the pastry cream with plastic wrap and refrigerate for at least a couple of hours before you use it.

    This pastry cream has many uses.  One of the favorites is filling tartlet shells with it, which makes a simple and fancy dessert.  You can also use it to fill donuts, in puff pastry, or even just eaten as-is with whipped cream!

    Stayed tuned for a post on how to many tartlet shells coming soon!

    Mango Pastry Cream

    Ingredients

    • 1 cup mango puree (strained if using fibrous mangoes)
    • 1 cup half-and-half
    • 3/8 cup sugar
    • 1/4 cup flour
    • 6 egg yolks
    • 1/2 tsp vanilla bean paste (or vanilla extract)
    • 1/4 cup (1/2 stick) butter, cut into chunks

    Directions

    In a measuring cup or small mixing bowl, whisk the egg yolks, sugar, and flour until pale and creamy.  Set aside.

    In a small saucepan, heat the mango puree and half and half.  When the mixture starts to simmer, remove from heat.  Gradually add the hot mango mixture to the egg yolk mixture, whisking constantly.  When about 1/3 of the mixture has been incorporated, pour the yolk mixture into the remaining hot mango mixture and stir to combine.

    Return the mixture to the heat and cook, whisking constantly, until the mixture thickens starts to form bubbles.  Remove from heat and add the butter and vanilla paste (or extract), stirring until the butter has completely melted and incorporated.  Strain with a fine mesh strainer into a heat-proof bowl, then cover with plastic wrap (with the plastic touching the surface of the cream to avoid forming a skin), and refrigerate for at least 4 hours before using.