Category: Pressure Cooker (Instant Pot)

Recipes that can be made in a pressure cooker or Instant Pot

  • Pressure Cooker Berry Citrus Liqueur

    Pressure Cooker Berry Citrus Liqueur

    Skip to Recipe

    A friend of mine has a cousin with a mulberry tree, and was nice enough to share some of their surplus with me. When I got the berries, they were frozen. Once fruit has been frozen, your choices for what to do with it become more limited. That is basically what gave me the idea to make this berry citrus liqueur.

    Making “moonshine” has become all the rage in the pressure cooking community. But, what most don’t realize is that what they are calling “moonshine” is actually liqueur. Moonshine is a high-proof distilled spirit, whereas liqueur is a sweet alcoholic liquor that is infused with things like herbs, fruits, spices, flowers, nuts, and creams. The “moonshine” that is made in the pressure cooking community gets its name from the fact that it usually uses grain alcohol (151 proof) in the beverage. Because I wanted a citrus flavor, I used citrus rum, but I added a little bit of 151 proof rum to offset the reduced alcohol content of flavored rums.

    Combine water, sugar, berries, and citrus rum in the liner of your pressure cooker. Cover, seal, and cook on High Pressure for 30 minutes. Once the time is up, allow the pressure to release naturally.

    At this point, you can move directly to the next step, or let the mixture cool for another hour or so. I let mine cool for an hour, and then strained mixture into a large bowl using a fine mesh strainer. Gently press the berries in the strainer so that they release more liquid, then discard. Add lemon juice and 151 proof rum to the mixture.

    My large mason jar was in use, so I poured the mixture into 16oz mason jars. One batch filled 5 jars

    Seal your jars (or chosen storage vessel) and then store in the refrigerator. You should let it sit for at least 2 weeks for best flavor, but no one will judge you if you can’t wait that long.

    Pressure Cooker Citrus Berry Liqueur

    Ingredients

    • 4 cups water
    • 1 1/2 cups sugar
    • 1 lb fresh or frozen berries (I used mulberries)
    • 2 cups citrus rum (I used Bacardi Limon)
    • 1 cup fresh squeezed lemon juice
    • 1/2 cup 151 proof rum

    Directions

    Combine the water, sugar, berries, and citrus rum in the liner of your electric pressure cooker. Cover, seal, and cook on High Pressure for 30 minutes. When the time is up, allow the pressure to release naturally. If desired, allow the mixture to cool for an additional hour after pressure has released.

    Strain the mixture through a fine mesh strainer to remove the berries. Gently press them down to release the additional juices. Stir in the lemon juice and 151 proof rum. Pour into your desired storage vessel.

    Refrigerate the berry citrus liqueur for 2-4 weeks before serving.

  • Pressure Cooker Tonkotsu Ramen Broth

    Pressure Cooker Tonkotsu Ramen Broth

    Skip to Recipe

    My favorite ramen place is a 45 minute drive from my house. On top of that, their bowls of tonkotsu ramen about about $30.00 nowadays. When I found out that someone had figured out how to make it in their pressure cooker, I was skeptical at first. But, I decided to give it a try, and it worked out great!

    Tonkotsu ramen broth in an electric pressure cooker is not significantly less labor-intensive. You still need to boil and clean your bones before you start the broth. This helps to remove the marrow and impurities that will alter the color of your finished broth. It does cut down on the total cook time significantly, though. Plus, no babysitting a boiling pot for an entire day.

    Traditional tonkotsu ramen broth is cooked for up to 18 hours, which is what gives the broth its signature “creaminess.” The fat and collagen in the bones breaks down and emulsifies in the broth. The pressure cooker doesn’t produce the rolling boil required to emulsify the broth. So, for using a pressure cooker, you need to add your own emulsifier after the broth is finished. I have also read that you can move the broth to the stove after pressure cooking and boil for about an hour to emulsify, but I have never tried this.

    If you REALLY want to go all-out with your tonkotsu ramen, you can also make chashu pork (braised pork belly) to top it with. You can add some of the leftover braising liquid to your ramen broth for flavoring.

    Once your broth is cooked, you can season it and pour over your cooked ramen noodles and serve with your choice of toppings. In addition to the base broth recipe, there are also recommendations for seasoning your broth and for toppings to serve the ramen with. Just play around with the ingredients and quantities until it tastes to your liking.

    You can refrigerate tonkotsu broth for up to a week, or freeze for a few months. The broth will separate when chilled, so be sure to bring it back to a boil when you reheat it to emulsify it again.

    Pressure Cooker Tonkotsu Ramen Broth

    Adapted from Pressure Eats Recipe

    **NOTE: I used an 8qt Instant Pot to make this quantity of broth, and it was a very tight squeeze. If you will be using a smaller pressure cooker, I recommend cutting the recipe in half.

    Ingredients

    For the broth

    • 3lbs pork hocks, cut into discs
    • 2bs chicken backs
    • 2 whole leeks, washed and roughly chopped
    • 1 3in piece of ginger, peeled and sliced
    • 12 cloves of garlic
    • 1 large onion
    • 6 dried shitake mushrooms (you can also use fresh)
    • 1 tsp salt
    • 1 slab pork fatback
    • 1/2 egg yolk or 2 tsp soy lecithin (I used a whole egg yolk with no issues)
    • Additional recommended equipment: an immersion blender

    For seasoning the broth (per 3 cups of broth)

    • 1 tbsp tahini
    • 2 cloves grated garlic
    • Salt and pepper to taste
    • 1 tbsp mirin
    • 1 tbsp chashu braising liquid
    • 1 tbsp toasted sesame seeds
    • a dash of fish sauce

    To serve

    • Cooked ramen noodles
    • Chopped scallions
    • Sliced chashu pork (I used this recipe)
    • Sliced mushrooms
    • Seaweed
    • Hard boiled or soya egg

    Directions

    Add the pork hocks and chicken backs to a large pot. Fill pot with water until the bones are fully submerged. Cover and refrigerate for at least 1 hour, but preferably overnight.

    Drain the water from the pot and add fresh water. Place the pot, uncovered, on a stove and bring to a boil. Boil for 3 minutes, then remove from heat and drain. Allow bones to cool for about 15 minutes, then rinse and clean with cold water.

    Optional step: Char the onions and garlic by placing them on a sheet pan and broiling them until some black spots appear (this took about 5 or 10 minutes for me)

    Add the cleaned bones to the liner of your pressure cooker. Add the leeks, onions, ginger, garlic, mushrooms, and salt. Add enough water to reach about 3/4 of the way up the pot. Cover, seal, and cook on High Pressure for 3 hours.

    When the time is up, release the pressure manually. Uncover, add the slab of fatback, then cover and seal again. Cook on High Pressure for 1 hour. At this point, you can release the pressure manually or naturally. I have done it both ways and both have been fine.

    Drain the broth to remove the solids. Add the soy lecithin or egg yolk (temper the yolk first with broth if using), using the immersion blender to blend completely. Broth should become translucent.

    Season broth to taste with seasonings of choice, then pour over cooked ramen noodles. Serve with your choice of toppings.

  • Pressure Cooker Chocolate Stout Molten Pudding

    Pressure Cooker Chocolate Stout Molten Pudding

    Skip to Recipe

    I had experimented with making molten puddings (AKA lava cakes) in the Instant Pot for a while.  This chocolate stout molten pudding is the result of such experiments.

    I was not on board with making lava cakes in my electric pressure cooker (Instant Pot) when I first heard that this was a thing.  Truth be told, I tried it.  In fact, I invited a few friends over to my house and we made a batch of lava cakes in the oven and nother batch in the Instant Pot to see which ones we liked better.  The decision was split fairly evenly, but I was firmly on Team Oven.  What finally changed my mind was a trip to the Epcot Food and Wine Festival last year, where the Ireland station was serving up “chocolate pudding” that was basically a lava cake.  But, that was when it hit me that what was REALLY bothering me was that I associate a certain texture to “cake.”

    When I stopped thinking about Instant Pot lava cakes as “cakes” and instead thought of them as “molten puddings,” I quickly warmed up to them.  It’s important to make the distinction, because molten puddings/lava cakes made in the Instant Pot do have a very different texture than their oven counterparts.  The exterior is more smooth and custard-like.  The oven gives you a drier, brownie-like crust.  You can also bake these in the oven if that is the texture that you prefer.

    Start by melting your chocolate and your butter, then set it aside.  Whisk the eggs with the sugar until foamy, then whisk in the flour until there are no clumps.  Slowly which the chocolate mixture into the egg mixture.  I did it in 4 rounds so that the heat from the chocolate mixture didn’t curdle the eggs.

    Once the chocolate mixture is thoroughly combined, gradually add the stout.  Doing it little by little ensures that it won’t make your batter separate.  After that is done, pour it into greased ramekins, then cook uncovered on High Pressure for 7 minutes.  When the timer is up, use Quick Release to release the pressure and remove the ramekins.

    Invert each pudding on a plate to serve.  You could eat it as is if you want.

    Since I was sticking to the St. Patrick’s Day theme, I served them with an Irish Cream Creme Anglaise.  The rich sweetness of the cream sauce paired perfectly with the bitterness of the chocolate and the stout.  Of course, this would also go great with ice cream.

    Because these stout molten puddings use both bittersweet chocolate and beer, the pudding itself does have some bitter notes.  You can use semi-sweet chocolate for a less bitter taste, or add more sugar to suit your taste.

    Pressure Cooker Chocolate Stout Molten Pudding

    Ingredients

    For the puddings:

    • 8 oz bittersweet chocolate, chopped (or semi-sweet chocolate)
    • 1/2 cup (1 stick) butter
    • 4 whole eggs
    • 1/2 cup Stout beer (I used Guinness)
    • 1/4 cup sugar
    • 5/8 cups flour

    For the Irish Cream Creme Anglaise:

    • 1 cup milk
    • 2 egg yolks
    • 1 tbsp cornstarch
    • 1/4 cup sugar, divided
    • 1/2 cup Irish Cream liqueur (I use Kerrygold)

    Directions

    Make the Creme Anglaise:

    In a small saucepan, heat the milk and half of the sugar over medium heat  Whisk the egg yolks, cornstarch, and remaining sugar and set aside.

    When the milk starts to simmer, remove from heat.  Slowly whisk the hot milk mixture into the egg mixture, a little bit at a time.  Return the mixture to the saucepan and cook over medium heat until the mixture thickens (about 2-3 minutes).

    Remove from heat and strain mixture through a fine mesh strainer, then stir in the Irish Cream.  Allow to cool completely, then refrigerate until ready to use.

    Can be made a day in advance.

    Make the molten puddings:

    Grease 6 4oz ramekins and set side.  Pour 1 cup of water into the liner of your pressure cooker.

    Melt the chocolate and the butter in a microwave-safe bowl in 20-30 second bursts until all of the chocolate is melted and the mixture is smooth.  Set aside.

    Whisk the eggs and the sugar together until combined, then add the flour and whisk until few clumps remain.  Gradually whisk in the chocolate mixture, then the stout.

    Divide the batter evenly among the 6 ramekins.  Arrange them in 2 layers on a trivet in the liner of your pressure cooker, then cook on Manual (High Pressure) for 7 minutes.  When the timer is up, manually release the remaining pressure.

    Remove ramekins from the pressure cooker and serve by inverting the puddings onto a plate.  Serve with Creme Anglaise.

    Makes 6 servings.

  • Pressure Cooker Bacon and Cheese Bites

    Pressure Cooker Bacon and Cheese Bites

    Skip to Recipe
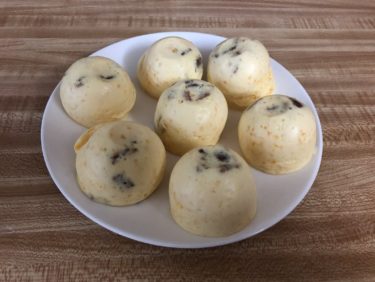
    I know, I know…there are a million and one recipes out there for egg bites.  This was why I hesitated to post a recipe for a while.  But, last week a coworker forgot her breakfast at home, so I offered her some of my egg bites.  She recently started a diet, and I had actually made some adjustments to the popular egg bite recipes to make them a little bit healthier.  She liked them so much that she asked for the recipe, so here it is!

    I use the silicone egg bite molds that are popular for egg bites nowadays.  I have tried in mason jars and cupcake molds to make the egg bites, but they do not come out the same. The texture is different.

    Crumble 1/2 strip of cooked bacon in each cavity.  Combine the rest of the ingredients in a blender, then blend until smooth.  Pour into the egg mold cavities.  Cover, then place on a trivet in your pressure cooker and cook on the Steam setting for 8 minutes.  After the time is up, allow the pressure to release naturally for 5 minutes before releasing the remaining pressure.

    Your egg bites might explode a little bit sometimes, but that’s okay.

    The egg bites can keep in the fridge for up to one week.  I hear that you can freeze them also, but I have not had any luck with that (they get all weird and watery for me).  I may try it again eventually, and will update this post accordingly if it works.

    Pressure Cooker Bacon and Cheese Egg Bites

    Ingredients

    • 4 eggs
    • 1/2 cup cottage cheese
    • 2 oz shredded cheese (I use cheddar)
    • 1/4 tsp salt
    • 3 1/2 strips thick-cut bacon, cooked
    • A dash of hot sauce (optional)
    • Equipment used: Silicone egg bite mold (such as this one)

    Directions

    Crumble 1/2 strip of bacon into the each cavity of the egg bite mold.  Set aside.  Add 1 cup of water to the liner of your electric pressure cooker.

    Combine the eggs, cottage cheese, shredded cheese, salt, and hot sauce (if using) in a blender.  Blend until smooth.

    Divide the mixture evenly between the 7 cavities.  Cover with foil, then place on a trivet in the liner of the pressure cooker.  Cover, seal, and cook on the Steam setting for 8 minutes.  When the timer is up, allow the pressure to release naturally for 5 minutes before removing the remaining pressure.

    Makes 7 egg bites

  • Pressure Cooker Rice with Noodles (Arroz con Fideos)

    Pressure Cooker Rice with Noodles (Arroz con Fideos)

    Skip to Recipe
    Arroz con Fideos (rice with noodles) was something that my mother used to make all of the time when I was growing up.  It was a staple at our Thanksgiving table every year.  Eventually, she also started making it outside of holidays because we liked it so much.

    Making rice was never my strong suit.  In fact, before my Instant Pot, I avoided making rice as much as possible.  I just could never get it to turn out the way my mother’s did.  But, since I finally upped my rice game, I decided to try the noodle version in there.  My stovetop rice pot quickly became obsolete.

    The only real difference with making arroz con fideos vs regular white rice is that you brown some dried noodles in your pot before adding the rest of your ingredients and proceeding with your rice-making as usual.  My mother always added a green onion to her rice.  She said that it gave it a nice flavor.  If she didn’t have any green onion, then she would add a slice of white onion.  You don’t have to use it if you don’t want, and it gets thrown out at the end anyway.

    This rice goes great with entrees that are served in a creamy sauce or gravy.  We used to eat it the day after Thanksgiving with leftover turkey gravy.  Maybe it can become a family tradition for you, too!

    Pressure Cooker Rice with Noodles (Arroz con Fideos)

    Ingredients

    • 3 cups white rice
    • 2 cups dried thin egg noodles
    • 1 green onion (optional)
    • 1 tbsp oil
    • 4 cups water
    • salt to taste

    Directions

    Heat the oil in the electric pressure cooker on the Saute/Browning setting.  When hot, add the dried noodles and cook until they turn brown.  Add the remaining ingredients and stir to combine.

    Cover, seal, and cook on the Rice setting using the pre-programmed time.  When the timer is up, allow the pressure to release naturally.  Discard the green onion and then fluff with a fork before serving.

  • Pressure Cooker Turkey Meatball and Spinach Soup

    Pressure Cooker Turkey Meatball and Spinach Soup

    Skip to Recipe
    After I learned how to make turkey stock using my Instant Pot, I was thrilled.  At the time, though, I had no idea what to do with my newfound stash of turkey stock.  I came across a turkey soup recipe that caught my eye.  I had been low-carbing it for a while, and it seemed easy enough to adjust to cut out some of those pesky carbs.  That’s how this turkey meatball and spinach soup came to be.

    Truth be told, I never did learn how to make anything else with my homemade turkey stock.  Anytime I get my hands on some, I wind up making more turkey meatball and spinach soup.  And, it’s super easy to make!  The hardest part is forming the meatballs.

    Mix your meatball ingredients together, either by hand or using a wooden spoon.  Once everything is combined, form your meatballs.  I used a cooker scooper to scoop the meat mixture and get them to be close to the same size.

    Brown the meatballs on both sides using butter or ghee in the liner of your electric pressure cooker.  You will have to do this in batches.  Once they are all brown, set them aside.  Sometimes, I saute a little bit of onions and garlic after this part, but this is entirely optional.  The soup still tastes good without them.

    Add about 1 cup of the turkey stock and stir it around to loosen the browned bits at the bottom of the liner.  Add the rest of the turkey stock, along with the meatballs.  Cook on Manual (High Pressure) for 10 minutes, then manually release the pressure.  Stir in the mushrooms and let them sit for about 5 minutes or until they’re cooked.  Your soup should still be plenty hot enough to cook them.  After they’re cooked, stir in the spinach until it’s wilted.

    Your turkey meatball and spinach soup is now ready to serve.

    This turkey meatball and spinach soup is great for so many reasons.  It is low in carbs, so it’s great for people watching their carb intake (or who just want something lighter after a Thanksgiving binge).  It freezes wonderfully, so you can make a big batch and save some for a rainy day.  And, it tastes almost too good to be good for you.  I call that a win!

    Pressure Cooker Turkey Meatball and Spinach Soup

    Adapted from recipe at Savory Lotus

    Ingredients

    For the meatballs

    • 2lbs ground turkey
    • 1/2 cup Parmesan cheese, grated
    • 2 eggs
    • 4 gloves garlic, crushed
    • 2 tsp Italian seasoning
    • 1 1/2 tsp salt
    • 1/2 tsp black pepper

    For the soup

    • 3 quarts turkey stock (you can also use chicken or vegetable stock)
    • 10 oz spinach leaves
    • 16oz sliced baby bella mushrooms
    • 2 tbsp butter or ghee
    • salt and pepper to taste
    • 1/2 cup diced onion (optional)
    • 2 cloves garlic, crushed (optional)

    Directions

    In a medium bowl, combine all of the meatball ingredients.  Form the mixture into balls, approximately 1in each.

    Preheat your pressure cooker on the Saute/Browning setting.  When hot, add 1tbsp of butter or ghee and brown the meatballs on both sides, working in batches and adding more butter/ghee as needed.  When the meatballs are browned, set them aside.

    Quickly saute the onions and garlic (if using) until fragrant, then add 1 cup of turkey stock.  Stir to loosen the browned bits stuck to the bottom of the liner.  Add the remaining turkey stuck.

    Return the meatballs to the pot. Cover, seal, and cook on Manual (High Pressure) for 10 minutes.  When the timer is up, manually release the pressure.

    Stir in the sliced mushrooms and let sit for about 5 minutes.  The soup should be hot enough to cook the mushrooms through.  Stir in the spinach until wilted.

    Makes 6-8 servings

  • Pressure Cooker Turkey Stock

    Pressure Cooker Turkey Stock

    Once upon a time, before the magic of pressure cookers, my turkey carcasses went in the trash after the turkey was carved.  Seeing the craze with making “bone broth” and stocks at home, though, I decided to give it a go.  After my first batch of turkey stock, I vowed never to let a turkey carcass go to waste again.  The canned and boxed stuff just doesn’t compare.

    If you plan on using it within a few days, you can store your turkey stock in the refrigerator.  Otherwise, you can freeze it in any freezer-safe container.  I have kept containers of turkey stock in my deep freezer for around 3 months and it’s still good.

    Pressure Cooker Turkey Stock

    Ingredients

    • 1 cooked turkey carcass (from a 12lb turkey or larger)
    • 1 large onion, quartered
    • 3 carrots, peeled and cut into large chunks
    • 3 celery stalks, cut into large chunks
    • 4 cloves of garlic
    • 1 in piece of ginger, sliced into rounds
    • 3 bay leaves
    • salt and pepper to taste
    • 8 cups of water

    Directions

    Combine all of the ingredients in the liner of your electric pressure cooker (you may have to cut up the carcass to make it fit).  Cover, seal, and cook on Manual (High Pressure) for 30 minutes.  When the timer is done, allow the pressure to release naturally.  Strain the turkey stock to remove the solids before using.

    Store unused turkey stock in the refrigerator, or freeze for up to 3 months.


  • Pressure Cooker White Chocolate Raspberry Cheesecake

    Pressure Cooker White Chocolate Raspberry Cheesecake

    Skip to Recipe
    After last week’s Halloween shenanigans, I had some leftover raspberry sauce.  Now, I hate letting stuff go to waste, even if it’s just a tiny bit of raspberry sauce.  I considered pouring it over ice cream, but I had all of that white chocolate left over from my failed attempts at white chocolate panna cotta that was firm enough to hold a shape.  It seemed like making white chocolate raspberry cheesecake was the inevitable conclusion.

    This was actually my first time making white chocolate raspberry cheesecake in my Instant Pot, but I have made enough cheesecakes in the past that I was pretty sure that I could figure out the recipe adaptation.  As it turns out, I was right!  And, since I got so many requests for the recipe, here it is!

    Start by preparing your cheesecake pan.  Combine the Oreo crumbs with the melted butter and press onto the bottom of your greased cheesecake pan.  Pop it in the freezer while you make the cheesecake batter.  Melt the white chocolate with the half and half (I used the microwave, but you can also use a double boiler if you’re more comfortable with that method), then set it aside.  Combine the cream cheese, eggs, sugar, and vanilla extract in a blender.  Blend until smooth, then add the white chocolate mixture and blend until just combined.
    Don’t overmix your cheesecake batter.  You’ll introduce too many air bubbles, which can lead to cracked cheesecakes.

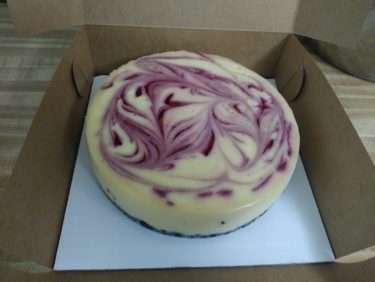
    When your cheesecake batter is done, pour half of it into your prepared cheesecake pan.  Drizzle some raspberry sauce over it, then pour in the rest of the cheesecake batter and drizzle more raspberry sauce.  Use a thin spatula or dull knife to gently marble the sauce into the cheesecake.  Place the cheesecake on a trivet and place over simmering water in your pressure cooker.  Cook on Manual (High Pressure) for 26 minutes, then Natural Release.  Take your cheesecake out and blot any moisture that collected on the surface of the cheesecake.  Let it cool on the trivet completely, then cover it with foil and refrigerate for at least 4 hours before serving.

    I strongly recommend letting your cheesecake sit at least overnight.  Like custards, cheesecakes benefit from giving them some time to “mature” to get the best flavor.  I normally make mine a day or two in advance.

    There you have it!  You should now have a cheesecake that is delicious and beautiful enough to impress at any dinner party or potluck.  Or, just make it for yourself.  I won’t judge.

    The recipe for the raspberry sauce makes more sauce than you will actually need for one cheesecake.  It’s great on ice cream and panna cotta.  I bet it would also be good on a slice of pound cake.  Or, if your cheesecake disappears too quickly and you need to make another one.

    Pressure Cooker White Chocolate Raspberry Cheesecake

    Ingredients

    For the Cheesecake

    • 1 cup Oreo crumbs
    • 1 tbsp butter, melted
    • 16oz cream cheese, softened
    • 2 large eggs, room temperature
    • 1/4 cup sugar
    • 8 oz white chocolate, chopped (See note at the end of this post)
    • 1/4 cup half and half
    • 1/2 tsp vanilla extract
    • 3-4 tbsp raspberry sauce
    • Required equipment: a 7-inch cheesecake pan (the one I am using is this one)

    For the raspberry sauce

    • 5oz frozen raspberries
    • 1/4 cup water
    • 1 tbsp granulated sugar
    • 1 tsp cornstarch

    Directions

    Make the raspberry sauce

    In a small saucepan, combine your raspberries, water, corn starch, and sugar.  Bring to a boil.

    Continue to boil for about 5 minutes or until thickened, stirring constantly.  Remove from heat and strain sauce through a mesh strainer to remove the seeds.

    Make the cheesecake

    Grease a 7in round cheesecake pan. Mix the Oreo crumbs and melted butter until the crumbs are moistened all the way through. Press the mixture onto the bottom of your prepared cheesecake pan, then freeze until ready to use.

    Place the white chocolate and half-and-half in a small, heat-proof bowl.  Melt the chocolate in the microwave by microwaving in 15 second bursts, stirring after each burst, until the chocolate is melted and smooth.  Set aside to cool slightly. (NOTE: You can also melt the chocolate over a double boiler, if you prefer)

    Place the cream cheese, eggs, sugar, and vanilla extract in a blender or food processor.  Blend until smooth, but do not overmix.  Add the white chocolate mixture and continue to blend until just combined.

    Pour half of the cheesecake batter into your prepared cheesecake pan.  Drizzle with 1 1/2 to 2tbsp of raspberry sauce, then pour the remaining cheesecake batter over it and drizzle the remaining raspberry sauce.  Using a small spatula or dull knife, gently swirl the raspberry sauce through the cheesecake batter.

    Pour 1 cup of water in the liner of your electric pressure cooker and set it to the Saute/Browning setting.  When the water starts to simmer, place the cheesecake on a trivet and lower it into the pressure cooker.  Turn it off, cover and seal, then cook the cheesecake on Manual (High Pressure) for 26 minutes.  When the time is up, allow the pressure to release naturally for an additional 15 minutes.  Remove cheesecake and blot the surface with paper towel to remove moisture buildup.  Allow to cool completely, then cover and refrigerate for at least 4 hours before removing from pan and serving.

    Makes about 8 servings

    NOTE: Make sure that you use actual white chocolate for this recipe.  Most of the commercial brand chips are no longer made out of actual white chocolate, and will affect the taste of your cheesecake.  The package should say “White chocolate” on it, or it is not real chocolate.

  • Ethiopian-Spiced Lentil and Chicken Soup

    Ethiopian-Spiced Lentil and Chicken Soup

    Skip to Recipe
    I have had heard from many friends and acquaintances about the magic that is Ethiopian food.  It has always been on my list of cuisines to try, but it actually had never really happened yet.  When I got my Instant Pot about 2 years ago, one of the first things that I made in it was this Ethiopian-Style Spinach and Lentil Stew that I came across online.  It quickly became a favorite of mine.  Still, I didn’t really awaken to the wonders of Ethiopian food until a recent visit to the Epcot Food and Wine Festival.  There, I had an Ethiopian-style beef dish and a lentil stew that blew me away.

    I knew that I wanted to recreate those flavors at home.  After some digging around, I found what seemed like the two main components that I would need.  The first thing is niter kibbeh.  Niter kibbeh is basically clarified butter that has been infused with herbs and spices.  The flavor of this aromatic butter lays the foundation for the flavors to build on in most Ethiopian cuisine.  The second component is berbere.  Berbere is a spicy all-purpose seasoning blend that is used in several Ethiopian dishes.  Think of berbere as the Goya Adobo or the Lawry’s Season-All of Ethiopian cooking.  Most commercial Berbere blends are incredibly spicy, but the heat can be adjusted if you make your own.

    I took a stab at adjusting the lentil soup recipe to include the newfound niter kibbeh and berbere, and am very happy with the results.  I also added chicken, because extra protein never hurt anyone.

    You can easily leave out the chicken and make this a vegetarian dish if you prefer.

    If you are using store-bought berbere seasoning, I suggest starting with a smaller quantity and adjusting the seasoning to your liking.  My berbere is fairly mild and I used 2 tbsp, but that might be too much for hotter ones.

    I strongly suggest that you use niter kibbeh for this dish, but if you don’t want to go through the trouble then you can use ghee or olive oil in place of it.  It will still taste good!

    Pressure Cooker Ethiopian-Spiced Lentil and Chicken Soup

    (Adapted from this recipe)

    Ingredients

    • 2 tbsp niter kibbeh (you can make your own using this recipe)
    • 1 medium yellow onion, diced
    • 1/2 tbsp minced ginger
    • 3 cloves garlic, minced
    • 1-2 tbsp berbere seasoning
    • 2 cups dry brown lentils
    • 2 lbs skinless chicken thighs (leave them out if you want to make this vegetarian)
    • 8 cups chicken stock (or vegetable stock if you prefer)
    • 6 oz baby spinach
    • Salt and pepper to taste
    • Lemon wedges for serving

    Directions

    Set the pressure cooker to the Saute/Browning setting

    When the cooker reads Hot, add the niter kibbeh and the onions.  Cook until the onions start to soften, about 3-5 minutes.  Add the ginger and garlic and continue to cook until fragrant (about 1-2 mins).  Add the berbere seasoning and stir to coat. Add the chicken or vegetable stock.  Taste and adjust seasonings as needed.

    Add the lentils and chicken.  Turn off the pressure cooker.  Cover, seal, and cook on Manual (High Pressure) for 20 minutes.  Allow the pressure to release naturally for another 10-15 minutes until releasing the remaining pressure.

    Uncover, then taste and adjust seasonings again if you need to.  Stir in the spinach until wilted, then serve with lemon wedges.

  • Pressure Cooker Kahlua Dulce de Leche Cheesecake

    Pressure Cooker Kahlua Dulce de Leche Cheesecake

    Skip to Recipe
    When I learned how to make dulce de leche in my Instant Pot, the floodgates were wide open for a time.  Any time that I caught a sale on condensed milk, some of it wound up becoming dulce de leche.  This, of course, meant that I needed to find a use for all of it.  I have never been the kind that can just eat it with a spoon.  I experimented all sorts of ways with it.  I even made some with coffee.  The coffee and dulce de leche combo is actually pretty delicious.  So, I combined them in cheesecake form and came up with this Kahlua and dulce de leche cheesecake.

    Prepare your cheesecake crust by combining Oreo crumbs and melted butter.  Press that into a prepared cheesecake pan, then stick it in the freezer.  Add 1 1/2 cups of water to the liner of your pressure cooker and set to the Saute/Browning setting.

    Combine cream cheese, sugar, vanilla extract, and eggs in a blender or food processor.  Blend them until they are smooth, but do not overmix them.  Set aside 1/2 cup of the cheesecake mixture and fold in 1/2 cup of dulce de leche into it.  Add the Kahlua to the rest of the batch of cheesecake batter, then pour it into the cheesecake pan.  Plop the dulce de leche mixture in spoonfuls over the batter, then use a dull knife to gently swirl it through the batter.  Place the pan on a trivet (you can also add a foil sling) and lower it into the pressure cooker.  The water in the pressure cooker should be simmering by now, so turn off the pressure cooker.  Cover, seal, and set to cook on Manual (High Pressure) for 23 minutes.

    Once the time is up, allow the pressure to release naturally for 12 minutes before you release the remaining pressure.  Remove the cheesecake and let it cool completely, then cover and refrigerate it for at least 4 hours before serving.


    You can swap out the Kahlua with another liqueuer, if you like.  Or, with plain espresso if you don’t want the alcohol.  This cheesecake will still be delicious!

    Pressure Cooker Kahlua Dulce de Leche Cheesecake

    Ingredients

    • 1 cup crushed Oreo crumbs
    • 1 tbsp butter, melted
    • 16oz cream cheese, softened
    • 1/2 cup granulated sugar
    • 2 eggs, room temperature
    • 1/2 tsp vanilla extract
    • 1/4 cup Kahlua coffee liqueur
    • 1/2 cup dulce de leche (can be homemade or store-bought)

    Directions

    Grease a 7in round cheesecake pan. Mix the Oreo crumbs and melted butter until the crumbs are moistened all the way through. Press the mixture onto the bottom of your prepared cheesecake pan, then freeze until ready to use.

    In a blender or food processor, combine the cream cheese, sugar, eggs, and vanilla extract until smooth.  Do not overmix.

    Remove 1/2 cup of the cheesecake batter and mix it with the dulce de leche.  Add the Kahlua to the remaining mixture, then pour that into the prepared cheesecake pan.  Gently drop spoonfuls of the dulce de leche mixture over the mixture in the pan, then swirl gently with a knife or thin spatula.

    Add 1 1/2 cups of water to the liner of your electric pressure cooker, then set to the Saute/Browning setting. When the water comes to a simmer, set your cheesecake on a trivet and lower it into the pressure cooker. Cover, seal, and change the setting to cook on Manual (High Pressure) for 23 minutes. When the time is up, allow the pressure to release naturally for 12 minutes, then release any remaining pressure. Remove the cheesecake from the pressure cooker and allow to cool completely, then refrigerate for at least 4 hours